

TimeXtender can extract data from Oracle databases.
Installing the Oracle Data Access Components.
Due to the discontinuation of direct Oracle support in the Microsoft .NET Framework, the Oracle Data Access Components are necessary for the program to be able to connect to an Oracle database.
These components should be installed on the system that is running the services according to the following steps.
- Create the C:\tns folder and copy the SQLNET.ORA and TNSNAMES.ORA files into this folder.
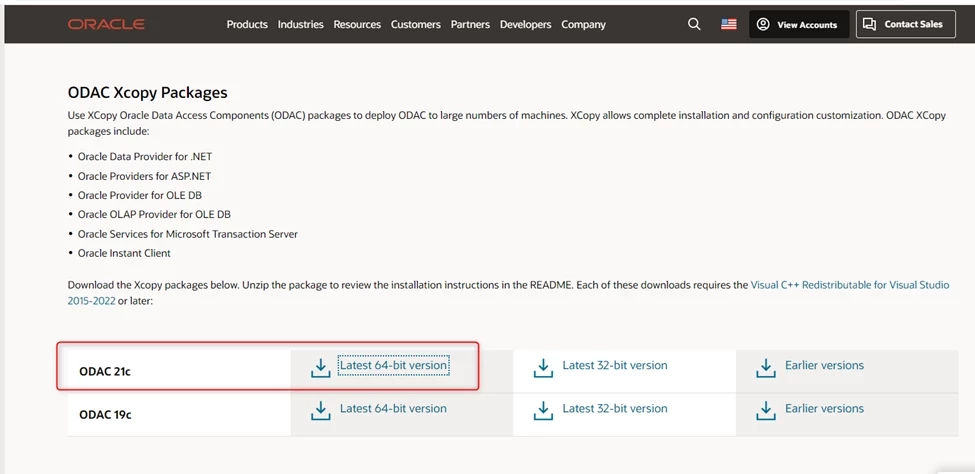
- Download the Oracle Data Access Components from the following webpage. https://www.oracle.com/database/technologies/net-downloads.html (Scroll down the webpage to find the ODAC 21c installer.
- Run the Command Prompt as an administrator (Right click -> Run as Administrator). This is very important!
- Navigate to the folder that has the unzipped installation files, and then run the installation by entering the following at the command prompt: "install.bat odp.net4 c:\oracle myhome true true c:\tns"
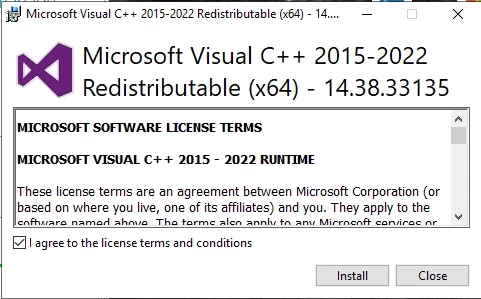
- Download and install the Microsoft Visual C++ 2015-2022 Redistributable available at the following link: https://aka.ms/vs/17/release/vc_redist.x64.exe
After the ODAC components are installed, the TimeXtender Oracle Data Source provider supports the following two connections methods.
- TNSNAMES
- EZCONNECT
The EZCONNECT method foregoes the need for a TNSNAMES.ORA file by entering the server, port, and database information in the TimeXtender portal under the data source. However, using the TNSNAMES.ORA file to connect to the Oracle database may be the more common approach. These two methods are outlined as follows.
TNSNAMES connection method
It is common for Oracle database administrators to provide the following two files to end users who need to connect to an Oracle database.
- TNSNAMES.ORA
- SQLNET.ORA
These two files need to be saved in a folder on the user’s system and environment variables need to be created in the machine context pointing to this folder as well as to the Oracle ODAC components installation directory. These configurations can be done manually or the TimeXtender Oracle Data Source ODAC Configuration Utility can be downloaded to expedite the creation of the environment variables as well as the .ORA files if desired.
- Create an Environment Variable in the machine context with the name of “TNS_ADMIN” and the value of “C:\tns”.
- Add the following two entries to the “Path” Environment Variable in the machine context:
- “C:\Oracle”
- “C:\Oracle\bin”
- Reboot the system.
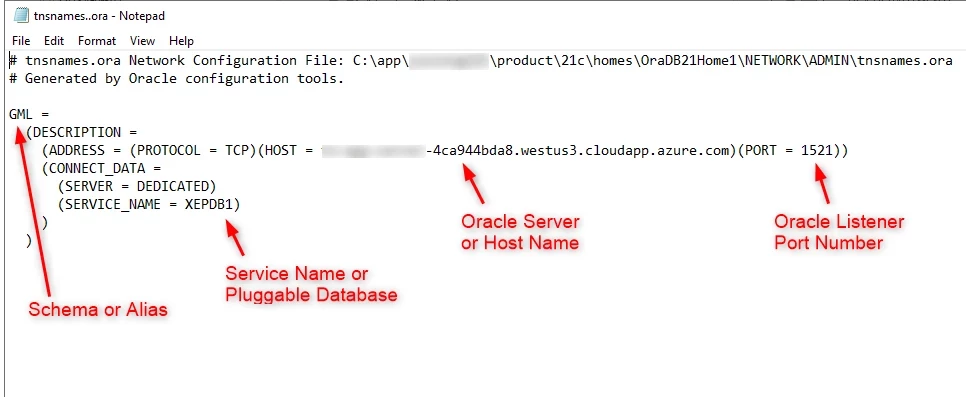
The following outlines how the Oracle Data Source in the TimeXtender Portal relates to the information in the TNSNAMES.ORA file.
Adding a Oracle Data Source that uses the TNSNAMES.ORA file.
Create a Oracle data source in your Business Unit.
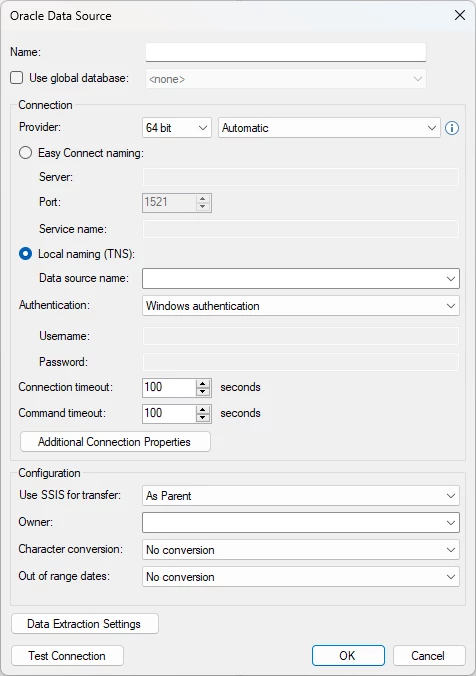
Use the following for the specific provider settings.
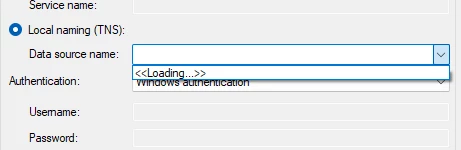
- Data Source name: Set this to the Schema name, which corresponds to “GML” in the TNSNAMES.ORA file above. If you click the downward arrow icon it will search for available TNS setups.
- Set Authentication to the type you want to use
- Username: Set this to the username, which corresponds to “GML” in the TNSNAMES.ORA file above.
- Password: Set this to the password for the username above.
- Owner: You set the owner of the database. You can choose those available after applying the user rights.
- Character conversion: You have three options

No conversion, Unicode and Non-Unicode.
- Out of range date: Set this to “MS SQL min/max date”, which will convert dates that exceed the minimum or maximum value supported by SQL Server to the SQL Server minimum/maximum.
After creating the Oracle Data Source and the Oracle Data Access Components have been installed and configured the program can synchronize and show the tables of the source.
In the example above, the Ingest Instance will use the Data Source setting of “GML” to read the TNSNAMES.ORA file to get the following information:
- Service name: #########-4ca944bda8.westus3.cloudapp.azure.com
- Port number: 1521
- Pluggable database: XEPDB1
EZCONNECT method
It is common for Oracle database administrators to provide the following two files to end users who need to connect to an Oracle database.
- TNSNAMES.ORA
- SQLNET.ORA
For the EZCONNECT method, only the SQLNET.ORA file needs to be saved in a folder on the user’s system and environment variables need to be created in the machine context pointing to this folder as well as to the Oracle ODAC components installation directory. These configurations can be done manually or the TimeXtender Oracle Data Source ODAC Configuration Utility can be downloaded to expedite the creation of the environment variables and the .ORA files if needed.
- Provided the Oracle ODAC Components are installed into the C:\Oracle directory, then the SQLNET.ORA files can be saved in the C:\Oracle\TNS directory.
- Create an Environment Variable in the machine context with the name of “TNS_ADMIN” and the value of “C:\Oracle\TNS”.
- Add the following two entries to the “Path” Environment Variable in the machine context:
- “C:\Oracle”
- “C:\Oracle\bin”
- Reboot the system.
Adding the Oracle Data Source that uses EZCONNECT.
Create a Oracle data source and choose Easy Connect naming.
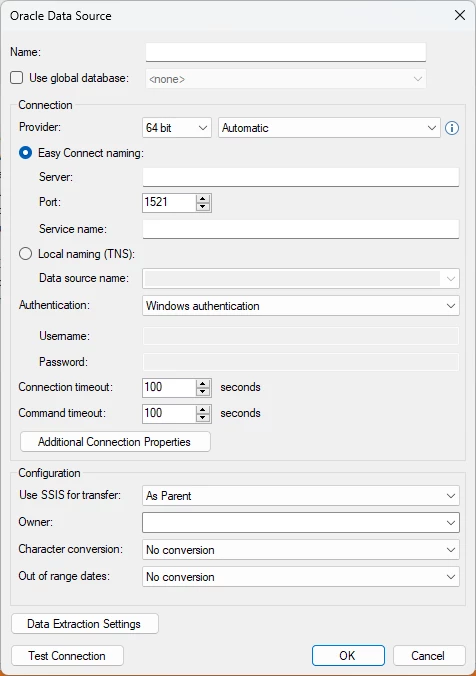
- Server: Set this to the server where the oracle server is located
- Port: Is 1521 by default
- Service name: Add the service name here
- Set Authentication to the type you want to use
- Username: Set this to the username, which corresponds to “GML” in the TNSNAMES.ORA file above.
- Password: Set this to the password for the username above.
- Owner: You set the owner of the database. You can choose those available after applying the user rights.
- Character conversion: You have three options
No conversion, Unicode and Non-Unicode.
- Out of range date: Set this to “MS SQL min/max date”, which will convert dates that exceed the minimum or maximum value supported by SQL Server to the SQL Server minimum/maximum.
In the example above, the Ingest instance will use the Data Source setting get the following information:
- Service name: ########-4ca944bda8.westus3.cloudapp.azure.com
- Port number: 1521
- Pluggable database: XEPDB1
