A Slowly Changing Dimension or SCD is a complex data warehouse pattern that maintains historical data for reporting even when this data is no longer available in the source.
Consider this example scenario: You report on customer shipments. Unfortunately, your data source only supports a primary address for each customer and previous versions are not available. Subsequently, a customer moves to a new location and the account manager updates the customer address in the source system. The data warehouse is updated, but now the historical shipping records are pointing to the row in the customer table which has the new address, instead of the original address they were shipped to.
By implementing a slowly changing dimension, you can maintain the historical dimension data. There are several different types of slowly changing dimensions depending on how you want to store and display the data. TimeXtender allows you to specify these types uniquely for each field in the table.
SCD Types
Type 0 - Retain Original: Fields with this setting will retain the original value appearing in the table. These are dimensional attributes that should never change such as birth date, or original credit score, etc.
Type I - Overwrite: This is the default option for all History table fields and will update values with the most recent source data. When enabled, the valid table won’t truncate during execution, so deleted source records are kept, the natural key will remain unique, and DW_Id values will always stay aligned with the natural key. However, this option does not provide any insight into historical field values.
Type II - Add New Row: In order to preserve historical changes, this method will identify when the given field values have changed, maintain the original values, and create additional records with the new values. In this case, the natural key may be listed several times for each change to the source entry.
History Fields
In order to help keep track of the different versions of data in the table, TimeXtender auto-generates several system fields. To see these fields, you may need to enable “Show System Fields” in the application’s View menu.
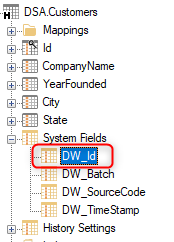
DW_ID is a unique identifier for each row and should be used as a dependable surrogate key for SCD Type II Tables.
SCD From DateTime is the earliest date the record was valid.
SCD To DateTime is the latest date the record was valid.
SCD Is Current is set to 1 for rows that currently align with source data and 0 for all the other historical rows.
SCD Is TombStone is set to 1 if the record was removed from the source. To see this field, you must be enabled in table settings.
Example
Below is a [Customer] table with the [Id] field set as a Natural Key and [City] & [State] as Type II. Let’s see how the data is handled when customer, “ABC Solutions”, moves to Austin, Texas:
As you can see, both records still maintain the natural key of “1”, however there are now two records for this customer. The first, showing their original City and State of “Portland, Oregon” and the second entry showing their new location. A new [DW_Id] value was generated ensuring this value will remain unique. You can also see [SCD From DateTime], [SCD To DateTime], and [SCD Is Current] have been updated to reflect when the records became valid.
Instructions
The following steps show how to enable History and configure SCD.
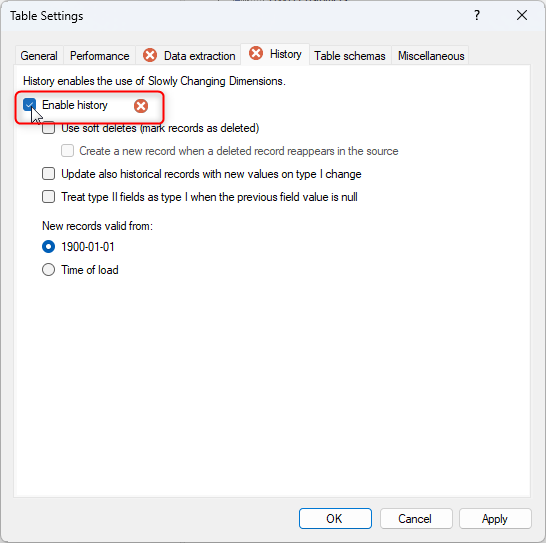
Enable History
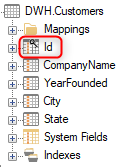
Ensure that the table has a Primary Key, typically the Natural Key as described above.
Right-click on the table and select “Table Settings”, and then select the “History” tab.
Check the “Enable History” box.
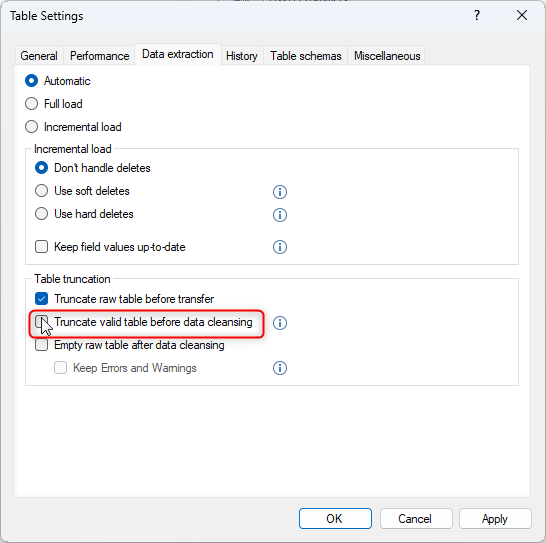
Select the “Data Extraction” tab and disable “Truncate valid table before data cleansing”.
Click “OK” to apply & close Table Settings.
Configure Fields
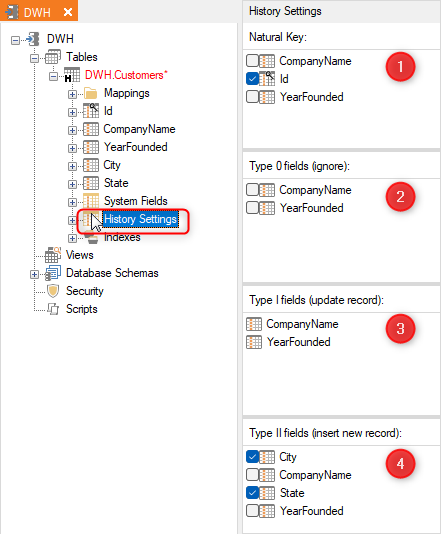
Expand the table and click on “History Settings”.
The “Natural Key” is used to determine if records should be considered an insert or update. By default, the primary key of the table.
Type 0 fields will always retain their original values.
Type I fields are the default and will update normally without creating new records.
Type II fields will be tracked for changes. Any change in the values of these fields will result in a new row with the new values while preserving the original row and values.
Additional Settings
Use soft deletes: Records are never deleted from a History enabled table. However, enabling this setting will create the “SCD Is Tombstone” system field which will be set to “1” on deleted rows.
Create a new record when a deleted record reappears in the source
When disabled: If the same natural key reappears in the source, the SCD is Tombstone field value will simply change from “1” to “0”.
When enabled: If the same natural key reappears in the source, a new record will be created.
Update also historical records with new value on type I change
When disabled: Type I field values will be updated only on the current version of the record.
When enabled: Type I field values will be updated on all version of the record.
This may be useful in reporting where the purpose is to have a recognizable or consistent name rather than the correct name at a specific time.
Treat type II as type I when field value is null
When disabled: Type II field values that change from null → not null will create a new record.
When enabled: Type II field values that change from null → not null will simply update in place with no new record created.
This setting can be enabled when keeping track of null field values being populated with a value is not necessary. A common use case for this setting is when a new field is added to a table and all the initial values for the new field are null.
New records valid from:
1900-01-01: The default option will use the value “1900-01-01” in the SCD From DateTime field for the first version of new records.
Time of load: will use the current DateTime value at the time of execution in the SCD From DateTime field for the first version of new records.
Once you enable History and Type II fields, your dimension can have duplicate natural keys. In order to maintain referential integrity with your fact table, you should use the system field DW_Id as a reliable Surrogate Key.
The DW_Id field is auto-generated on every table in the TimeXtender data warehouse and can by expanding the System Fields node at the bottom of the field list. (You may need to enable “Show System Fields” in the application’s View menu to see them.)
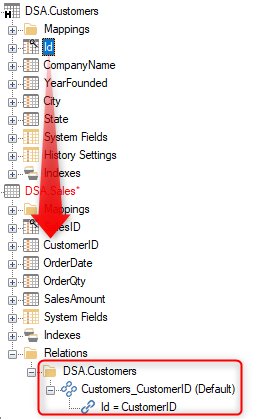
Relate your dimension table to your fact table by dragging the primary key on the dimension to the foreign key on the fact table.
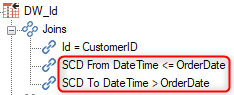
Drag the DW_Id from your dimension table with History enabled to the fact table name to create a conditional lookup of the DW_Id field.
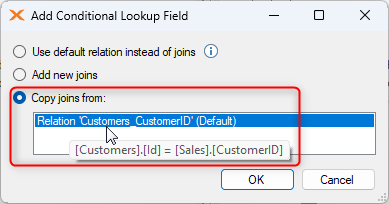
Select, Copy joins from and the Relation you just created. This will ensure the surrogate key lookup will always use the correct join, even if you change your relations.
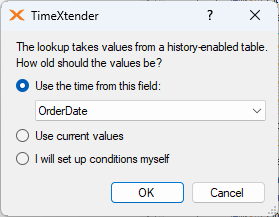
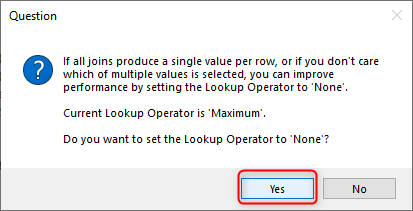
If History is properly enabled on you dimension table you should receive the following prompt:
Use the time from this field: This will add additional joins to lookup the value of the record that was active at the time of the selected date/time field. This is the recommended option for SCD Surrogate Keys.
Use current values: This will add additional joins to lookup the value of the current record. All records will display the current value for the attribute regardless of what the value might have been at the time of the fact table transaction.
I will setup conditions myself: This will not add any additional joins.
Click “Yes”, which equates to “None” if the following lookup dialog appears. The relations as configured will allow for the return of the proper value.
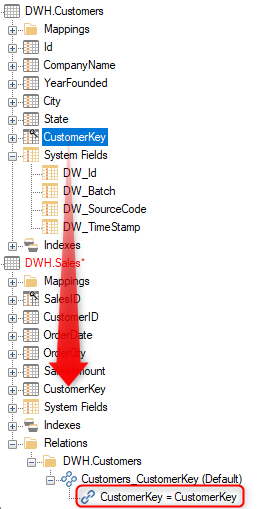
Rename the lookup field to match your desired naming convention. Commonly something like <DimensionName>Key or <DimensionsName>_SK (e.g.: CustomerKey)
Map your tables to the Data Warehouse presentation layer.
Map the Dimension’s DW_Id field as a new field in the table, rename it with the desired naming convention, and make this the new primary key.
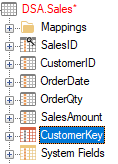
Map the Fact table.
Relate the two tables in the Data Warehouse presentation layer using the newly-created Surrogate Key.