This article describes how to add a Qlik Endpoint to a Deliver instance. For Qlik endpoints, the end product is a QVD file for each table in the model. QVD is a proprietary data format that stores data in a way that gives the best performance in Qlik apps. Since only Qlik applications can create QVD files, deployment and execution of Qlik endpoints create apps or scripts that a Qlik application can use to create QVD files.
Note: If you are using SQL Server 19, ensure that version 18 (i.e. 18.x.x) of the Microsoft OLE DB Driver for SQL Server is installed on the Qlik Server (instead of version 19.x.x). Also if you have Qlik installed on a separate machine, and not on your application VM, then please ensure you have installed the Microsoft OLE DB Driver for SQL Server version 18.x.x on both the Qlik server and the application VM.
Qlik endpoint menu
In the TimeXtender Portal navigate to Data Estate > Instances, click Add Instance> Add Deliver instance. Select Qlik Endpoint from the Add endpoints list, then click Add an endpoint.
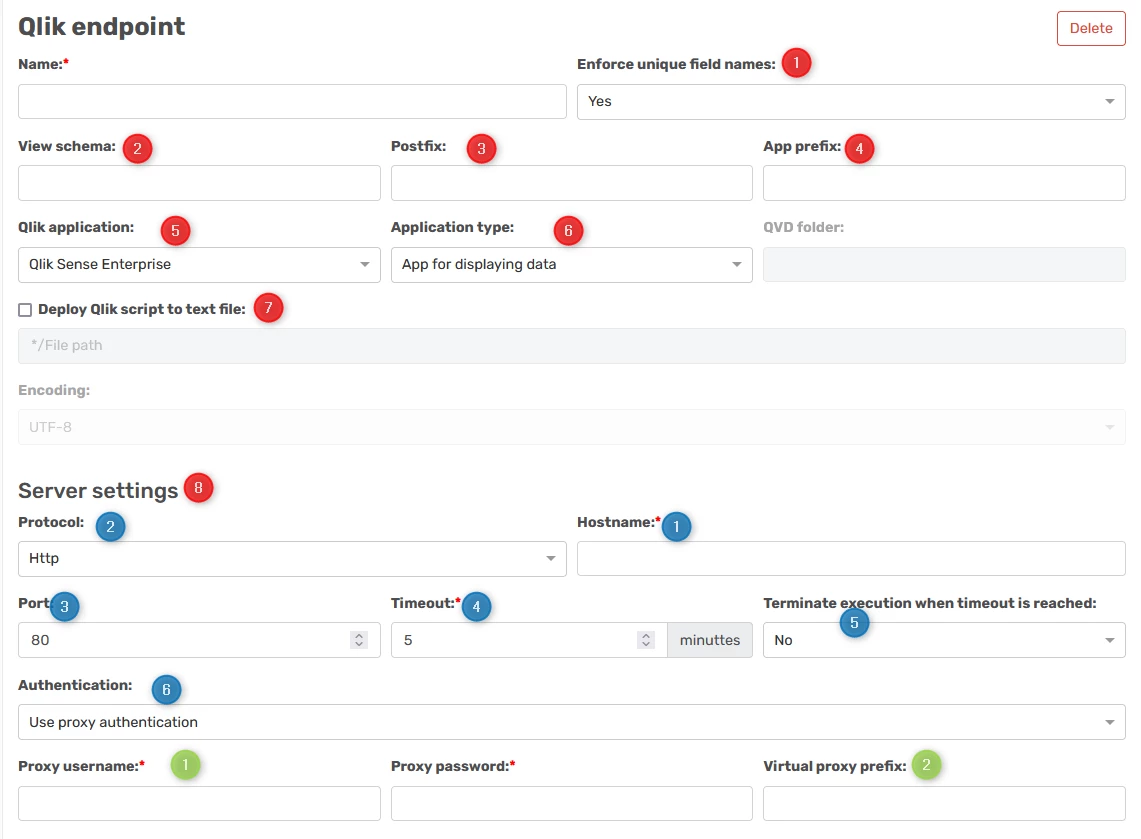
Fill out the following fields in the form.
-
(Optional) In the Enforce unique field names list, click on No if you don't want TimeXtender Data Integration to ensure that field names are always unique across tables by prefixing the name with the table name on deployment.
-
(Optional) In the View schema box, type the schema name you want to use for the views generated by TimeXtender Data Integration.
-
(Optional) In Postfix box, type the postfix TimeXtender Data Integration uses for views, folder names etc.
-
(Optional) In the App prefix box, type a string to be prefixed to the endpoint name to create the app name used in Qlik Sense.
-
In the Qlik application list, click on the Qlik application to target. You have the following options:
-
Qlik Sense Enterprise: Use a Qlik Sense Enterprise server. When you chose this application type, you need to enter server connection information under Server Settings.
-
Qlik Sense Desktop
-
QlikView
-
-
If you are deploying to Qlik Sense Enterprise or Qlik Sense Desktop, click on the app type you want to create in the Qlik Sense app type list. You have the following options:
-
App for generating QVD file: Creates an app that generates a QVD file with data from the model in the QVD folder you specify. The QVD folder should accessible for both TimeXtender and Qlik Enterprise.
-
App for displaying data: Creates an app and loads data from the model into it.
-
-
Select Deploy Qlik script to text file and enter a path in File path to have TimeXtender Data Integration output the script it generates to a text file.
-
If you are deploying to Qlik Sense Enterprise, enter settings under Server Settings:
-
In the Protocol list, click on HTTPS if your server uses a secure HTTP connection.
-
Type your server's hostname in the Hostname box.
-
Type the port to connect to in the Port box if it is different from the default. The defaults are 4747 if you use certificate authentication, 80 if you use proxy authentication with HTTP and 443 if you use proxy authentication with HTTPS.
-
(Optional) In the Timeout box, enter the timeout you want to use in communication with the server.
-
Select Terminate execution when timeout is reached if you want TimeXtender Data Integration to terminate - kill - an execution when the timeout is reached. This is useful in rare cases where executions will not terminate by themselves.
-
In the Authentication list, select the method you are using to authenticate with the Qlik Sense Enterprise server.
-
Click Use proxy authentication if you are using the proxy authentication method to authenticate with the Qlik Sense Enterprise server. Type your username in the Username box and your password in the Password box. Write the prefix from the virtual proxy in Qlik Sense in the Virtual proxy prefix box.
-
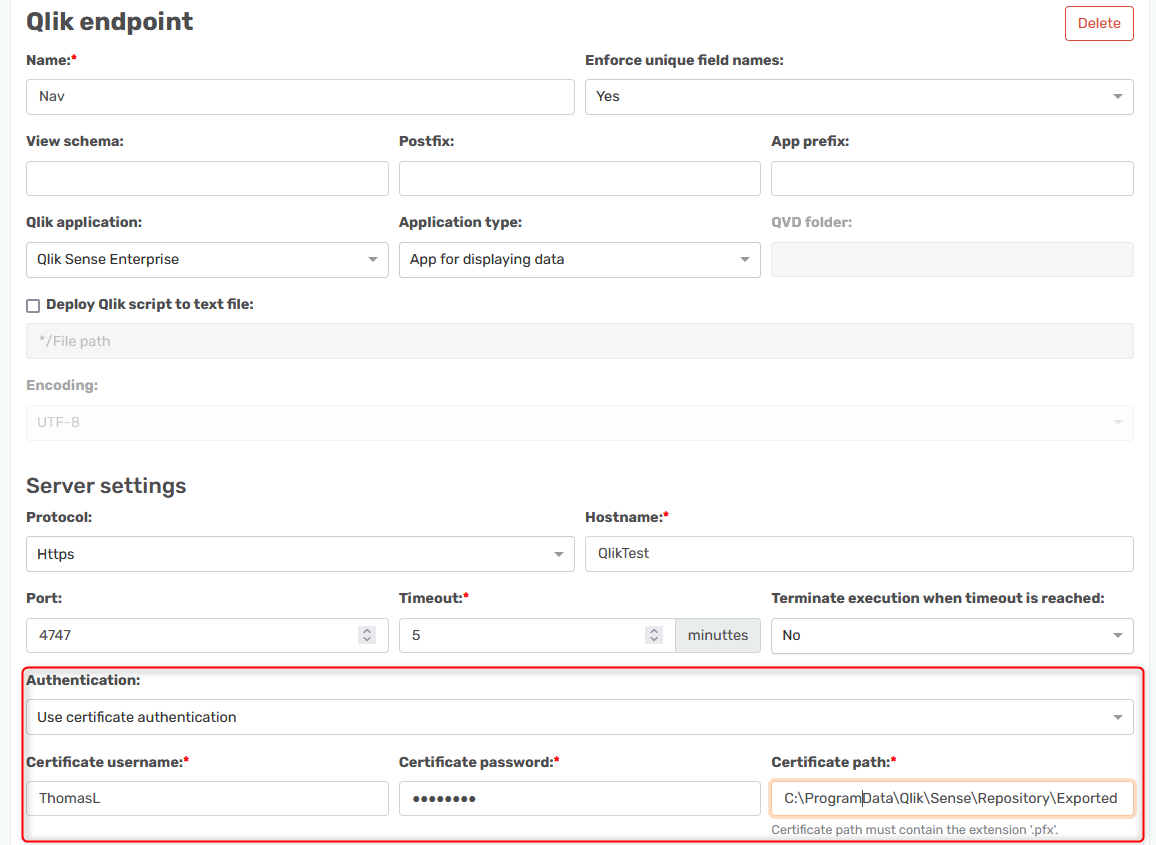
Click Use certificate authentication if you are using the certificate authentication method for authenticating with Qlik. Type your username in the Username box, enter the path to the certificate in the Certificate path box, and the associated password in the Certificate password box.
-
-
-
If you are deploying to Qlik Sense Enterprise, enter settings under Cloud settings:
- In the Tenant URL box, enter the Qlik Cloud tenant host name (for example, 'tenantname.region.qlikcloud.com') exactly as shown in your browser or tenant configuration.
- In the API key box, paste a valid Qlik Cloud API key generated in Qlik Cloud.
- Select Use Qlik Data Gateway checkbox, if Qlik Cloud must access on‑premises or otherwise non‑public data through a Direct Access gateway.
- In the Data gateway ID box, enter the identifier of the Direct Access data gateway as shown in Qlik Cloud administration.
- In the Data gateway agent ID field, enter the Direct Access Agent ID associated with the selected gateway, using the value from the gateway configuration in Qlik Cloud.
Data for the QVD files is extracted from views. On deployment, a view for each table in the model is created in the Prepare instance or staging database that house the table. The view name depends on the settings on the endpoint and has the format [view schema].[table name]_[postfix], e.g. "QView.Customers_QV".
Qlik application types
Apart from creating the views, deployment is different depending on your choice of Qlik application:
-
Qlik Cloud
-
Qlik Sense Enterprise: An app called "[Endpoint name]_QVDApp" is created on the server. Unlike the other Qlik applications, Qlik Sense Enterprise has an execution step. On execution, the app on the server is executed and creates QVD files on the file path specified.
-
Qlik Sense Desktop: You can right-click the endpoint and click Create Qlik Sense App to create an app in the application. When you execute this app in Qlik Sense Desktop, it creates QVD files based on the tables in the Deliver instance on the file path you have specified.
-
QlikView: You can right-click the endpoint and click QlikView Scripts to show and copy the script you need to use in QlikView to generate QVD files based on the tables in the Deliver instance.
Options needed for connecting to Qlik Enterprise
Set up users for connection, deployment and execution
Your users need ContentAdmin rights to deploy and execute models.
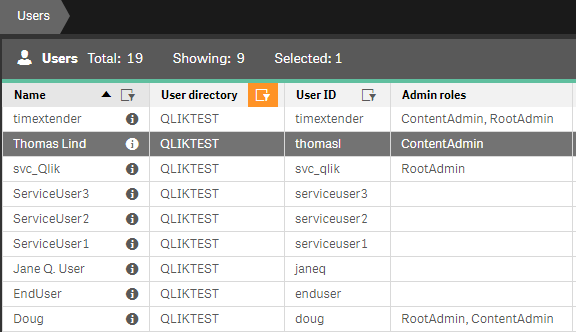
The user also needs rights to create files in a folder if you use QVD files. In this case for the svc_qlik user as well.

Set up a proxy in the Qlik Management Console (QMC)
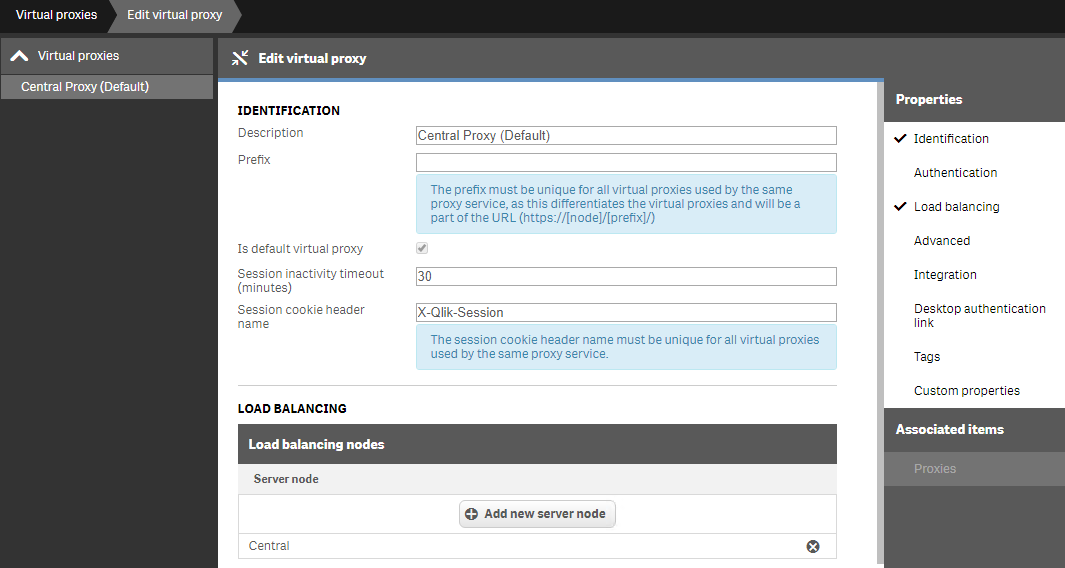
You can create your own proxy to connect to and the things you need to set up are these. It needs a unique Description name with no blank spaces, a unique Session cookie header name and the load balancing needs to point to the server node.
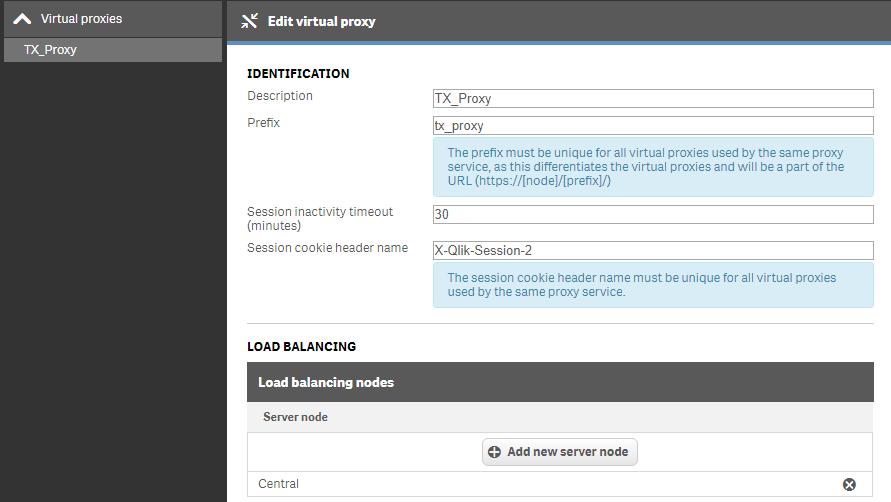
It also needs to be associated by the proxy server.
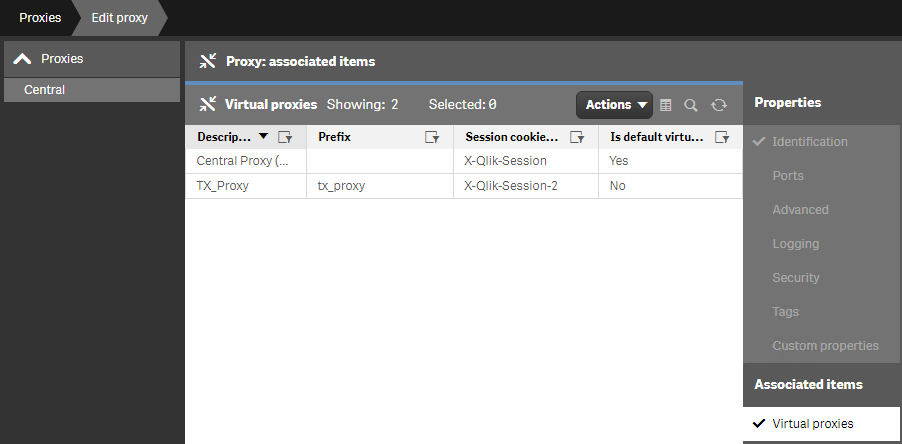
Though as standard the default one can be used if TimeXtender Data Integration is to be used on the same server.
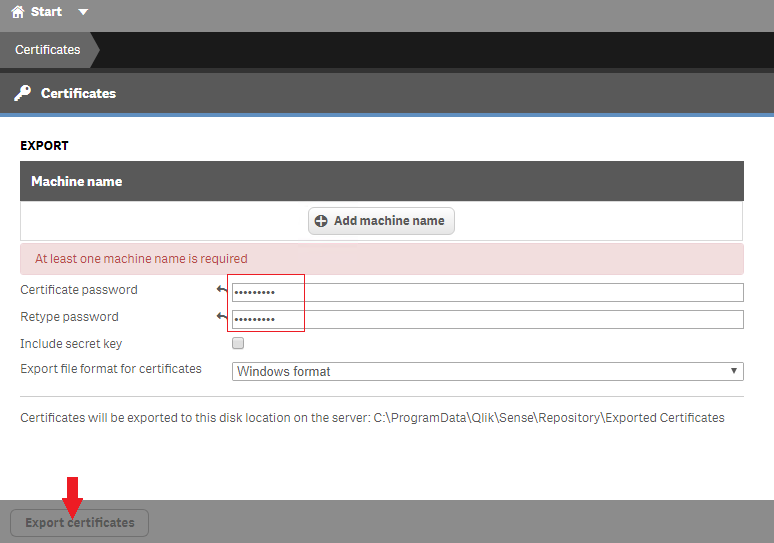
Export a Certificate from the Qlik Management Console (QMC)
To use the certificate, you need to export it. Add a certificate password, click Add machine name, set up the machine name and press Export Certificates. It will be stored in this path "C:\ProgramData\Qlik\Sense\Repository\Exported Certificates\<machinename>". Go there and copy it and store it on a location that is available for all users of the program, so not "Documents", but a specific Qlik folder on the C drive.
Set up the Prepare instance to be used with a Qlik Enterprise endpoint
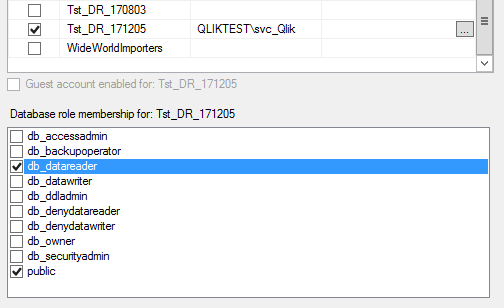
There are some services that are running.

The user that runs the engine service needs read rights on the Prepare instance table.
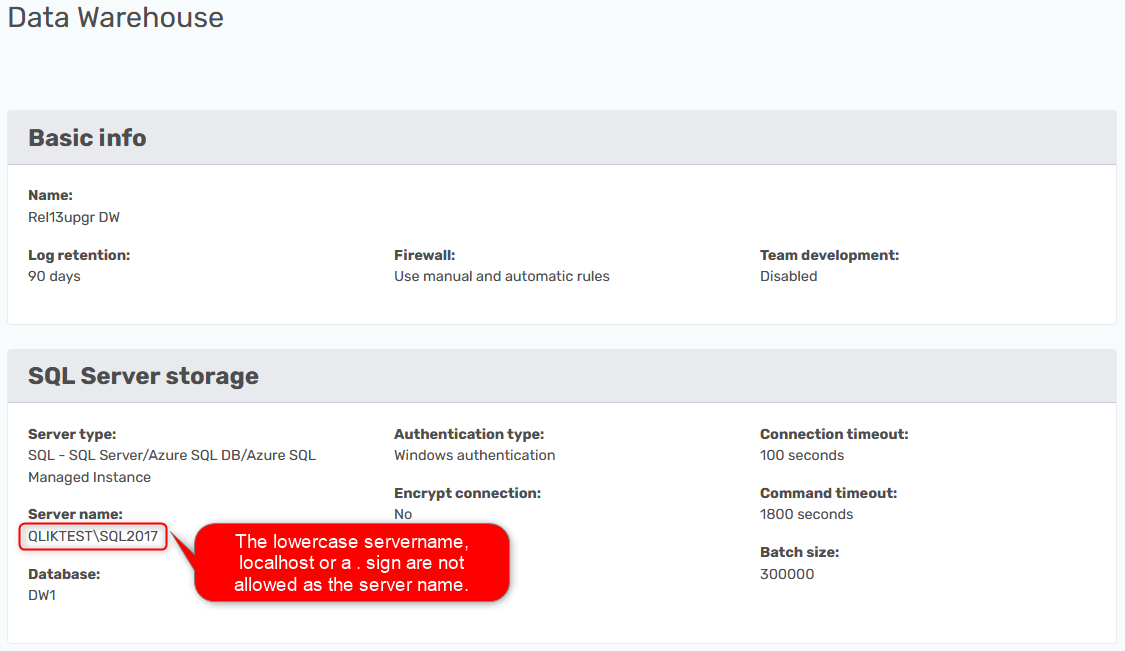
Lastly the server name cannot be localhost and ., it needs to be the host name instead.
It is really important that the server name and name of the Prepare instance database you connect to are in the same case, if it is all in lowercase the connection will fail.
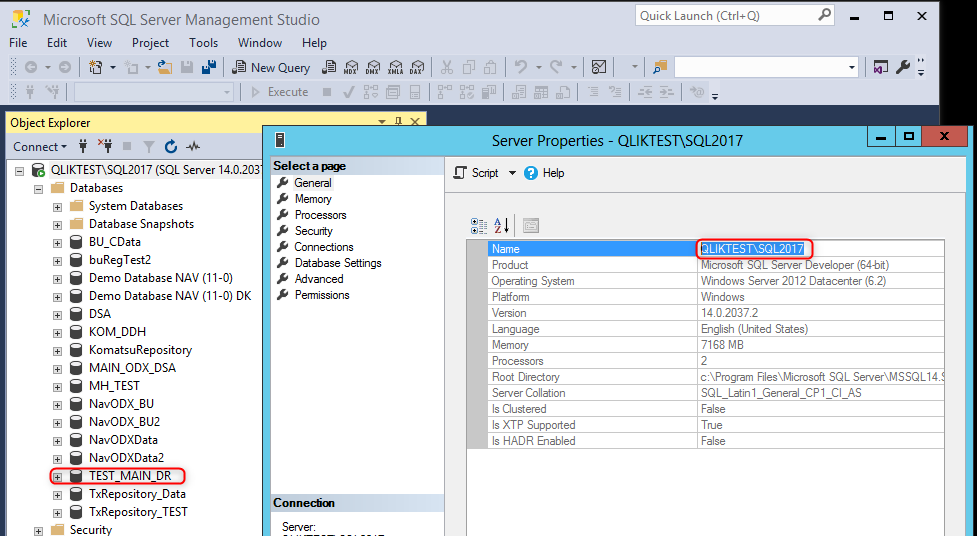
You can always find the correct server name in this location in management studio.
Adding the correct host name
It is very important that you add the correct host name and that it is the same case as what is in the system setup.
So while the virtual machine name is one thing, the actual computers name is different.
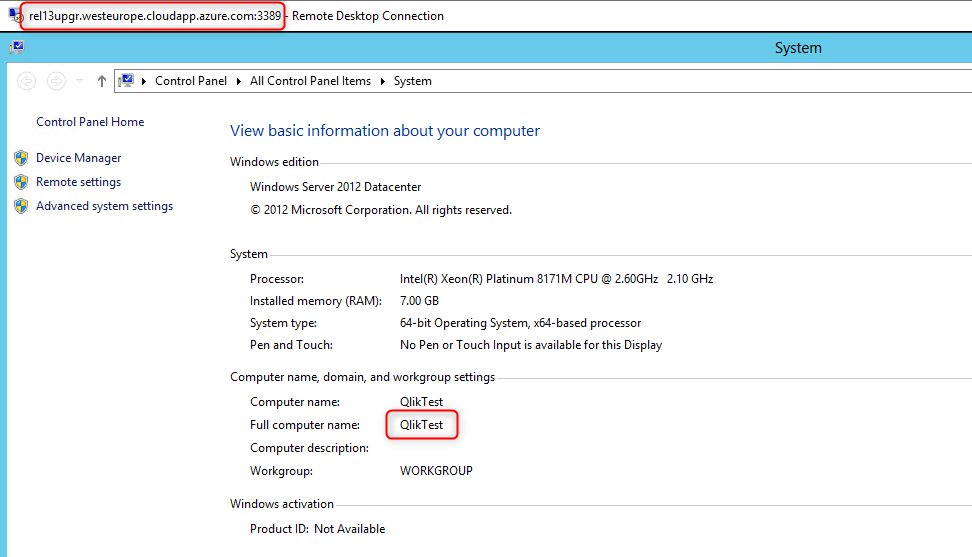
It is also necessary that the host name is in the same case setting as it is in the system menu.
How to set up a connection to Qlik Enterprise with a proxy setup
When you set it up, you use the correct protocol, add the server name, the port, the virtual proxy you made and the account you want to run as.
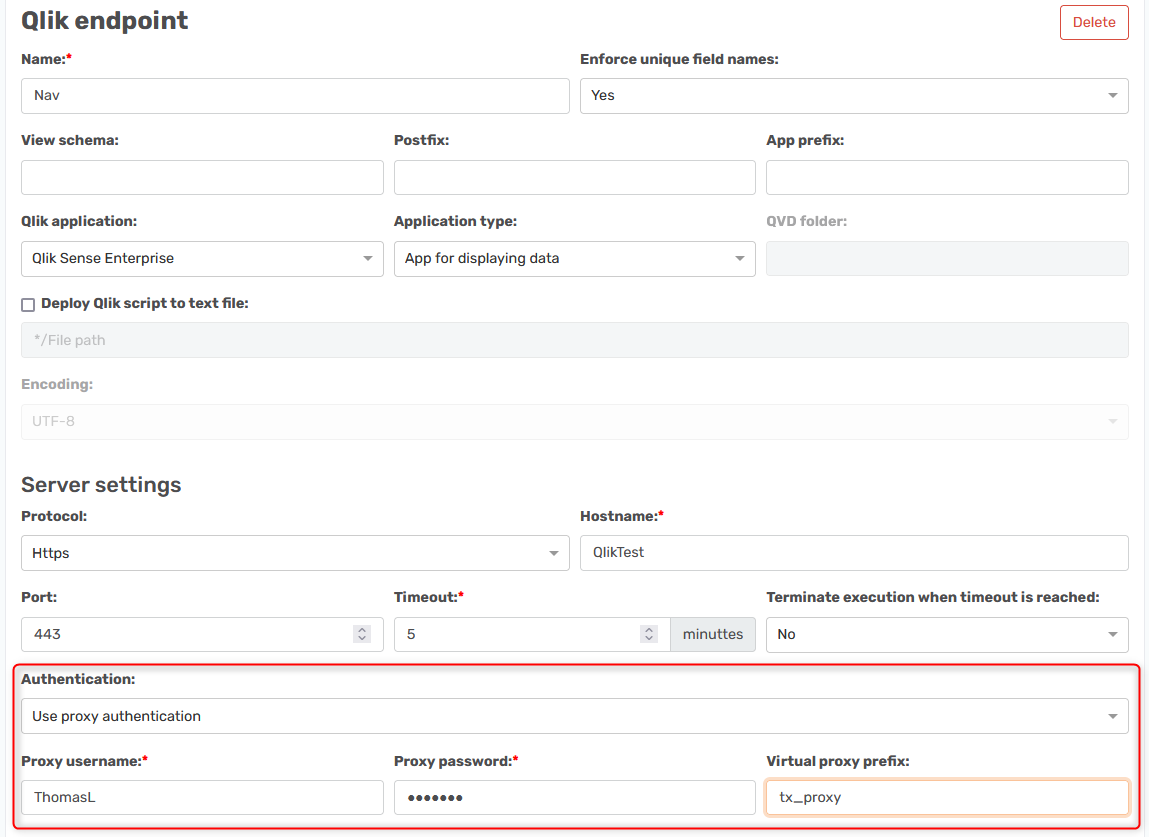
The port expects 443 when you use Https, you can leave the Virtual proxy prefix field empty and it will use the default proxy that is set up.
How to set up a connection to Qlik Enterprise with a Certificate setup
The setup needs a port, a user account, the certificate that was exported and the password you gave it. Port 4747 is default.

