


This adapter simplifies the extraction of data from Microsoft Dynamics AX.
AX is now called Finance & Operations by Microsoft and offers both an Online version and an SQL version for TDI.
This is the Business Unit version of the SQL version of the Finance data source.
If you connect to a Dynamics AX database as a regular data source, you will have to apply and maintain selection rules on all tables. With the TimeXtender Dynamics AX adapter, you can select company accounts at a global level.
The adapter also extracts any virtual company accounts, including table collections, and tables that are set up in the source database. The information can then be used in dimensions and cubes.
Furthermore, the adapter extracts all Base Enumerations and their associated labels and supports synchronization with the back-end application.
Importing XPO Files into Dynamics AX
The Dynamics AX adapter is only available if the .xpo file has been imported into Dynamics AX.
- Import the .xpo file into Dynamics AX.
- Compile the imported project within Dynamics AX.
- Run all four classes in Dynamics AX to populate the tables.
- Add a Dynamics AX adapter to your TimeXtender project. For more information, see Add Dynamics AX Adapters.
Adding a Dynamics AX Adapter
Use the Dynamics AX Adapter to load data from separate Dynamics AX company accounts tables in a single table.
- Open a business unit, right-click Data Sources, click Adapter Data Sources, and then click Add Dynamics AX Adapter.
- Enter a name for the adapter, and then click OK.
You can now choose the provider that contains the data source you want to connect to.
Adding a Microsoft SQL Server Provider
- Right-click the adapter, click Source Providers, and then click Microsoft SQL Provider.
- In the Server name box, enter the location of the server.
- In the Authentication list, click the authentication mode you want to use. You have the following options:
- Windows Authentication: Use the logged-in Windows user's credentials for authentication.
- SQL Server Authentication: Use a login set up on the SQL Server. Enter the username and password in the corresponding fields.
- Azure AD Password Authentication: Use Azure AD credentials from a domain that is not federated with Azure AD. Enter the username and password in the corresponding fields.
- Azure AD Integrated Authentication: Use the logged-in Windows user's credentials for authentication, provided that he is logged in using Azure AD credentials from a domain that is federated with Azure AD.
- In the Database field, enter the name of the database.
- In the Connection timeout box, enter the number of seconds to wait before terminating the attempt to connect to the server, and then click OK.
- In the Command timeout box, enter the number of seconds to wait before terminating the attempt to connect to the database.
- (Optional) In the Encrypt connection list, you can enable encryption of the connection, which is recommended when you are not in a private network (e.g., when your server is on Azure). You have the following options:
- No: The communication is not encrypted (default).
- Yes: The communication is encrypted. A certificate authority verifies the server's certificate.
- Yes, trust server certificate: The communication is encrypted. However, the server's certificate has not been verified. This setting is not recommended for use on public networks.
- In the Use SSIS for transfer list, click on Yes to enable SQL Server Integration Services data transfer, No to disable it, or leave it at As Parent to respect the project setting.
- Select Force codepage conversion to convert all fields to the collation of the data warehouse.
- Select Force Unicode conversion to declare all alphanumeric fields as nvarchar.
- Select Allow dirty reads to allow reading from the source without locking the table.
- To add additional connection settings, click Additional Connection Properties. In the Connection String Properties window, enter the required connection strings, and then click OK.
Adding a Dynamics AX OData Provider
The version of Dynamics AX released in 2016, known as Dynamics AX 7, introduced a new Azure-based data storage option. You can access this through the "AX7 Odata" provider.
The provider uses OAuth 2.0 authentication, which means you need to set up a client in Azure AD to connect - please see this article for more information:
https://ax.help.dynamics.com/en/wiki/dynamics-ax-7-services-technical-concepts-guide/
Note that this provider cannot use SSIS transfer.
To add a Dynamics AX OData provider, follow the steps below.
- Right-click the adapter, click Source Providers, and click Add AX7 Odata Provider. The AX7 Odata window appears.
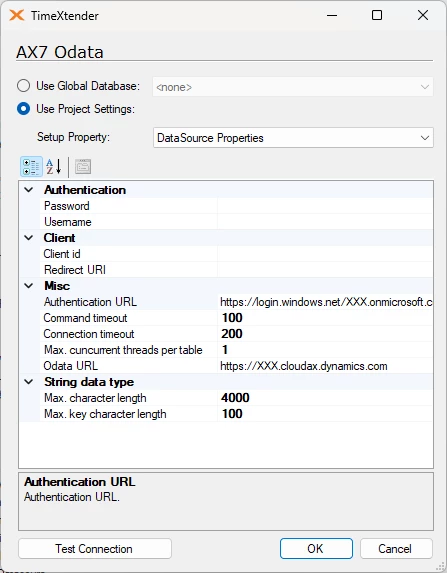
- In the Password option, enter the password you use to connect.
- In the Username option, enter the username you use to connect.
- Under client, enter the Client id and Return URI you use to connect.
- In the Authentication URL option, enter the URL used for authentication.
- (Optional) The Connection Timeout option allows you to modify the number of seconds to wait before terminating an attempt to connect to the server.
- (Optional) The Command Timeout option allows you to modify the number of seconds to wait before terminating an attempt to connect to the database.
- (Optional) The Max. concurrent threads per table option allows you to modify the number of connections you will allow to a single table.
- In the OData URL option, enter the URL from which you will get the data.
- (Optional) The Max. character length option sets the maximum length in characters for fields that are strings.
- (Optional) The Max. key character length option allows you to set the maximum length in characters for key fields that are strings.
- If you need to connect through a proxy server, click Proxy settings in the Setup property list. In the WebProxyApproach list, you have the following options:
- NoProxy
- ApplicationProxy: Use the proxy settings configured at the application level. To adjust the application settings, click Options on the Tools menu and then click Proxy Settings.
Note that using a proxy server for Internet connections can also be turned on and off from here.
- SpecificProxy: Enter the settings (server, port, username, and password) to use for the adapter.
Adding an Oracle Provider
- Right-click the adapter, and select Source Providers. Then select Oracle Provider.
- In the TNS alias field, type the alias that identifies the database.
- In the Owner list, select the owner of the database.
- Specify the authentication mode. When you select Oracle authentication, you are prompted to enter a username and password.
- Select Convert Out of Range Dates to MS SQL min/max if you want to convert all dates older than January 01, 1753, to 1753-01-01.
- In the Connection Timeout field, specify the number of seconds to wait before terminating the attempt to connect to the server.
- In the Command Timeout field, specify the number of seconds to wait before terminating the attempt to connect to the database.
- If you want to set the character encoding to either Unicode or Non-Unicode, select Force Character Setting. Then select the preferred character encoding in the list.
Note: Forcing character encoding may affect performance. If you want to add additional connection strings, click the Additional Connection Properties button. In the Connection String Properties window, type the preferred connection strings, and then click OK.
Setting the Account Table
Before you can proceed with setting up accounts, you must verify that the company account table is accurate.
- Right-click the adapter, and then choose Set Account Table. The table DATAAREA and the field ID are selected by default.
- Click OK.
Setting Up Dynamics AX Companies
After adding a Dynamics AX adapter and specifying a provider, you need to set up the accounts. To set up accounts:
- Right-click the adapter, and select Set Up Accounts. An information message is displayed, which lists the accounts that have been added. Click OK. The Accounts window appears.
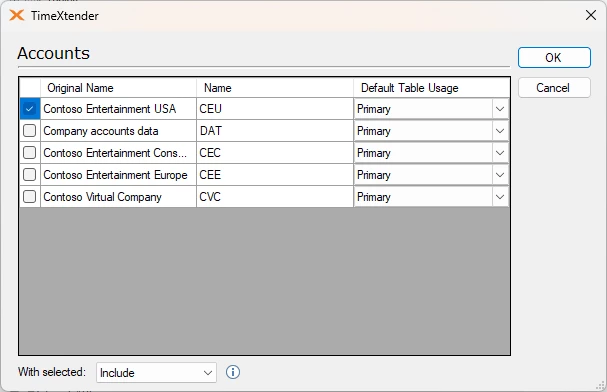
- Select the accounts from which you want to retrieve data. In the With selected list, click Include to use the selected accounts in the data warehouse, or click Exclude to exclude the selected accounts and include all other accounts. The last option is helpful if you frequently add new accounts in Dynamics AX and want to ensure that all accounts are included in the data warehouse as soon as they exist in the ERP system. Note that the exclude option isn't available when you use the OData provider.
- In the Default Table Usage list, specify the order in which data from the tables is retrieved and read. You have the following options:
Option Definition Primary Data from this company account is read and retrieved first Secondary Data from this company account is read and retrieved after the primary account, if it has not already been retrieved from the primary account. None Tables from this company are not retrieved unless you specify at the table level that you want to recover data from a specific table. For more information, see Modifying Table Usage on Dynamics AX Tables. - Click OK.
Loading and Selecting Data from Dynamics AX Data Sources
- Right-click the Dynamics AX adapter you want to select data from, and then select Read objects. The Data Selection pane displays all tables and fields.
- In the Data Selection pane, select the tables and fields you want to extract to your staging database.
The tables and fields are displayed in the data source tree and in the staging database tree.
Adding Dynamics AX Virtual Table References
- Expand the AX adapter that contains the table to which you want to add a virtual table reference, right-click the table, and then choose Add Virtual Table Reference.
- In the Add Virtual Table Reference window, select the preferred virtual tables, and then click OK.
Viewing Dynamics AX Table Information
TimeXtender can retrieve table information directly from your Dynamics AX database.
- Expand the Dynamics AX adapter that contains the table you want to view information about, right-click the table, and then select View Table Information.
The three tabs in the View Table Information dialog contain the following information:
Fields Tab Description Name Specifies the name of the field as it appears in the database Label Specifies the name of the field as it appears in the user interface Help Text Contains the help text for the field EDT Name Specifies the name of the extended Data Type if applicable Enum Name Specifies the name of the enumeration if applicable System Specifies whether the table is a system table or visible in the user interface Relations Tab Description External Table Specifies the name of the table that the selected table is related to Directions Specifies whether the selected table is the child or the parent in the relation Field Specifies which field in the selected table relates to a field in the related table External Field Specifies the field on the related table Relation Type Specifies the type of relation. Field specifies relation fields without conditions. This Fixed option specifies relation fields to restrict the records in the primary table. ExternFixed specifies relation fields that limit the records in the related table Virtual Company References Description Company The name of the company account Virtual Company The name of the Virtual Company that contains tables shared by several company accounts
Viewing Dynamics AX Enum Table Information
All Enum values in Dynamics AX are represented as integers in the tables. However, you can see the corresponding literal values by viewing the enumeration table information.
- Expand the Dynamics AX adapter that contains the table you want to view information about, right-click the table, and then select Preview Enum Table.
Changing Dynamics AX Schemas
- Right-click the AX adapter that contains the table whose priority you want to change, and then select Change Schema.
- In the Select Schema To Change list, select the schema you want to change.
- In the New Schema Name field, enter a name for the schema.
Modifying Table Usage on Dynamics AX Tables
When you set up accounts, you specify the default order in which data is retrieved from the individual accounts. However, it is possible to select a different priority order for individual tables.
- Right-click the AX adapter that contains the table whose priority you want to change, and then select Modify Table Usage. The company accounts and the usage of all tables will be displayed.
- Right-click the table and account field with the setting you want to change the order of priority on for data retrieval. You have the following options:
Priority Definition Default Data from this table is read and retrieved first Primary Data from this table is read and retrieved first Secondary Data from this table is read and retrieved after the primary table, if they have not already been retrieved from the primary table None Data from this table is not retrieved 1-9 Specify the order priority in the range of 1-9. Enter priority If the order of priority exceeds the numbers 1-9, you can specify additional numbers. - Click OK.
Modifying the Usage of a Single Dynamics AX Table
If you want to change the order of priority in which data is retrieved from a single table, you can do so from the individual table.
- Right-click the AX adapter that contains the table whose priority you want to change, and then select the preferred table.
- Right-click the table and select Modify Single Table Usage. The company accounts and the usage specified in Setup Company Accounts will be displayed.
- Right-click the field that contains the setting for the table, and then specify the table usage. You have the following options:
Priority Definition Default Data is retrieved based on the settings specified when you set up the company accounts. Primary Data from this table is read and retrieved first Secondary Data from this table is read and retrieved after the primary table, if they have not already been retrieved from the primary table None Data from this table is not retrieved 1-9 Specify the order of priority in the range from 1-9 Enter priority If the order of priority exceeds the numbers 1-9, you can specify additional numbers here.
