Microsoft Dataverse is the underlying data platform for Dynamics 365 applications, including Sales, Customer Service, and other CRM modules. When you connect to Dataverse, you get direct access to CRM entities such as accounts, contacts, leads, and opportunities. This guide walks through setting up that connection using the TimeXtender Classic OData provider with OAuth 2.0 client credentials authentication.
This guide uses client credentials (app-only) authentication. No user account is involved at runtime — access is granted to a registered Azure AD application, which is then mapped to a Dataverse application user. This is the recommended approach for service integrations.
Before you begin, confirm you have the following in place:
Requires: Azure AD admin access and Power Platform System Administrator role
An active Microsoft Azure subscription with permission to register applications in Azure Active Directory.
A Dataverse environment (Power Platform admin center) with at least one Dynamics 365 app or custom tables present.
Power Platform admin or System Administrator role in the target Dataverse environment, required to create an application user.
TimeXtender Classic installed and a Business Unit (BU) project open.
Network connectivity from the TimeXtender server to login.microsoftonline.com and your Dataverse environment URL.
Register an Azure AD Application
The OData provider uses OAuth 2.0 client credentials to authenticate against Dataverse. This requires an app registration in Azure Active Directory and a corresponding application user created inside the Dataverse environment.
Register the app in Azure Portal
Go to portal.azure.com, search for Azure Active Directory in the top search bar, and open it.
In the left-hand menu, select App registrations, then click + New registration.
Fill in the registration form:
Name: e.g. TimeXtender-Dataverse (descriptive name for easy identification)
Supported account types: Accounts in this organizational directory only (single tenant is sufficient)
Redirect URI: Leave blank (not needed for client credentials flow)
Click Register.
After registration, the Overview page shows the Application (client) ID and Directory (tenant) ID. Copy and save both — you will need them when configuring the OData data source in TimeXtender.
Grant Dataverse API permissions
In your app registration, select API permissions from the left menu, then click + Add a permission.
In the "Request API permissions" panel, click Dynamics CRM (this is the Dataverse API). Select Application permissions, then check user_impersonation. Note: Dynamics CRM may appear under "APIs my organization uses" rather than the default Microsoft APIs tab. Use the search box if it is not immediately visible.
Back on the API permissions page, click Grant admin consent for [your tenant] and confirm. The status column should update to a green checkmark.
Create a client secret
In your app registration, select Certificates & secrets, then click + New client secret.
Give the secret a meaningful description (e.g. TimeXtender-OData) and select an appropriate expiry period. Click Add.
Important: Copy the secret Value immediately after creation. Once you navigate away, it will no longer be visible in full. Store it securely (e.g. in a password manager or Azure Key Vault).
Configure an application user in Dataverse
Azure AD app registrations do not automatically get access to Dataverse. You must create an application user inside the Dataverse environment and assign it a security role. This is the user mapping that grants your registered app the right to read data.
Click Settings in the top ribbon, then go to Users + permissions > Application users.
Click + New app user. In the panel that opens:
App: Search for and select your registered app (e.g. TimeXtender-Dataverse)
Business unit: Select the root business unit (default)
Security roles: Assign at minimum the Basic User role, plus any additional roles needed to read your CRM entities
Tip: For read-only data integration, a custom security role with read access on the required tables is preferable over assigning a broad role like System Administrator.
Click Create. The application user will appear in the list with a type of Application user. The app registration is now authorised to access Dataverse data using client credentials.
Create the OData Data Source in TimeXtender Classic
With the Azure AD application registered and the Dataverse application user in place, you can now configure the OData data source inside TimeXtender Classic (version 20.10). In TimeXtender Classic, data sources are created and managed within the Business Unit (BU). The OData provider reads the Dataverse service metadata document automatically, meaning tables and fields are discovered from a browsable list rather than entered manually.
Add a new OData data source
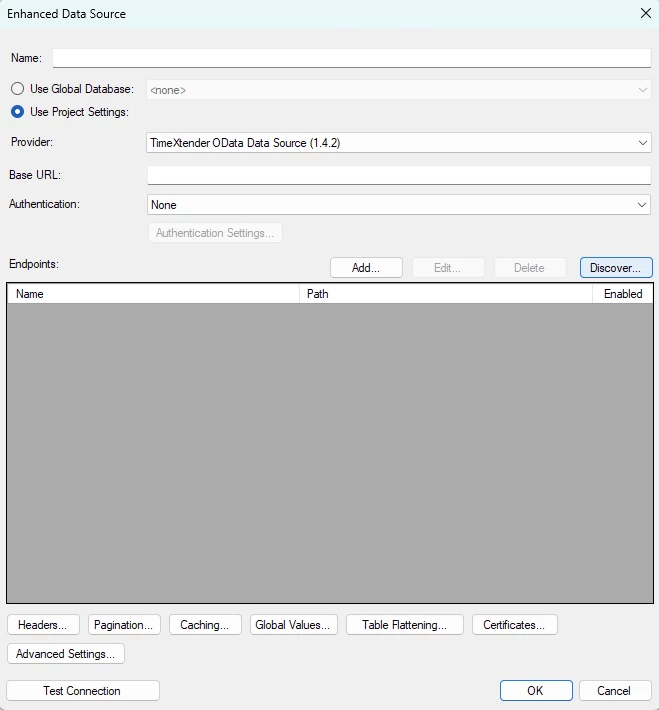
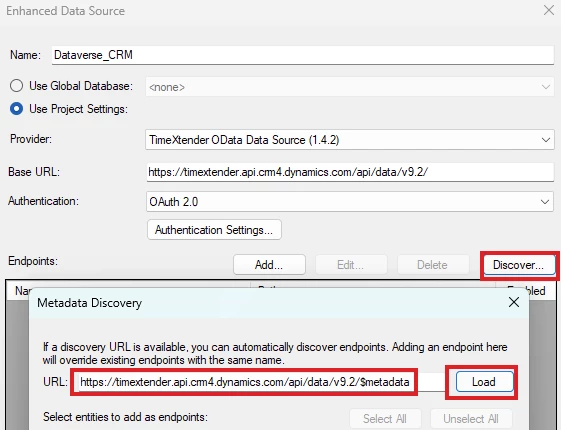
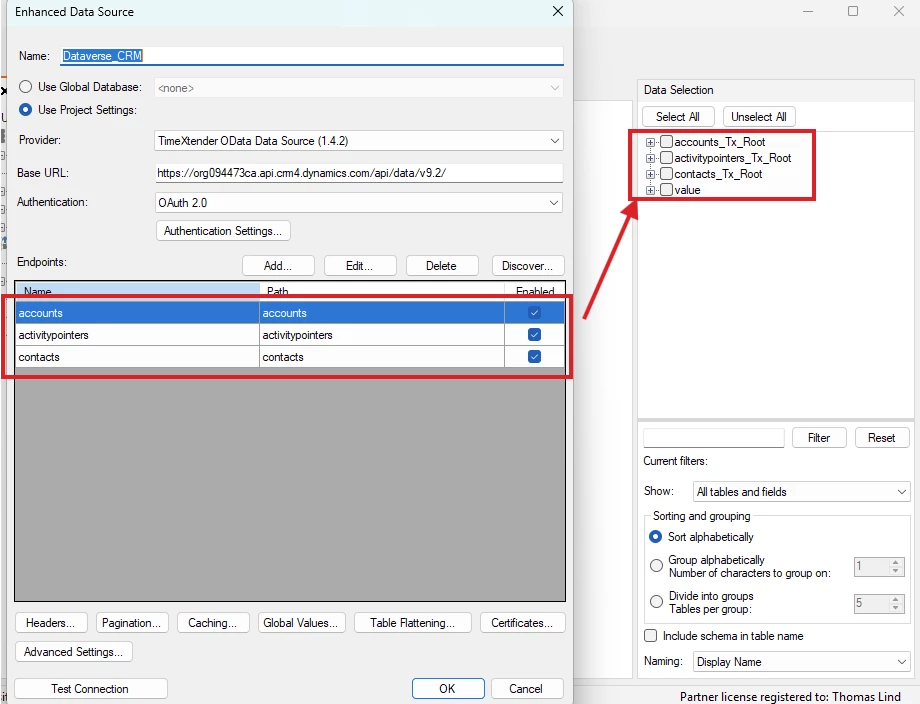
In TimeXtender Classic, open the relevant Business Unit from the portal. In the left-hand project tree, right-click on Data Sources and select Add Data Source > Enhanced Data Source and select the TimeXtender OData Data Source provider.
Give the data source a clear name, for example, Dataverse_CRM. This name is used throughout the BU when referencing this connection.
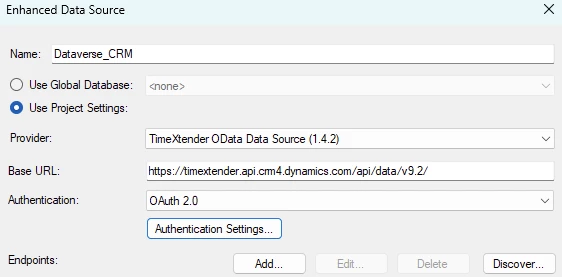
Set the base URL
The base URL points to the Dataverse Web API endpoint for your environment:
You can find your environment URL in the Power Platform admin center under Environments → [your env] → Details. Make sure to include the trailing slash and specify the API version (v9.2 is current and recommended).
Note: The region suffix in the URL (.crm, .crm4, .crm11, etc.) varies by geography. European environments typically use .crm4.dynamics.com.
Configure OAuth 2.0 authentication
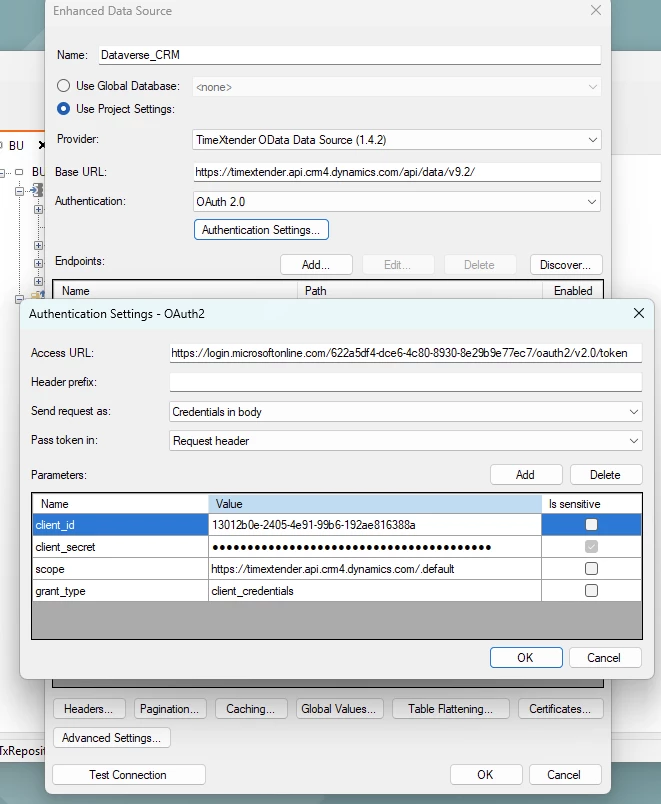
Select OAuth 2.0 - Client Credentials as the authentication type and fill in the fields below using the values collected during the Azure AD registration.
Replace {tenant-id} in the Token URL with your Directory (tenant) ID from the Azure AD app registration overview.
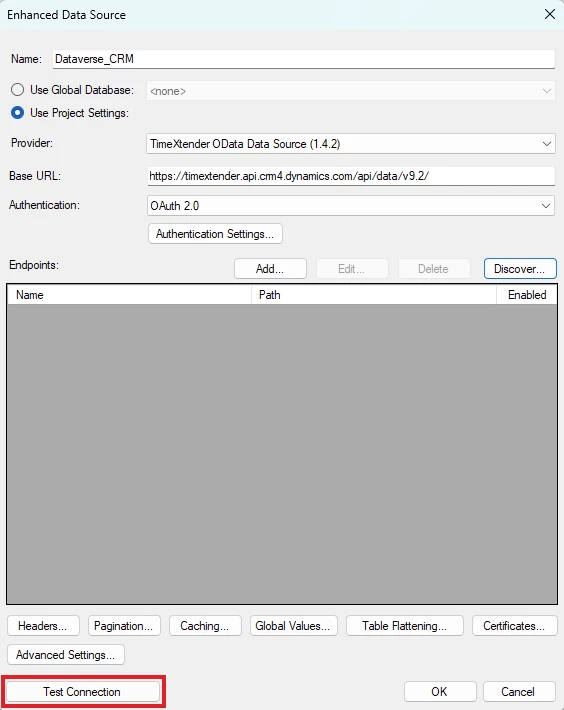
Test the connection
In the data source configuration dialog, click the Test Connection button. TimeXtender will attempt to retrieve an OAuth token and make a request to the base URL.
A successful test returns an HTTP 200 response with the Dataverse service metadata. If you see an error, refer to the Troubleshooting section below.
Add Tables and Entities
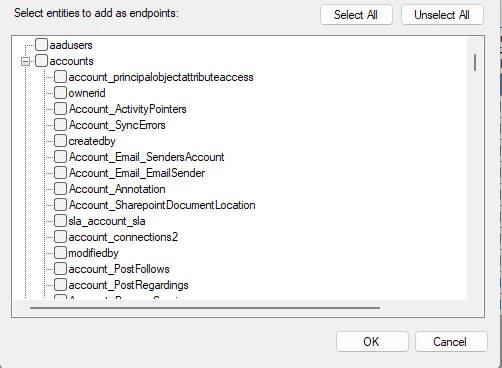
A key advantage of the OData provider is that TimeXtender reads the Dataverse $metadata document and presents all available entities in a browsable list. You do not need to know or type endpoint names — you select what you need from the interface.
Click on the Discover… button apply the Base URL URI with $metadata on it and click on the Load button. TimeXtender will contact the Dataverse metadata endpoint and return a list of all entity sets your application user has access to.
Browse and select the entity.
Note: Custom entities created by your organization will also appear in the list, typically prefixed with a publisher identifier such as cr123_. Select the entity and click OK to add it.
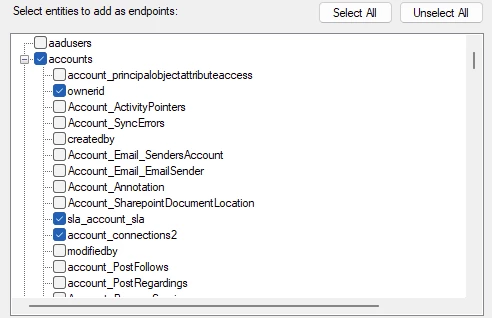
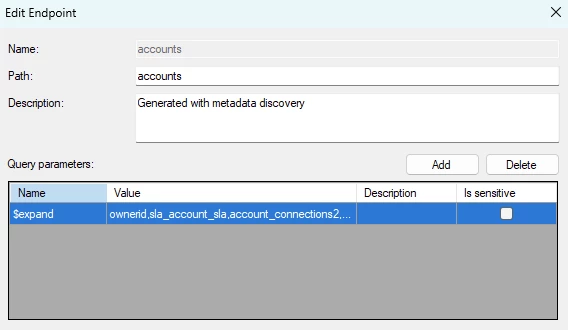
Review and select fields. The provider presents all available fields sourced from the metadata. You can select just the table or the fields below. The option to select fields can be used to limit the amount of fields or to expand the content. When fields are selected the endpoint will show this like a $expand parameter.
Tip: Dataverse entities like accounts and contacts can have hundreds of fields, including many system and audit columns. Deselecting unused fields reduces ingestion time and storage significantly.
Preview data and confirm. After synchronizing the data source, you will see the result. Right-click the newly added table and select Preview Data to verify that records are being returned correctly from Dataverse. Repeat for each additional entity you need.
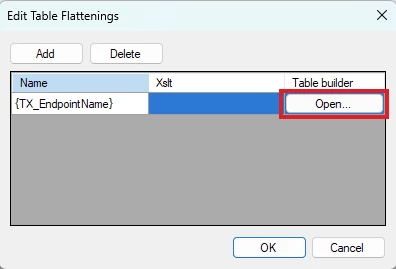
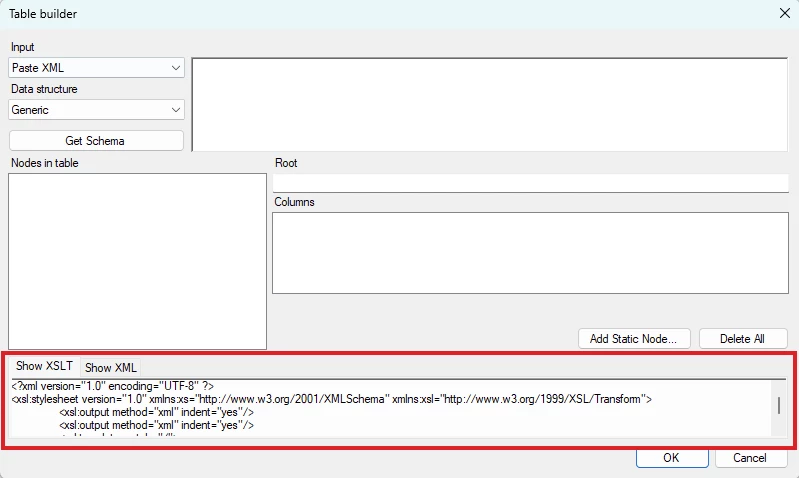
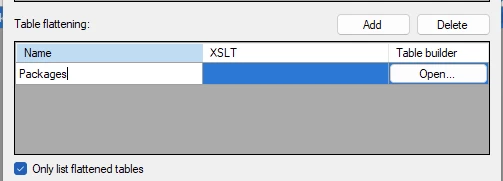
Apply general Table Flattening to align endpoints. Click on the Table Flattening button and click Add. Set the Name field to {TX_EndpointName} and click Open… button under Table builder. In the area in the bottom Show XSLT area. Apply the following query.
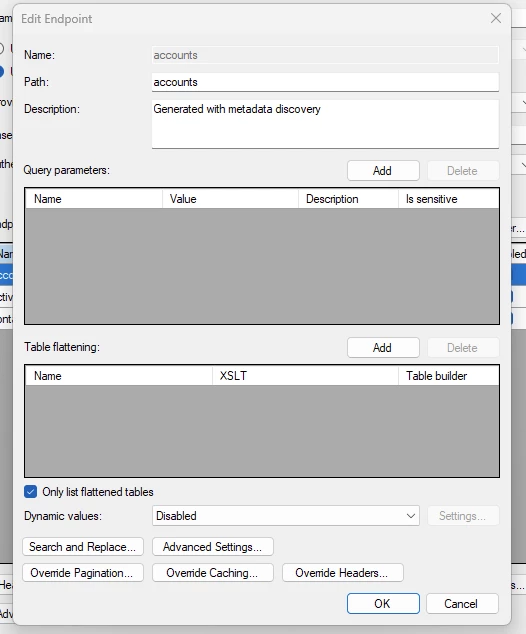
Change the endpoints to only use the table flattening. Edit each endpoint and check the Only list flattened tables.
Now when you synchronize it only shows the Table Flattening of the endpoints.
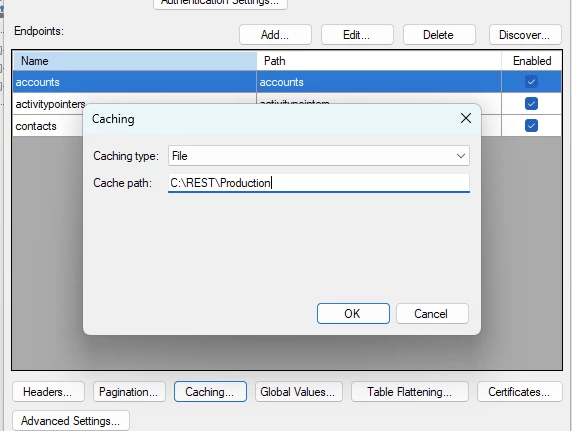
If tables use special setups not hit by the general Table Flattening setup. Start by turning on Caching to a file
And synchronize the data source. Check if the files for each endpoint is generated and is larger than 1kb.
Edit an endpoint without a correct table and click on Add besides Table Flattening. Give it a name and click Open.
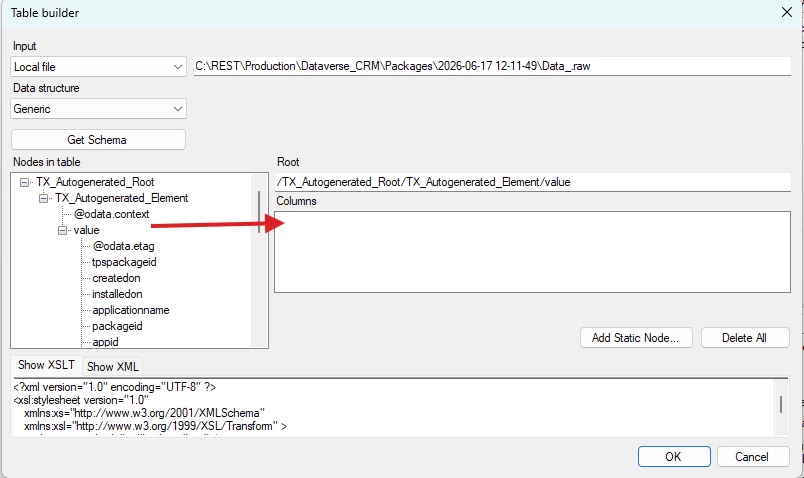
In the menu, set the Input field to Local file, import a path to a raw cache file and click on Get Schema.
Set up the flattening by dragging in the repeat level to the root and dragging in the fields from the same level. Once you are done, click OK to accept the setup and Synchronize to see that it now exists as a table flattening.
Troubleshooting
401 Unauthorized when testing the connection
This typically means the client secret is wrong, expired, or was not copied correctly. Verify the Client Secret value in your Azure AD app registration. Also confirm that the Tenant ID and Client ID match the registered application. If the secret has expired, create a new one under Certificates & secrets.
403 Forbidden — token acquired but Dataverse rejects the request
The Azure AD application has a valid token but the Dataverse environment does not recognise it as an authorised user. This almost always means the application user was not created in the Dataverse environment (Section 1, Step 4), or the application user has no security role assigned. Open the Power Platform admin center, confirm the application user exists, and that it has at least one security role.
Token URL error — "AADSTS700016: Application not found"
The Application (client) ID in the Token URL or Client ID field does not match any registered application in the specified tenant. Double-check both the Tenant ID (Directory ID) and the Client ID from the app registration overview page.
Entity list is empty or does not load in the table browser
If the entity browser opens but shows no entities, the most likely cause is that the application user has no security role that grants read access to any Dataverse tables. Assign at least the Basic User role in the Power Platform admin center and try again. If the browser does not open at all, verify the base URL is reachable and that the connection test passes first.
Admin consent not granted — permission error during token request
If admin consent was not granted for the Dynamics CRM permission, the token request will fail with a consent-related error. In Azure AD, go to your app registration → API permissions and click "Grant admin consent for [tenant]". You must be a Global Administrator or Privileged Role Administrator to complete this step.
Connection test passes, but no data is returned from a table
The application user may have an empty security role that does not include read access on the queried entity. In Dataverse, security is table-specific. Open the security role assigned to the application user in the Power Platform admin center and confirm that read access is granted for the relevant tables.