

Complete the steps below to use Azure Analysis Services as a target for the Semantic Model Endpoint (Analysis Services Tabular) within your Deliver instance.
Prerequisites
If you created your own application server (not from the Azure Marketplace Template), then you will need to download and install the AMO library which can be found here: Analysis Services Data Providers
Create an Analysis Services Resource in Azure
If you already have an Analysis Services in Azure then you can skip this step.
- Azure Portal > Create a new Resource > Analysis Services > Create
- Assign the Server Name, Subscription, Resource group, and Location.
- Once deployed, open the resource and note down the Analysis Services Server Name which will look like this: asazure://eastus.asazure.windows.net/xxxxxx
Create an App Registration
In order to access the Analysis Services resource from TimeXtender Data Integration, you will need to configure an App Registration in the Azure Active Directory.
- In the Azure Portal menu, click on Azure Active Directory, then click on App Registrations in the menu bar on the left. Then click New Registration.
- Enter a name and select Accounts in this organizational directory only. The value of Redirect URI is the URL at which your application is hosted. Click Register when you are done.
- For the newly added App Registration, select Certificates & secrets to create a New Client Secret. This key is encrypted after save, so it needs to be documented somewhere safe. The secret will appear after you click Add.
- Please note the following properties of the App Registration which will be needed later:
- Application ID
- Client Secret (Application Key)
Assign the App Registration as Analysis Services Admin
This step must be completed using SQL Server Management Studio.
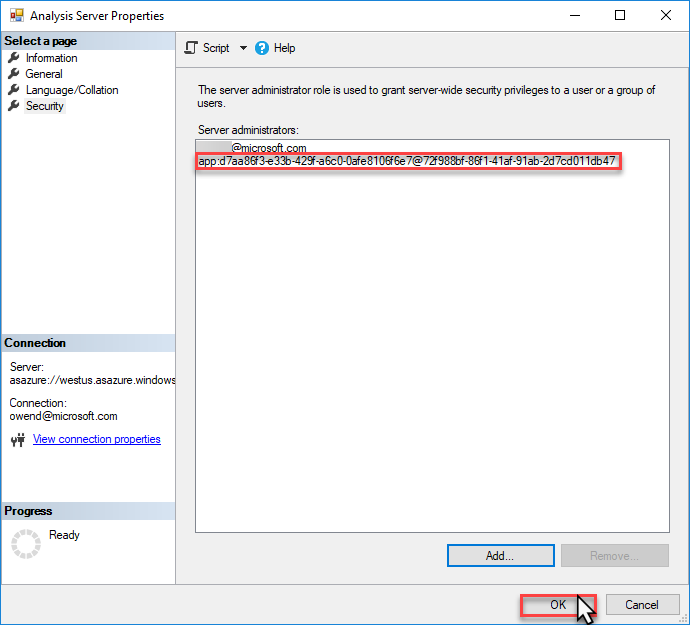
- In SSMS, connect to your Azure AS server.
- In Server Properties > Security, click Add.
- Type the name of your app registration in the the search box and click search.
- Click the app registration as it appears in the list, click Add.
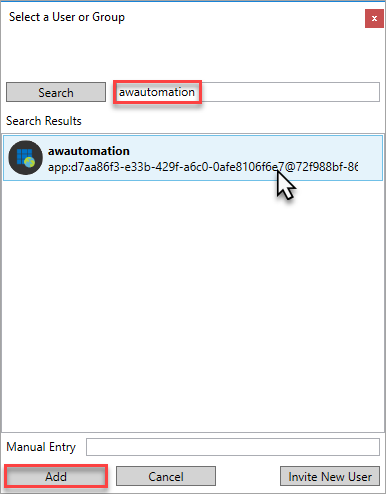
- If your App registration is not visible in search result, you may enter it manually using the following format: app:<app-ID>@<tenant-ID>
Verify the service principal account ID, and then click OK.
Add Tabular Endpoint
Sign in to the TimeXtender Portal, go to Data Estate > Instances, click Add instance > Add Deliver instance
Refer to Add Deliver Instance “Tabular” section for details on connection options.
Note: You need the Data Estate Admin permission to configure instances. Review and set permissions using the Profile & preferences page.
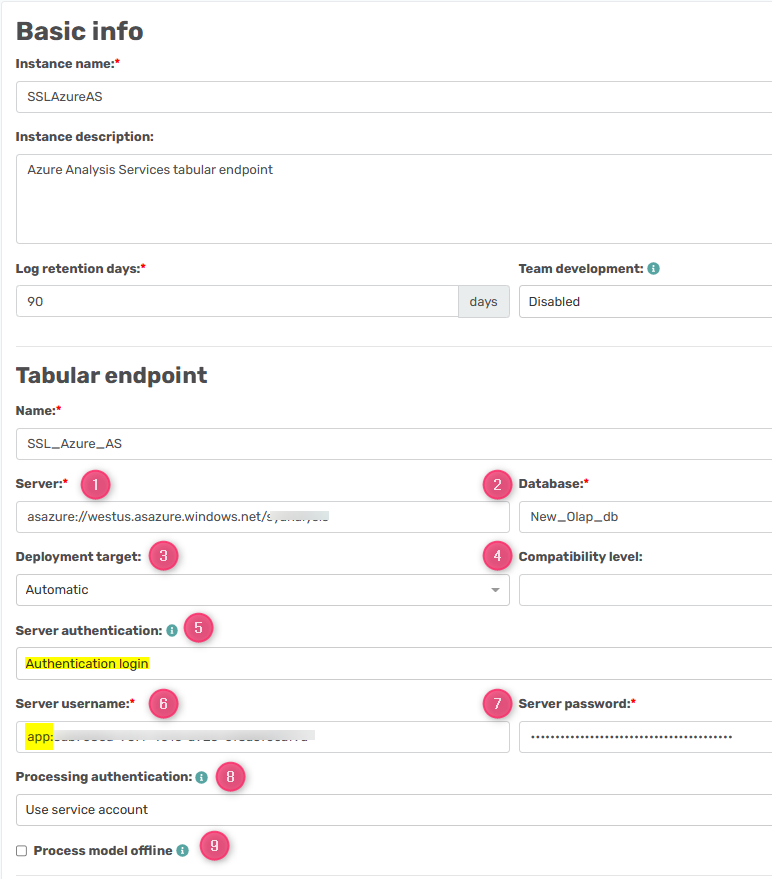
- In the Server box, type the fully-qualified name of your Azure Analysis Services.
- In the Database box, type the name of the database (new model to be created).
- In the Deployment target list, click the version of SSAS you are targeting. Automatic (default) or Analysis Services Universal are the recommended settings.
- In the Compatibility box, type the compatibility level you want to use, or leave it blank to use the highest supported by the server.
- Set Server authentication to authentication login
- In the Server Username box, type the App Registration (created above), using app:<app-ID> format .
- In the Server Password box, enter the secret for App Registration
- In the Processing Authentication list, select how the Tabular service will connect to the data warehouse.
- Click Service account to use the SQL Server Analysis Services service account.
- Click Windows user to use another user and then enter the user name for the user in the Username box and the corresponding password in the Password box.
- Select Process model offline to process the model "behind the scenes" and make the deployment seamless for the users. The offline database will have the endpoint's name prefixed with "Offline_".
Run TimeXtender Data Integration, click on “refresh” button on the menu bar to see the new Deliver instance you added above.
You can now drag objects from Prepare instance to the Deliver instance, then Deploy & Execute your Deliver instance. On deployment, the model is created on the SSAS Tabular server. To get data in the model, you need to execute the model as well.
Enable use with SQL Managed Instance or On-Prem SQL Server
Note: If you are not using Azure SQL Managed Instance or an On-Prem SQL Server, you can skip this step.
If using Azure SQL Managed Instance for your Data Warehouse, you must configure one of the two following options to connect to Azure Analysis Services:
- Configure public endpoint (Easiest option - Recommended)
- Use an On-premises Data Gateway
When using an On-Prem SQL Server for your Data Warehouse Use an On-premises Data Gateway
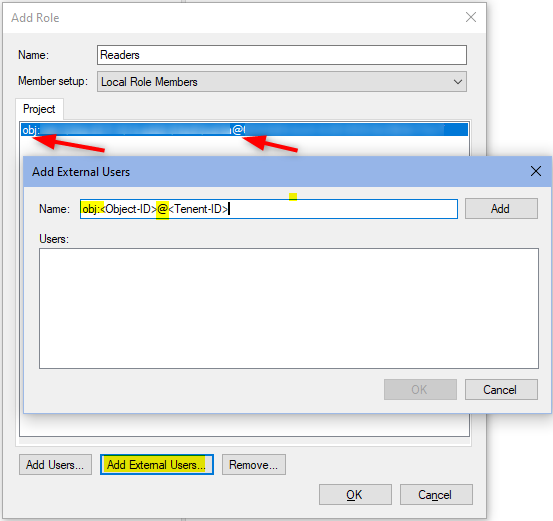
Provide Users Access to the Model
Just like in SQL, Analysis Services requires user permissions to access the model. This is done by adding user's e-mail address, or you can add Azure User Groups as defined below:
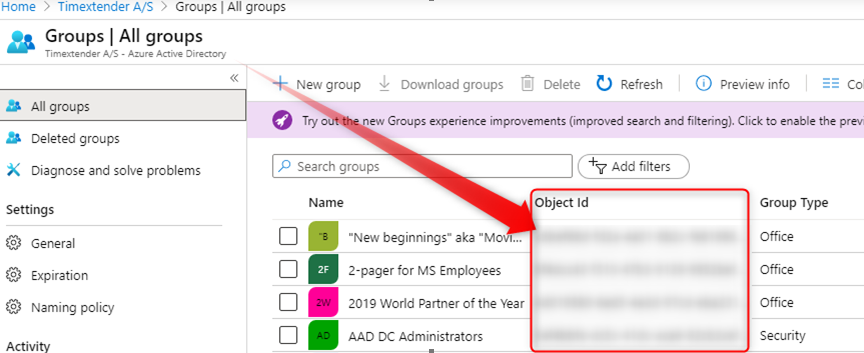
- Identify Azure Active Directory Group Object IDs as shown below:
- In TimeXtender Data Integration > Deliver Instance > Role > Add Role > Add External Users, use the following format: obj:<Object-ID>@<tenant-ID>
Troubleshooting
Error: Unable to obtain authentication token using the credentials provided.
If your Active Directory tenant administrator has configured Multi-Factor Authentication or if your account is a Microsoft Account, please remove the user name and password from the connection string, and then retry.
You should then be prompted to enter your credentials.
Symptoms: You are trying to authenticate an Azure Active Directory user, who is granted access as Analysis services Admin, but unable to authenticate and deploy the models. You receive this error:
Root cause: This scenario will only work for Active Directory user accounts that do NOT use 2-factor authentication. So, you have to implement one of the following 2 options:
- Create a new (special) Active Directory user account which does NOT use 2-factor authentication, for endpoint connection.
- Create an app registration and implement all steps as described above in this guide
