

Azure SQL Database Overview
Azure SQL Single Database is a fully managed, database-as-a-service in the Microsoft Azure Cloud. This service runs the latest SQL Engine, requires no patches or updates, and can be deployed in minutes.
For development workloads, configure using the General Purpose Service Tier with Serverless Compute Tier for automatic scaling and cost optimization.
For production workloads requiring heavy log and IO throughput, the Hyperscale Service Tier with Premium-series hardware delivers maximum scalability and best-in-class transaction log performance ideal for data warehousing operations.
Note: Multiple data areas (e.g. DSA and MDW) can be configured in one Prepare instance using the same Azure SQL database.
1. Configure an Azure SQL Database
Development Environments:
- Create an Azure SQL Database as storage for your Prepare instance. Using the General Purpose Service Tier with Serverless compute, the database automatically scales and pauses based on workload, providing cost-effective resource management with minimal storage costs when inactive.
Production Environments:
- For production workloads, utilize the Hyperscale Service Tier with Provisioned compute and Premium-series Hardware configuration. Hyperscale with Premium-Series hardware provides the best Log throughput (150 MiB/s) of any SQL DB tiers, delivering optimal performance for TimeXtender ETL workloads that require intensive data warehouse operations.
Note: Two deployment considerations for TimeXtender Data Integration:
- Development Workloads: Initial execution may fail when serverless is paused - configure retries with 2-3 minute delays in your execution package to handle database resume operations.
- Production Workloads: Repeat executions may fail when serverless is scaling due to processing speeds at lower vCores. Configure Min vCores to match Max vCores to prevent scaling-related connection drops, or implement the Orchestration Cloud Optimizer to trigger scale operations before scheduled executions.
2. Configure SQL users & Permissions
You will need to create users in Azure SQL Database with the necessary permissions. Alternatively, you can use Azure Active Directory.
3. Setup an Instance with Azure SQL Database as storage
Create an Ingest instance or a Prepare instance using the relevant guide below, for the server name enter the
For the server, copy the server name provided in Azure.
4. Allow read access to the Database
The first step in the process is to give admin privileges to the user making the initial changes.
- Identify the SQL Server in your resource group where the database is.
- Inside the SQL Server resource click on the Azure Active Directory in the settings tab
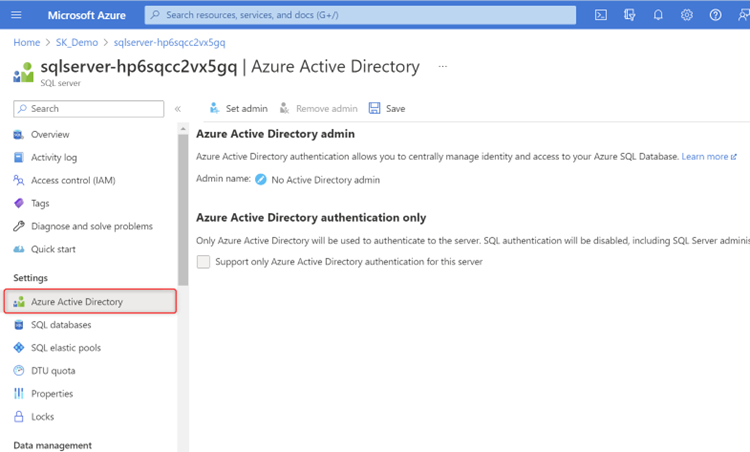
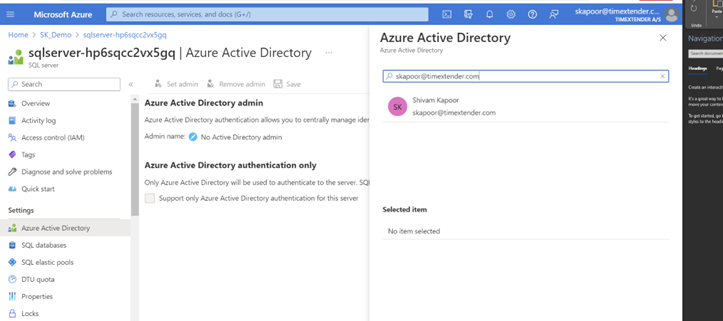
- To set your user as the admin click on the Set admin option > Search and select the name in the dialogue box.
- In your SSMS Login to the Azure SQL as the Azure Active Directory admin specified above
- Run the below script in SSMS connected to the same Azure SQL database
CREATE USER [Azure AD Group Name] FROM EXTERNAL PROVIDER; - In TimeXtender Data Integration, open the Prepare instance, expand Security right click on the Database Role to Add: Add Database Role-> Add Manually-> Please enter the same AD Group Name used in the SSMS
- To Provide the users in the Group access to only the valid schemas, right click Database Roles > Object Security Setup > Click on Schemas and check user Access Role to the valid schema.
- Deploy the security tab
Optionally, to give the users read access to all the tables in the database, run the below script in SSMS
EXEC sp_addrolemember 'db_datareader', ‘AD Azure Group’;
