

Note: Azure Synapse Dedicated SQL Pool Storage is available as part of the Standard, Premium or Enterprise Package
Azure Synapse Dedicated SQL Pool (Previously Azure SQL Data Warehouse), is a massively parallel processing database which you can use as Prepare instance storage. Click here to learn more: What is Azure Synapse Dedicated SQL Pool?
Create an Azure Synapse Dedicated SQL Pool
You can view the Microsoft documentation on how to create an Azure Synapse SQL Pool. However, the basic steps are listed below:
- In the Azure Portal, click "Create a Resource" and type "Dedicated SQL Pool"
- Use an existing Azure SQL Server or create a new Azure SQL Server.
- Take note of the SQL Server Admin Username & Password.
- Create a Server Level Firewall Rule
- In the Azure SQL Server, click Firewalls and virtual networks, click Add client IP, and click save.
Connect to the Server
- Get the fully qualified server name
- On the Synapse Dedicated SQL Pool resource Overview page, find the "Server Name" and click copy.
- Using SQL Server Management Studio, connect to the database
- Server name: fully qualified Server name
- Database: name of the Dedicated SQL Pool
- Username & Password: use the SQL Server administrator
Create SQL Server Logins
Create SQL Server Logins by running queries on the database using SQL Server Management Studio. (More Info here). Sample statement:
--Create SQL Server Login in the Master Database
USE MASTER
CREATE LOGIN USERNAME
WITH PASSWORD = 'STRONGPASSWORD';

--Create User in the desired Data Warehouse
USE --***Insert Database Name Here***
CREATE USER USERNAME FROM LOGIN USERNAME;

--Assign User to the desired role in the Data Warehouse
EXEC sp_addrolemember 'db_owner', 'USERNAME'
Assign users to a Resource Class
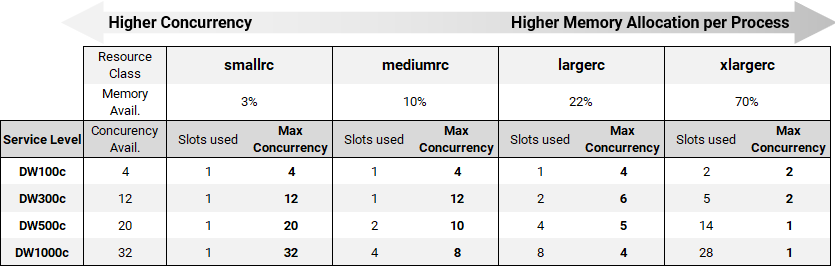
By default, each user is a member of the dynamic resource class smallrc. However, it is recommended to adjust your resource class depending on the workloads you will be performing (more about Resource Classes here). Keep in mind that while the smaller resource classes have a smaller percentage of memory, the max concurrency is higher. However, the xlargerc class may use up to 70% of available memory but it will only be able to run 1-2 jobs concurrently.
Note: Be mindful of the concurrency limits of your resource class when configuring max threads of your TimeXtender Data Integration execution packages.
Sample Statement:
EXEC sp_addrolemember 'mediumrc', 'USERNAME'Create a Master Key
(more about Master Keys here). Sample Statement:
CREATE MASTER KEY ENCRYPTION BY PASSWORD ='STRONGPASSWORD';Configure Dedicated SQL Pool Storage
-
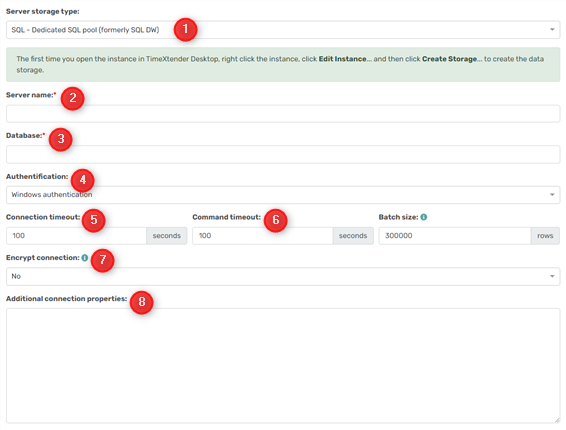
In the Add Prepare instance menu in the portal, select the Server Storage Type: SLQ - Dedicated SQL Pool
-
In the Server name box, type the name of the server that you want to store the database on. If it is a named instance, type the server name and the instance name.
-
In the Database box, type the name of the database you want to create.
-
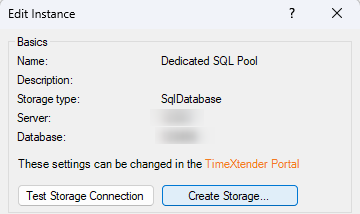
TimeXtender Data Integration will create this Database for you, later in the Desktop click Edit Instance... and click Create Storage… See Below
-
-
In the Authentication list, click the mode of authentication you want to use. You have the following options:
-
Windows Authentication: Use the logged-in Windows user's credentials for authentication.
-
SQL Server Authentication: Use a login set up on the SQL Server. Enter the username and password in the corresponding fields.
-
Azure AD Password Authentication: Use Azure AD credentials from a domain that is not federated with Azure AD. Enter the username and password in the corresponding fields.
-
Azure AD Integrated Authentication: Use the logged-in Windows user's credentials for authentication, provided that he is logged in using Azure AD credentials from a domain that is federated with Azure AD.
-
-
In the Connection timeout box, enter the number of seconds to wait before terminating the attempt to connect to the server. Set it to 0 to wait indefinitely.
-
In the Command timeout box, enter the number of seconds to wait before terminating a command. Set it to 0 to wait indefinitely.
-
In the Encrypt connection list, you can enable encryption of the connection, which is recommended when you are not in a private network (e.g. when your server is on Azure). You have the following options:
-
No: The communication is not encrypted (default).
-
Yes: The communication is encrypted. The server's certificate is verified by a certificate authority.
-
Yes, trust server certificate: The communication is encrypted. but the server's certificate is not verified. This setting is not recommended for use on public networks.
-
-
(Optional) If you need a connection string with properties not found in the UI, you can enter it in the Additional connection properties box. It will override the data in the other boxes with connection information.
Create Storage & Required Objects
-
Open the Prepare Instance
-
Right-click the Instance > Edit Instance > Create Storage…
-
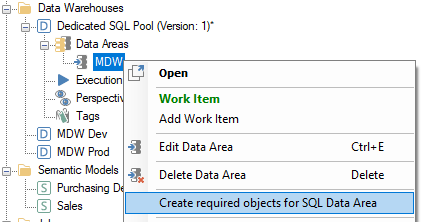
Right click on the Data Area > Create required objects for SQL Data Area
Troubleshooting
Error: An error occurred during executing this statement \r\n DELETE FROM [dbo].[TimeXtenderExtendedProperties]…
-
Right-Click on Prepare instance in TimeXtender Data Integration > Create required objects for SQL DW as indicated in step 2 above.
Error: Please create a master key in the database or open the master key in the session before performing this operation.
-
You need to create the Master Key by running the SQL query directly against the database.
-
More info in step 3 above.
