


TimeXtender Data Integration (TDI) includes security functionality that provides a way to set access permissions for objects within a data area. Access permissions can be set for specific views, schemas, tables, as well as individual table columns. Row level permissions can be configured for those objects within a data area.
The Security folder in the data area tree contains all of the security setups. Right-click on the Security folder to see the options needed to configure a new security setup, which is done two general steps:
- Create a database role based on an SQL Server login.
- Use the database role to set up either object level or row level security.
According to step 1 above, creating a Database Role in the data area is a prerequisite for configuring object level permissions. Click on the following link for a detailed explaination of creating a database role.
Assigning Object Level Permissions to Database Roles
Permissions for database roles can be set on objects for database to create object level security.
TDI uses the same allow/deny settings as SQL Server. Select from one of the three possible permission settings below.

- Not set (gray dot): The database role is not allowed to access the object but is not explicitly denied access.
- Grant (green with a white checkmark): The database role is granted access to the object. However, if a user is a member of another database role that is denied access, then the user will not have access to the object.
- Deny (red with white bar): The database role is denied access to the object. Even if a user is a member of another database role that allows access, the user will still be denied access.
Since tables may be a mix of different settings, the permission icon for tables may reflect this by being split down the middle and displaying two different icons side by side. The mixed states icons are shown and explained below.
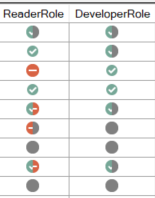
- Partially Granted (green and gray icon). The database role is granted access to some but not all of the table columns. Note that this icon may appear even when the database role is granted access to all of the table columns, as granting access does not automatically set Allow on the table level.
- Partially Denied (red and gray icon): The database role is denied access to some but not all of the table columns. Note that this icon may appear even when the database role is denied access to all of the table columns, as denying access does not automatically set Deny on the table level.
- Mixed Grant/Deny (red and green icon): The database role is granted access to some of the table columns and denied access to other columns.
Use the following steps to assign object-level or column-level permissions to database roles for tables.
- Under the data area, right-click the Security folder and select Object Security Setup to open that window.
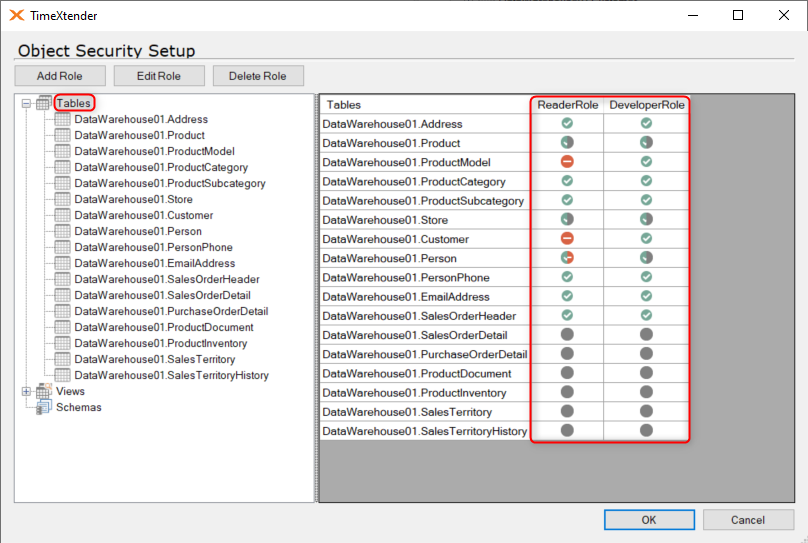
- In the tree on the left, click on either Tables, Views, or Schemas to select the type of object to set up access for. Expand Tables and select an individual table to assign object or column level permissions on that table.

- On the right-hand side, the objects are listed out showing their names and the round icon in the MyRole column indicates their current role permission setting. Click the icon to toggle through the three types of access settings of “Not Set”, “Grant”, and “Deny”. Setting column-level permissions on a table will overwrite any current object-level permissions that have been set.
- (Optional) Click Add Role, Edit Role, or Delete Role to add, edit or delete database roles as needed.
- Click OK to save changes and close the window.
In addition to being used to create object level permissions, database roles can also be used to create row level Permissions. Click on the following link to open the article regarding the configuration and setup of row level permissions.
