

Customized Code and Custom Scripting can be incorporated into your Data Warehouse as needed, but should only be used when other TimeXtender Classic functionality is unable to accomplish your data sourcing and transformation tasks. Depending on how it is used, customized code may impact TimeXtender Classic’s ability to perform the following:
- Managed execution based on object dependencies.
- Code maintenance.
- Documentation.
- Data lineage.
Custom Scripting supports User Defined Functions, Stored Procedures, Script Actions, Code Snippets, and Custom Code. Global Project Variables can also be created for use in custom scripts. The following is an outline of the functionalities that incorporates custom coding and scripts, listed out in the order of those that are relatively simple and easy to deploy, and ending with a more advanced section that explains how to add custom coding to the stored procedures and transformation views that create and comprise a data area table.
- Add a Custom View as a Table Insert
- When to use Stored Procedures and User Defined Functions over Script Actions alone
- Add a Script Action
- Adding a Script Action to a table as Pre- or Postscript
- Adding customized code to a table
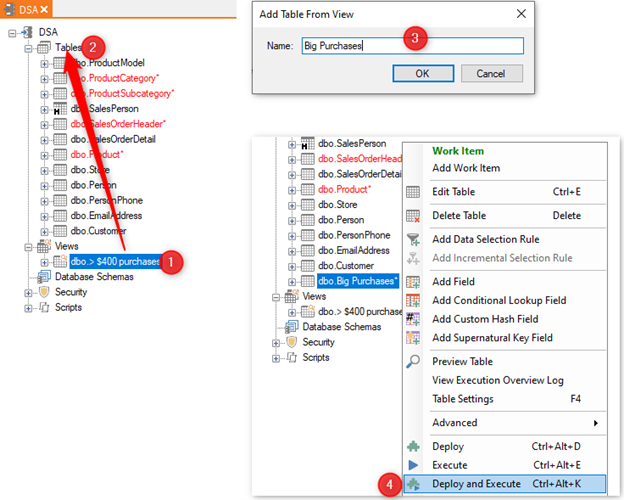
Add a Custom View as a Table Insert
Custom views are a means to implement custom code that can be relatively easy to maintain as field mappings can be set and parameters can be used. A Custom view is a better practice than using a Custom Table Insert, which will not maintain data lineage.
- First create the Custom View.
- Right-click the view and select Map Custom View fields to set up field mapping, which will maintain data lineage.
- Drag the custom view onto your data area
- Provide a Name for the table
- Deploy and Execute to enact the changes
The following link has more detailed information on creating Custom Views:
When to use Stored Procedures and User Defined Functions over Script Actions alone
Script Actions are blocks of code that can be saved and run before or after a specific step during Execution.
Stored Procedures (SPs) and User Defined Functions are generally only used in edge cases such as supporting an 3rd party or external components. For example, you may use an SP to make an external call, or setting up special rights and links to a DLL for advanced calculations or program calls.
Stored Procedures are stored in the SQL Server, and compiled the first time that they are run. The execution plan can be reused when running the SP several times, which means faster execution compared to Script Actions. Script Actions are compiled every time they are run, which means that SPs are preferred over Script Actions for processing large amounts of data.
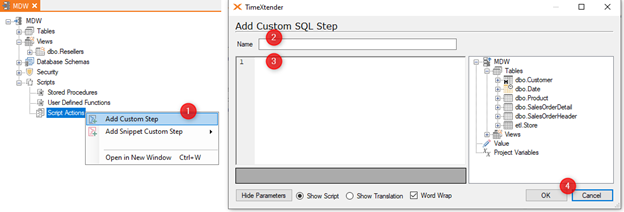
Add a Script Action
- Select Add Custom Step from Script Actions under Scripts in a data area
- Provide a Name
- Enter your SQL script in the textbox, using objects in the right-side pane
- Click OK
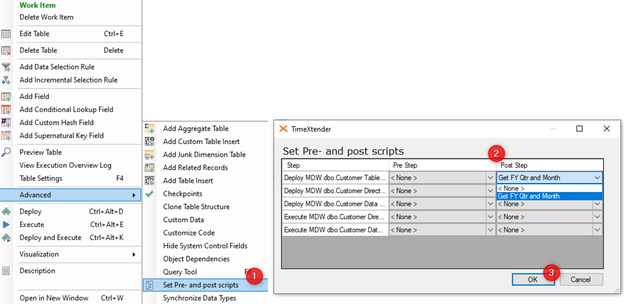
Adding a Script Action to a table as Pre- or Postscript
Prescripts and postscripts are scripted actions that can be configured to run as part of a deployment or an execution, with prescripts being run before the deployment or execution and postscripts being run after.
- Select Set Pre- and Postscripts under Advanced on a table to use the Script Action
- Use the dropdown menus Pre Step and Post Step to select when a Script Action or Custom Step should be triggered
- Click OK.
Adding customized code to a table
TimeXtender Classic autogenerates the stored procedure based on all the settings that have been configured, and will maintain or amend this stored procedure based on new configurations to the data area. If you choose to customize this stored procedure, then TimeXtender Classic will not be able to maintain this stored procedure going forward and any updates to it will need to be done manually. For this reason, customizing stored procedures are generally considered to be the last or final option when setting up a data area.
With those caveats in mind, TimeXtender Classic does provide a way for an instance to integrate "hand-written" code that is used to customize the data cleansing procedure and a transformation view for a given table.
Use the following steps to deploy customized code for a given table:
- Right click the table > Advanced > Customize code.
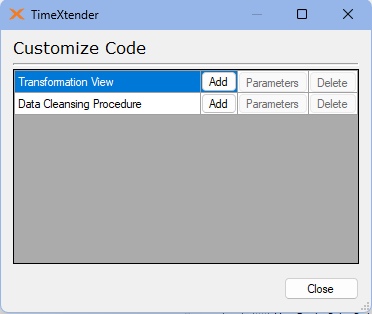
- Click the Add button to the right of the step to be customized, which will open the Choose Editor window.
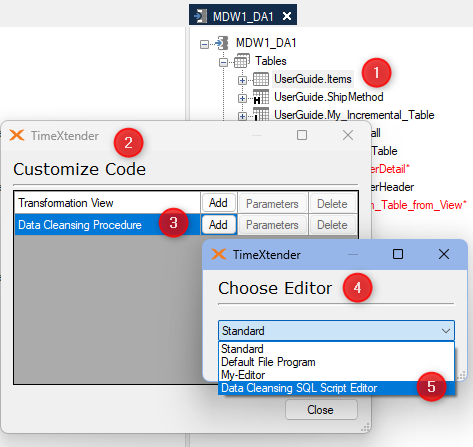
- In the Editor Name list, the following options are available:
- Standard is the basic built-in editor.
- Default File Program is the program that is set to open files of the type in question. For the data cleansing procedure and the transformation view, the file name extension is .sql.
- Any custom editors that have been added (see Managing Custom Editors).
- If the Standard editor is chosen, the Edit window will open. Once the code editing is complete, click OK to confirm the edits.
-
If a custom editor is chosen, TimeXtender Classic will open the code in the chosen editor. After editing the code, save the changes and close the editor. The Custom Code Editor window will be open in TimeXtender Classic.
Click Import to import the changes made in the custom editor into your instance.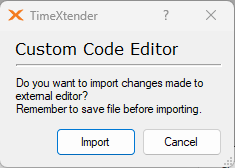
- When returning to the Customize Code window, note that Parameters (if applicable) and Delete can now be clicked. Click Delete to remove the customization and return to having TimeXtender Classic generate the code. Click Parameters to decide which parameters are sent to the code on execution.
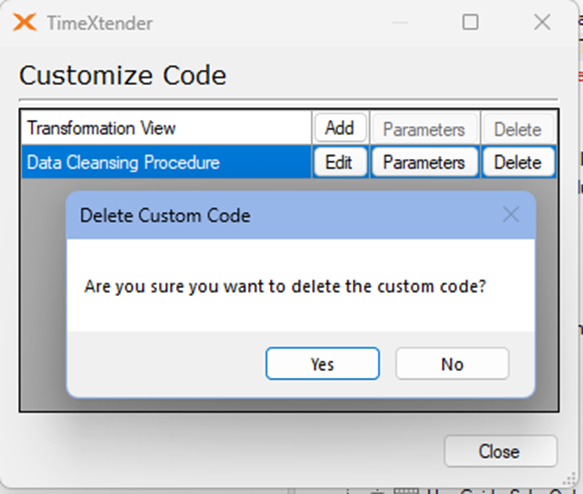
- Click Close to close the window.
Note: When editing the data cleansing procedure or the transformation view, make sure to have a Create Procedure or Create View declaration in the code with the exact same name as TimeXtender Classic would have used. This will invoke the correct code during execution. It is best to simply keep the first line of the code generated by TimeXtender Classic to ensure that the proper declaration is included.
Managing Custom Editors
To add, edit or delete a custom editor
- On the Tools menu, click Options. Click the Custom editors tab in the Options window that appears.
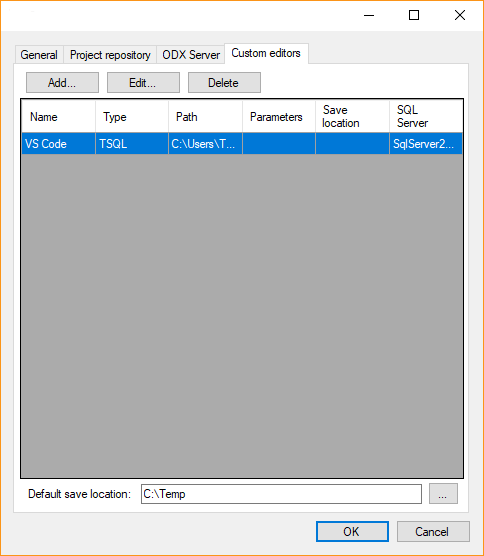
The list of custom editors is displayed. In the Default save location box, you can type the path to the folder where the custom code files are temporary stored (or click the folder icon to open a browse dialog).
To edit the settings for a custom editor, select the editor in the list and click Edit.
To remove a custom editor from the list, select the editor and click Delete.
To add a custom editor, follow the steps below:
- Click Add. The Add custom editor window appears.
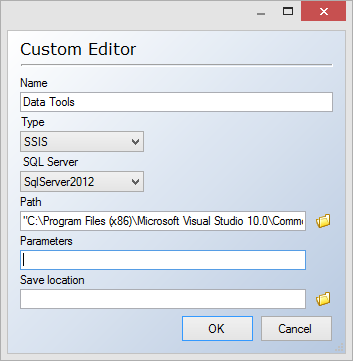
- In the Name box, type a name for the editor.
- In the Type list, click the type of editor you want to add. Choose TSQL if you want to use the editor with data cleansing procedures and transformation views and SSIS if you want to use it with SSIS packages.
- In the SQL Server list, select the SQL Server version that you are using. Currently, this setting is only used for custom editors for SSIS packages. When you want to customize the code for a SSIS package, TimeXtender checks what version of SQL Server the table is stored on. You will only be able to select editors that are marked compatible with that version of SQL Server.
- In the Path box, type the path that TimeXtender should call to start the program (or click the folder icon to open a browse dialog)
- In the Parameters box, type any additional parameters for the program.
- Optionally, in the Save Location box, type as save location for the editor (or click the folder icon to open a browse dialog).
- Click OK to add the custom editor.
Project Variables
Project variables allows you to save information in project-wide variables. This is useful when you need to distinguish different environments in a script or
The value of a given variable is determined when you deploy the object that uses the variable. As such, when you have changed a variable it is important to deploy the objects that uses this variable. The exception is when you use project variables with customized code. Here, the value of the variables is determined on execution.
The variable does not have a specific data type. If, for instance, you want to use the variable as a string, make sure to enclose the variable in quotes in the script.
Adding a Project Variable
To add a new project variable, follow the steps below.
- On the Tools menu, click Project Variables. The Project Variables window opens.
- Click Add. The Add New Variable window appear.
- In the Name column, type a name for the variable.
- In the Type list, click the variable type you want to use. You have the following options:
- Fixed: A fixed string.
- System: One of the following system properties:
- MachineName
- EnvironmentName
- UserName
- UserDomainName
- Source Scope: A property of the source of the current object. For instance, if you use a source scope variable in a custom transformation rule on a table in the data warehouse, the variable will have the value of property on the relevant staging database. Since different possible sources have different properties, the variable might not always have a value. Examples of properties include Database Name, API Version, Host, File Name.
- Destination Scope: A property of the destination of the current object, similar to source scope.
- Contextual Scope: A property of one specific element in the project, such as database name on a particular staging database.
- Dynamic: The value of the variable is generated by a custom script you written.
- If you are adding a dynamic variable, in the Resolve Type list, select when you want to resolve the value of the variable. You have the following options:
- Every Time: Resolve the value every time the value is used.
- One Time: Resolve the value when the variable is used for the first time and reuse the resolved value for the following uses until the project is closed.
- Each Batch: Resolve the value once for each batch, e.g. an execution.
- If you are creating a Contextual Scope variable, click the object you want to use in the Context list.
- If you are adding a Source or Destination Scope variable, click the Value Filter list and click the type of object you want to see available properties for in the Value field.
- If you creating a fixed variable, enter the value of the variable in the Value field.
- OR -
If you are creating a dynamic variable, click Script Editor to open the standard script editor in TimeXtender and write the script that generates the value.
- OR -
If you are creating a variable of a type other than fixed or dynamic, in the Value list, click the property you want to use as a value for the variable. - Click OK.
Using a Project Variable in a Script Action, Custom Transformations and Custom Views
Project variables are available for use when writing script actions as well as custom transformation rules and custom views. The available variables are listed in the tree view in the right hand side of the editor window. Simply drag the variable in from the tree to use it.
Using a Project Variable with Customized Code
Project variables are available as parameters when using the customized code feature. To make a project parameter available in a customized step, follow the steps below.
- Right click a table with customized code. Click Parameters next to the step in which you would like to use a project parameter. The Execution Parameters window opens.
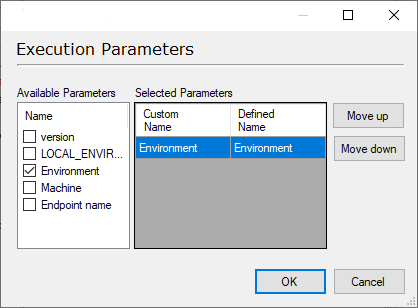
- In the Available Parameters list, select the variables you want to have available.
- (Optional) If you need to change the name of a parameter to match your custom code, double-click the parameter name in the Custom Name column to rename the parameter.
- Click OK.
