


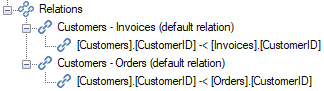
In Deliver instance tables, a relationship is a connection between two tables of data. The relation establishes a correlation between the data in the two tables defining how the data from each table will relate to the data in the other table. For example, a Customers table and an Invoices table can be related so that the customer name can be shown with an associated invoice.
The Relations folder in the table tree lists out all the relations for that table, which means that the same relation will be listed out under each of the related tables.
A newly created relation will have a default name of the two table names separated by a hyphen, but this default name can be amended as needed.
A relation is comprised of one or more relationship items, which are relationships defined between the corresponding fields that exist between tables.
Adding Relations
When adding relations, the available settings depend on the types of endpoints that have been selected for the Deliver instance.
Add a Relation for a Qlik endpoint
To add a new relation on a model where Qlik is the only endpoint type enabled
- Drag a field from one table on the model to a field on another table and click Yes when prompted to add the relation.
Add a new relation for SSAS Tabular, PowerBI Premium or Tableau
Use the following steps to add a new relation on a Deliver instance model where the enabled endpoint type is either SSAS Tabular, PowerBI Premium or Tableau.
- Drag a field from the first table to the corresponding field on the second table. If the cardinality of the tables involved is not “One-to-One”, drag from the "One" table to the "Many" table.
- In the Cardinality list, click on the option the represents the cardinality of the table relationship.
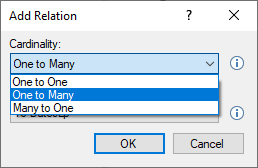
- In the Filter direction list, click on option you prefer:
- To [table]: [Table] is filtered by the other table in the relationship.
- To both tables: The tables filter each other.
Note: This setting applies to SSAS Tabular endpoints and PowerBI Premium only.
To add a new relation item to an existing relation
- Drag a field from one table on the model to field on another table and click on the existing relation in the menu that appears.
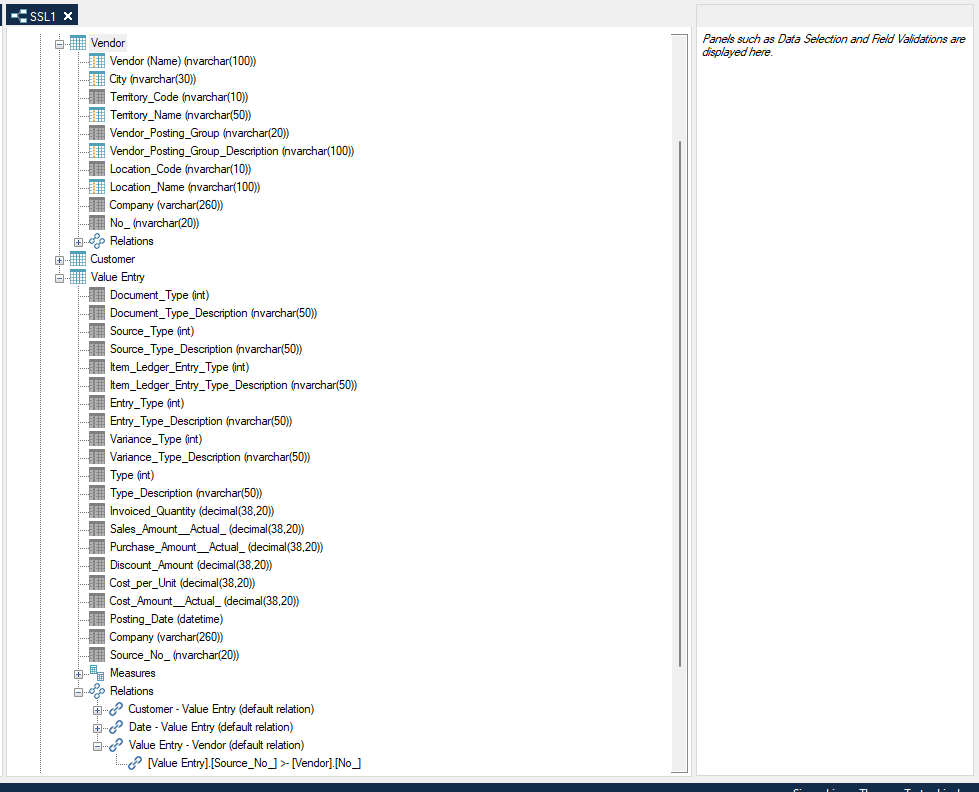
Changing the Default Relation
Multiple relations may exist between two tables. Setting a default relation is necessary in some endpoints.
Warning: If you receive an error message when trying to connect to your endpoint similar to “can’t determine the relationship between two or more fields”, then set a default relation and deploy and execute your Deliver instance
To set a relation as the default relation
- Right click the relation and click Set as default relation.
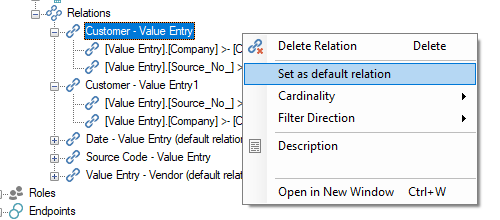
Changing a Relation's Cardinality
Note: This setting applies to SSAS Tabular, PowerBI Professional and Tableau endpoints only.
Each relation has cardinality. In the tree, the cardinality can be identified on the relation items as follows:
- --: One to one
- -<: One to Many
- >-: Many to one
To change the cardinality for a relation
- Right click the relation, click Cardinality and click on the cardinality you want for the relation.
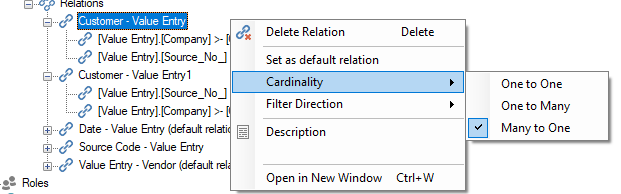
Changing a Relation's Filter Direction
Note: This setting applies to SSAS Tabular endpoints and PowerBI Premium only.
Each relation also has a filter direction. To change the filter direction
- Right click on the relation, click on Filter Direction and click on the filter direction you want to set for the table.
Using relations from Prepare instance to automatically set relations
If relations have already been created in the data area of a Prepare instance, then these relations may automatically be brought in when one of the data area tables are added to the Deliver Instance. In order for this to work, the dimension tables should first be added to the Deliver instance prior to adding the associated fact table.
The fields that comprise the relations do not need to be added themselves, the relations on the Prepare instance tables just need to be deployed prior to adding the tables to the Deliver instance.
The same holds true when adding the fact table. The specific fields in the relation do not need to be added themselves, and the relation should come over automatically.
When the fact table is added, a menu will be presented with all the existing relations and options are available to select which relations to use.
For example, if the fact table contains more than one date field, then the specific date field to use for the relationship with the date table can be selected.
Once this is complete, the fields used for the relations will be added as hidden fields.
Refer to the following short video for a demonstration of this process.
https://use.vg/RT7JQV
