


Relates to TimeXtender 6024.1 and later versions. The Ingest Instance Documentation feature was released in TimeXtender 6024.1
Generating Documentation
Documentation can be generated for Ingest instances, Prepare instances (as well as individual data areas within instances) and Deliver instances.
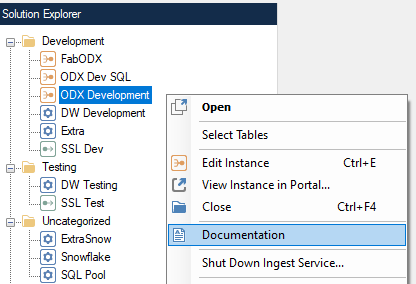
Ingest Instance Documentation
Right-click on the Ingest instance either in the Solution Explorer or in on the Ingest instance name once it is open in the TimeXtender Data Integration application and select Documentation.

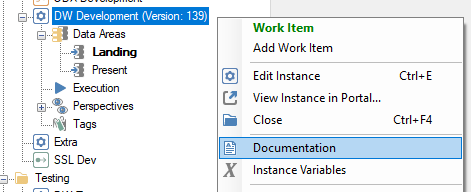
Prepare Instance Documentation
To generate documentation for all data areas within a Prepare instance, right-click on the Prepare instance in the left hand pane and select Documentation.
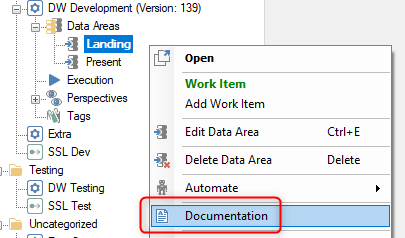
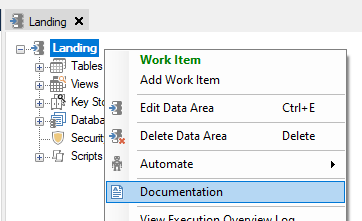
Data Area Documentation
To generate documentation for an individual data area within a Prepare instance, right-click on the data area in the Solution Explorer or on data area name once it is open and select Documentation.
Deliver Instance Documentation
To generate documentation for a Deliver instance, right-click on the Deliver Instance in the Solution Explorer and select Documentation.

Documentation Templates
- Right-click on the relevant instance and select Documentation as described above or select Generate Instance Documentation in the Tools menu
- Click Manage to select the template you wish to use and change settings for templates
- In the window that opens, click Add or click on the template you want to edit in the list
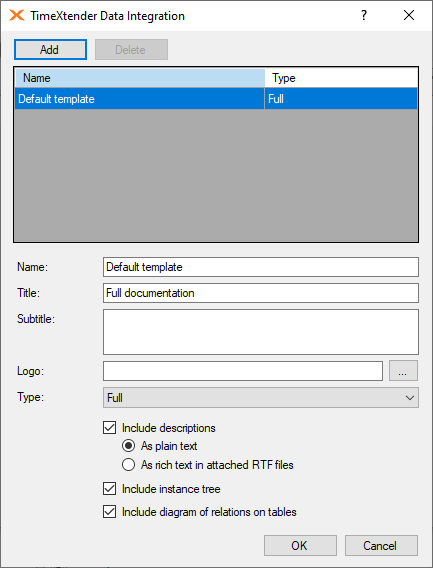
- In the Name box, type a name for the template
- In the Title box, type a title for the documentation
- (Optional) In the Subtitle box, type a short text to use as a subtitle for the documentation. The text will be displayed on the front page of the documentation
- (Optional) In the Logo box, enter the path to the logo you want to use. This will be displayed on the front page and in the header of the documentation
- In the Type list, click the type of documentation, Full or Data Impact you want the template to be
- If you have selected Full, the following options are available:
- Include descriptions: Include the descriptions of objects
- As plain text: Descriptions will be included in the documentation as plain text without any formatting
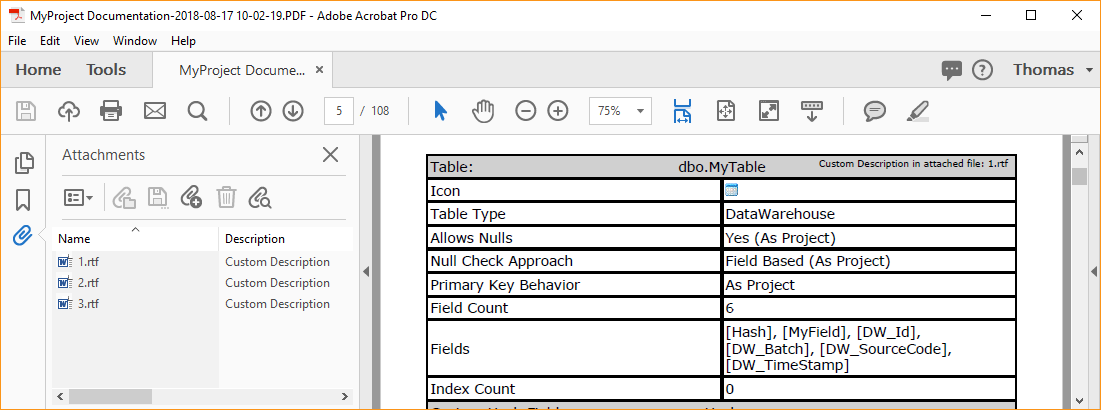
- As rich text in attached RTF files: Descriptions will be included in RTF files attached to the PDF with all formatting retained
- Include instance tree: include a rendering of the instance tree in the document
- Include diagram of relations on tables: Include a diagram for each table that show the table's relations to other tables
- Include descriptions: Include the descriptions of objects
- If you have selected Data Impact you should enter the tags you want the template to cover. Type a tag name in the box and click Add to add it to the list of included tags. Click OK
- To save your template without generating documentation, click Apply
Note: If you have chosen to include descriptions in attached RTF files, they can be found under Attachments in Adobe Acrobat Reader. A link to the relevant file is included with the documentation of the object it belongs to.
Documentation Settings
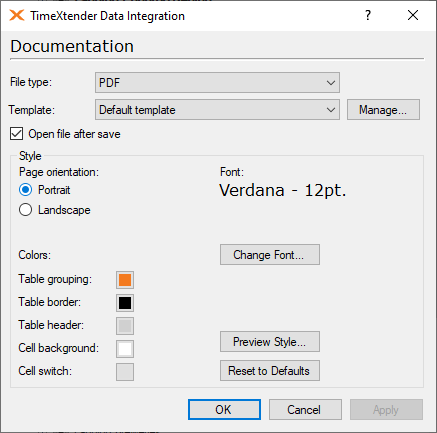
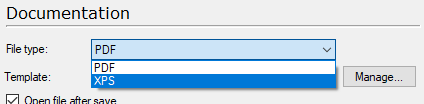
- In the File type list, click the file format you want to use
- In the Template list, click on the template you want to use
- Select Open file after save to view the document when TimeXtender has generated it. TimeXtender shows the document using external viewers that needs to be present on the machine.
- Under Style, you can configure the look of the documentation. The settings are saved in the repository and used for documentation as well as the files generated by Export Deployment Steps.
- Click Change font... to choose a font for the documentation. A preview is displayed under Font.
- Click the color preview next to the different color details to choose a color.
- Under Page Orientation, select the page orientation you want the documentation to use.
- Click Preview Style... to generate and open a sample file with the colors you have chosen.
- Click Reset to Defaults to reset the style settings to their defaults
- Click OK. In the window that appears, choose a file name and location for the documentation and click Save. The default name is the instance name followed by "documentation" and a timestamp
Generate Deployment Status Report
You can also generate a deployment status report that contains a list of the objects to need to be deployed. This can be done on an instance level, as well as a data area level.
Generating a Deployment Status Report
To generate a deployment status report for a part of or your entire project, follow the steps below.
- Right-click on the object you want to create the report for, and under Advanced, click Export Deployment Steps. The Export Deployment Steps window appears.
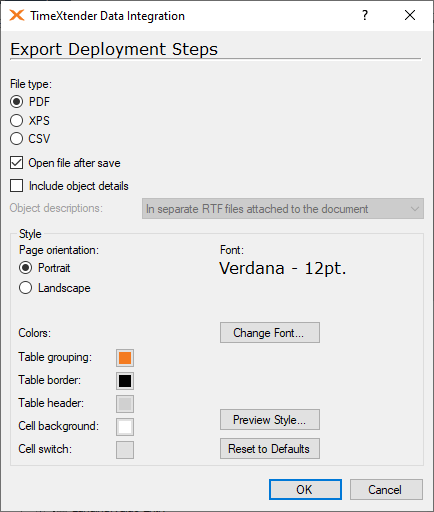
- Under File type, click the file format you want to use. If you choose CSV,
- Select Open file after save to view the document when TimeXtender has generated it. TimeXtender shows the document using external viewers that needs to be present on the machine.
- Select Include object details to include details of the objects that the steps that need to be deployed are part of.
- In the Object descriptions list, you can choose how you want to use include the object descriptions. You have the following options:
- In separate RTF files attached to the document: The descriptions are attached to the document as RTF files. This option is useful if you have used rich text formatting or added pictures to your descriptions, but only available for the PDF file format.
-
Only text placed in the document: The descriptions are included in the documentation as plain text.
-
No descriptions: The descriptions will not be included in the generated documentation.
- In separate RTF files attached to the document: The descriptions are attached to the document as RTF files. This option is useful if you have used rich text formatting or added pictures to your descriptions, but only available for the PDF file format.
- Under Style, you can configure the look of the status report. The settings are saved on a per-user basis and used for this as well as the files generated by the documentation feature.
- Under Page Orientation, select the page orientation you want the documentation to use.
- Click the color preview next to the different color details to choose a color.
- Click Change font... to choose a font for the documentation. a preview is displayed under Font.
- Click Preview Style... to generate and open a sample file with the colors you have chosen.
- Click Reset to Defaults to reset the style settings to their defaults
- Click OK. Wait while the steps are calculated. In the window that then appears, choose a file name and location for the report and click Save. The default name is the project name followed by "deployment steps" and a timestamp.
