


Pre-Upgrade Considerations
- It is not required to uninstall existing versions before upgrading.
- It is recommended to backup your repository database and all SQL databases in your project prior to upgrade.
- If you are moving to a new server or changing the database platform you should ensure all prerequisites are installed
Considerations for upgrading Multiple Environments
To handle a multiple environment transfer, the two environments involved in the transfer must be using the same version of TimeXtender Classic. Here is the recommended process for upgrading multiple environments.
- Upgrade Dev - Deploy, Execute, & Validate all is working.
- Upgrade Test - Deploy, Execute, & Validate all is working.
- Transfer Dev -> Test - Deploy, Execute, & Validate Test to ensure all is working.
- Upgrade Prod - Deploy, Execute, & Validate all is working.
- Transfer Test -> Prod - Deploy, Execute, & Validate Prod to ensure all is working.
Note: You can wait as long as desired between steps outlined above. However, they should be performed in the order specified above
Download & Install the latest version of TimeXtender Classic
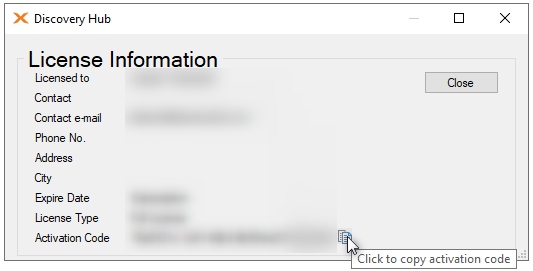
Activate the Software
Upon opening TimeXtender Classic, you will be prompted to activate the software with a license key. The license key for your current installation of TimeXtender Classic can be found under Help > License Information.
Note: If your application server does not have access to the internet then you will need an offline activation file. To obtain an offline activation file, send your request along with your license key and the version of TimeXtender Classic which is being installed to support@timextender.com
Import Settings from Previous Installation
Next, you will have the option to import settings from a previous version, such as repository database connection properties, accent color, and version detail prompts, etc.
Upgrade your Repository database
Once you connect to your existing repository you will be asked asked to upgrade your repository database. This process will make the necessary adjustments to the database to support the newest version as well as create a backup of repository database in case you need to roll back to previous version of TimeXtender Classic.
TimeXtender Classic will ask you to select the method for upgrading the repository. Web service is typically recommended, however, if your server does not have internet access use Local files.
Deploy, Execute, & Validate
At this point it is recommended to open your project and run a differential deploy and execute to ensure the changes to the project if any is updated. Run each area one at a time if the project is very large.
Review Performance Recommendations
Newer versions of TimeXtender Classic come with improved features and scripts to increase performance. The Performance Recommendations tool can analyze your project and provide recommendations using these new improved features.
Reconfigure your Services
If you have any running services in this environment now is the time to reconfigure those services.
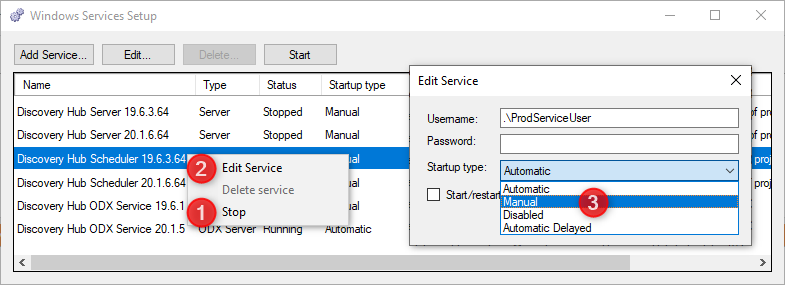
Click on the Tools menu > Windows Service Setup.
Stop any previous versions of the service
Once the windows service setup window opens, identify the scheduler service for the previous version.
- Right-click the previous version of the service > click Stop
- Rick-click the service again > click Edit Service
- Change the Startup type to Manual
- Note the Username of the Service account, you will use this in the next step.
Assign the Service Account to the correct Project Repository
New Installations of TimeXtender Classic point to a default Project Repository name. After upgrading you will need to ensure your service accounts are pointing to the correct repository database. The steps below explain how to link the service account with the correct project repository database.
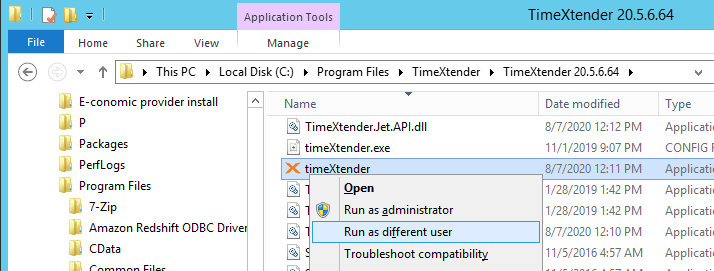
- Log into windows using the service account that will be used to run the service and launch TimeXtender Classic. Alternatively, you can navigate to the timextender.exe application file in the installation directory and press Shift+Right-Click and choose Run as different user.
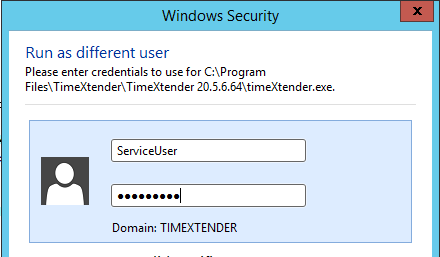
- Enter the credentials for the Service Account and click OK. This will run the TimeXtender application as the Service Account user.
- Once TimeXtender launches for the first time as this Server Account, you will have the option to import settings from a previous version. Select the previous version and TimeXtender will import the Repository connection settings as well.
- If you do not see this prompt, go to Tools > Options > Project repository and point to the correct project repository database.
- Close the TimeXtender application.
Start newly installed version of the service
- Identify the newly installed version of the scheduler service.
- Right click > Edit Service
- Enter the Username and Password of the service account
- Set the startup type as Automatic
- Check Start/restart service when I click 'OK'
- Click OK

Note: After upgrade and modifying the service account, when you attempt to start the new Scheduler service, and it stops again after a while (can be several minutes) then please review and repeat the steps above under the section “Assign the Service Account to the correct Project Repository”.
If you receive the below error, it is likely because the service is connected to a repository that has not yet been upgraded. This is likely the case if you are running multiple environments on the same server.
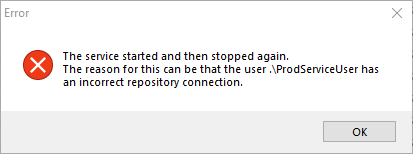
You will need to upgrade the other repository database before this service will start.
Upgrade Subsequent Environments
We recommend that you perform proper testing and validation procedures after upgrading to ensure all systems are operating properly before upgrading subsequent environments.
Troubleshooting
Upgrading your TimeXtender software should be fast and easy. On rare occasions, problems may occur as the result of an upgrade. This article discusses the three most common issues, and how to resolve them.
Cannot open one or more projects
Sometimes after upgrading, trying to open a project will result in an "out of bounds index/array" error, or an "object not set to instance of an object" error. This problem can be alarming, but it is not as serious as it may first appear.
This issue is usually due to a hidden problem in the repository database. Often, these problems are invisible to the end user, and are only revealed by the changes the upgrade process makes to the repository database. These issues are often caused by multiple people working on the same project at the same time without the proper use of work items.
To resolve this problem, submit a ticket and create a backup (.bak) of your repository database. We recommend compressing the .bak file, if possible. If the file is less than 20MB in size, you can submit it with your ticket. If it is larger than that, TimeXtender support will provide you with an FTP upload link.
If you need to continue immediately continue development work, you can restore the auto-backup created by the upgrade process to quickly regain access to your project while we resolve the issues with your repository.
Cannot deploy or execute SSIS packages
Inability to deploy or execute SSIS packages is an extremely common problem that many people encounter after upgrading. The reason this occurs is that for many security setups, you must run the application as an administrator. This setting does not transfer from old versions of the software to new ones, as they are considered different programs from the operating system's point of view.
The best way to deal with this is right-click on your program shortcut and select Properties, choose the Compatibility tab, click Change settings for all users, and check Run this program as an administrator.
Restart the program from the updated shortcut, and you should be able to deploy and execute SSIS packages with no problems.
Circular reference errors
In older versions of the TimeXtender software, circular reference detection wouldn't work properly in some circumstances. This allowed careless users to make bad circular references; it also allowed careful users to make functioning circular references.
In newer versions, circular reference detection works properly, and will not allow you to deploy any object that contain such a reference. This means that certain objects may not deploy properly after upgrading.
Exactly how to handle this problem depends largely on the nature of the circular reference. If you get this error, the first thing to do is determine whether or not your circular reference actually works. For instance, mutual lookups between two tables will never behave as expected, because both tables will be stuck waiting for the other to load.
If the reference does work, you will need to develop a fix. A common valid, although somewhat risky circular reference is to create a view of a raw table, then do a lookup from that view back into the same table. This self-reference will work, provided that none of the join or condition fields have a transformation on them that's relevant to the lookup process. However, if you have a parameterized view, this table will no longer deploy after an upgrade.
There are a number of solutions in this particular case - the easiest one is to replace the parameterized code in the view with the translated code, which can be viewed by selecting the translation button. After that, delete the parameters from the view, and the circular reference error will no longer occur. This technique does mean you will no longer get the benefits of parameterized code, but it is a quick and easy way to resolve this issue.
