


We have recently developed a range of new data source connections that significantly enhance performance and usability compared to the CData or Microsoft alternatives. These new connections are designed to streamline your data integration processes, offering improved efficiency and a more user-friendly experience.
In light of the above, we recommend transitioning to these new providers to take full advantage of their benefits. The below guide explains how to change a Microsoft OLE DB Provider for SQL to a TimeXtender SQL Data Provider. The basic approach outlined below may be similar for swapping other types of data providers.
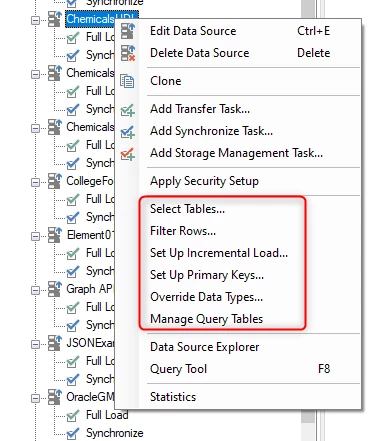
Review the Microsoft SQL Data Source Configurations
An Ingest Instance Data Source commonly includes configurations on some or all of the following items:
- Select Tables
- Primary Keys
- Incremental Loading Rules
- Query Tables
- Filter Rows
- Override Data Types
The above items are configured in the TimeXtender Data Integration (TDI) by right-clicking on the Ingest Instance data source and selecting the appropriate item from the menu.
Make note of any of the above configurations in the original SQL data source, as these will need to be reconfigured in the new Ingest Instance data source.
Create a New Data Source Connection in the Portal
- Navigate to Data Source Connections:
- Go to Data Estate > Data source connections and click Add data source connection.

- Go to Data Estate > Data source connections and click Add data source connection.
- Select Data Source Provider:
- In the Type box, select “SQL Database”, and note how the provider will default to the “TimeXtender SQL Data Source”.
- Enter Connection Details:
- Enter the necessary connection details and settings required for the connection to the SQL database.
- Map to the Ingest Instance:
- Map the data source to an Ingest instance by selecting the Ingest Instance and then providing the data source name and short name to be used in the TimeXtender Data Integration (TDI).

- Map the data source to an Ingest instance by selecting the Ingest Instance and then providing the data source name and short name to be used in the TimeXtender Data Integration (TDI).
- Save the Connection:
- Click Save to finalize the creation of the data source connection.
- Synchronize the Connection.
- In the TimeXtender Data Integration (TDI), right-click on the Synchronize Task underneath the new Ingest Instance data source and select Execute.
- Configure the new data source.
- Refer to the “Review the Microsoft SQL Data Source Configurations” section above.
Synchronize Prepare Instance with the Ingest Instance and remap tables to the new data source.
- Check that you have a current backup of your Prepare Instance data storage just to be prudent. Nevertheless, you shoud be able to revert to a previous version of your instance if you want to reverse any of the following changes.
- Right-click on an Prepare Instance that has data area tables that are mapped to the CData data source and select “Synchronize with Ingest Instance”.

- In the Synchronize dialog box, Identify those tables that are using the CData REST data source and then click the “Remap Tables”.

- In the Remap Table dialog, first select the new TimeXtender REST data source and then click the Search button to list out the tables. Select the appropriate table and click OK.

-
If any fields had been renamed, then “None” will be displayed for the mappng. To resolve this, click the drop-down menu and select the appropriate field in the source table.

-
Once all of the CData REST data source tables have been remapped to the new TimeXtender REST data provider, click OK to save the changes.
-
Deploy and Execute the Prepare Instance to confirm that everything completes successfully.

