This article describes the available settings for instances. Instances are the building blocks for TimeXtender Data Integration solutions. A TimeXtender Data Integration solution is built up of three types of instances - Ingest, Prepare and Deliver instances. Read more about these instances here:
By opening and right-clicking on an instance and selecting Edit Instance the following settings will be displayed for each instance type.
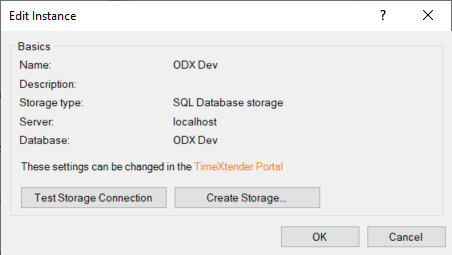
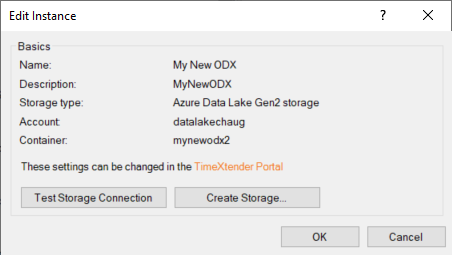
Ingest Settings
The following information is shown for the Ingest instance based on the input for the instance in the TimeXtender Portal. The information shown is based on the storage type for the selected instance.
Prepare Settings
The following information is shown for the Prepare instance based on the input for the instance in the TimeXtender Portal. The default settings and options for the Prepare instance are described below.
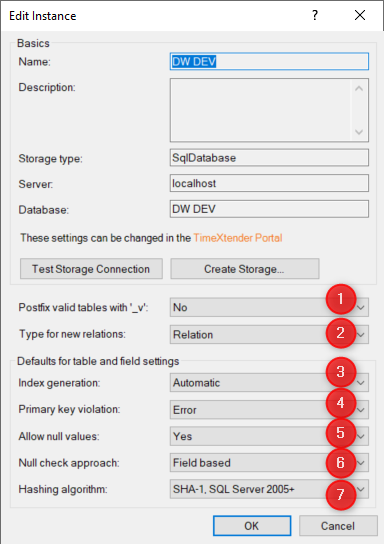
- Postfix valid tables with "_V" is by default set to No. Change this to Yes in order to add the "_V" postfix to valid tables.
- Type for new relations is by default set to Relation. This setting decides how TimeXtender should treat foreign key violations. Select Error to move the offending row to the error table. Select Warning to move the offending row to the warning table. Select Physical to ignore the violation.
- In the Index Generation list, choose the default setting for index generation. Select Automatic to automatically create indexes as needed, Manual to enable automatic index generation on a per-table basis or Disabled to not create any indexes automatically.
- Primary key behavior determines how TimeXtender will treat primary key violations and by default is set to Error, which moves the offending row to the error table. In the Primary key behavior list, select Warning to move the offending row to the Warning table or select None to ignore the violation.
- Allow null values is set to Yes by default, which means it is okay for fields to contain null values. Change this setting to No to move any rows with null field values to the Error table.
- In the Null check approach list, the default option is Field Based, which will advise both the record and which field within that record contains the null value. Alternatively, select Record Based to only advise the record that contains a null value and not reference the specific field within that record.
- In the Hashing algorithm list, select the hashing algorithm to be used for hash fields from the following options:
- SHA-2 512, SQL Server 2016 +: The safest hashing algorithm in terms of the probability that two different data sets would create identical hashes. The size of the hash is 64 bytes. It is about 40% slower than the "SHA-1, SQL Server 2016+" algorithm and should only be used when extreme safety is required. Note that this algorithm requires SQL Server 2016.
- SHA-1, SQL Server 2016 +: The fastest hashing algorithm when the amount of data to be hashed is more than 8000 bytes. In those cases, it can be about 30% faster than the "SHA-1, SQL Server 2005 +" algorithm. Otherwise, the performance for the two algorithms are about the same. The size of the hash is 20 bytes and this algorithm requires SQL Server 2016.
- SHA-1, SQL Server 2005 +: The default algorithm in TimeXtender. Slower than "SHA-1, SQL Server 2016 +" algorithm when the amount of data to be hashed is more than 8000 bytes. The size of this hash is 20 bytes and is compatible with all SQL Server versions supported by TimeXtender.
- Plain text (debug): Used for debugging, it will concatenate the fields into a string and provides a way to see what data goes into creating the hash. Because of a limitation in SQL Server, the string is limited to a length of 4000 characters.
- Legacy binary: Provided for compatibility with earlier versions of TimeXtender and should not be used in new instances. It is not typesafe and is limited to a total of 4000 characters for all the fields used in calculating the hash.
- Legacy plain text (debug): Used for debugging legacy algorithms, it will concatenate the fields into a string with a length of up to 4000 characters.
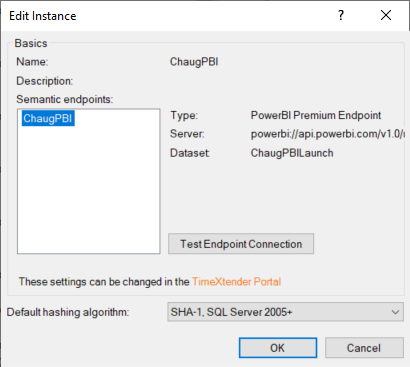
Deliver Settings
The following information is shown for the Deliver instance based on the input for the instance in the TimeXtender Portal. The information shown is based on the selected endpoint. In the Hashing algorithm list, select the hashing algorithm you want to use for the hash fields. The options for the Deliver instance hashing algorithm are the same as for the Prepare instance described above.