Deliver instance models represent the culmination of all the extraction, transformation, and loading that happens prior to the tables being added to the Deliver instance.
Instance-level security allows developers to implement role based access to the Deliver instance model, providing access to either the entire model, or a subset of the model data that is related to specific field values.
Model-level Security is configured by creating a role that is not associated to any row-level security setup, and then associating that role to an endpoint. This association will grant full access to the endpoint for all the members of that role.
Row-level security (RLS) is configured according to the following general steps that are outlined in more detail below.
Creating Roles that are comprised of users or groups of users
Creating RLS Setups that grant access to specific field values
Associating RLS Setups to specific Roles
Associating Roles with specific Endpoints
A RLS Setup is created under a specific field and specifies which field values that the role will have access to, which also means that the role will not have access to data that is related to the field values that are not specified as part of the setup. In this way, roles and row-level security setups work together to provide a security layer to the model based on the identity of the user that is accessing it.
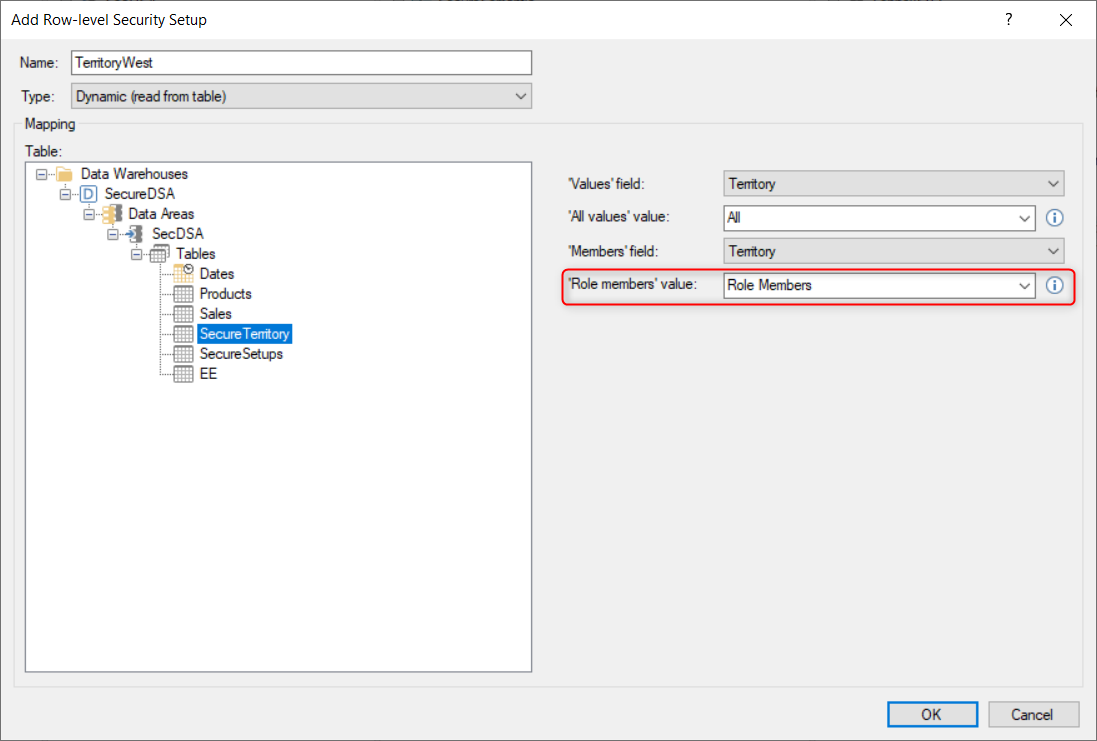
For example, the “TerritoryWest” security setup shown below is based on the “Territory” field and is granting access to the subset of data that is related to the “West” Territory field value. Any role associated with this security setup will not have access to data that is outside of the “West” territory.
The specific steps for implementing model-level and row-level security are outlined as follows.
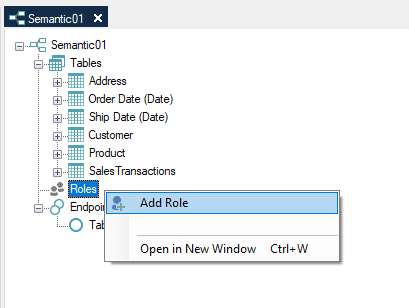
In the Deliver instance model tree, right-click Roles and select Add Role.
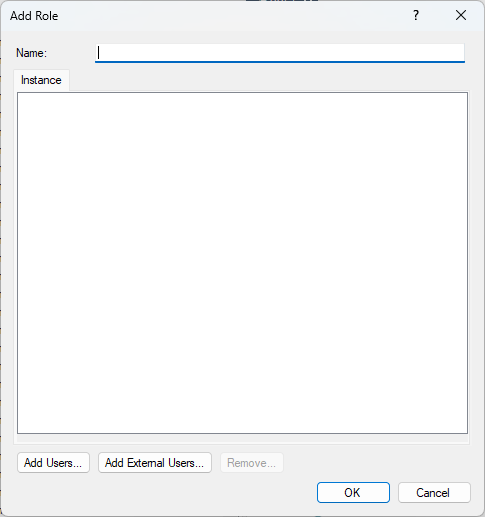
The Add Role window opens as follows:
In the Name box, enter a name for the role.
Click the Add Users button to add users from the Local Computer Users directory, which will open the normal Select Users and Groups dialog.
Click the Add External Users button to add external users, such as those in Azure Active Directory. The Add External Users window will appear as follows:
Enter the user’s email address and click the Add button. Active Directory Groups can also be added, provided their name is specified in the following format: <obj:groupid123@tenantid123>.
Click OK to return to the Edit Role window, which will list out the new users in the Instance pane below. Note the format for the different types of user as shown below.
Click OK to add the role.
Mapping a Role to an Endpoint
Mapping a role to an endpoint will provide model-level access to that endpoint for the members of that role, provided the role does not have an associated row-level secuirty setup. Use the following steps to map a role to an endpoint.
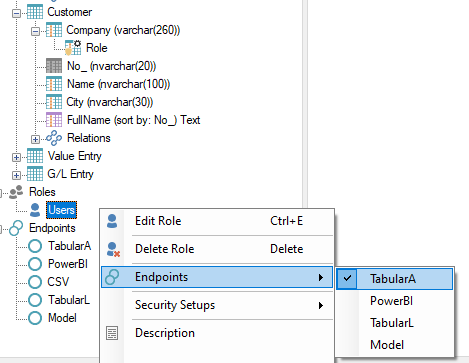
In the Deliver instance model tree, expand the Roles folder, and use either of the following two methods to complete the mapping.
Right-click a role, select Endpoints, and then select the specific endpoint for the role mapping.
Role mapping can also be created by simply dragging the role to the endpoint as shown in the GIF below.
Adding a Row-Level Security Setup
Note: This setting applies to SSAS Tabular, PowerBI Premium and Qlik endpoints only.
Row-Level security is implemented by associating a Row-Level Security Setup to an existing role.
There are two types of row-level security setups that are available:
Manual - Values and members are mapped in the security setup dialog.
Dynamic - Mappings are configured to be read from a table in the Prepare instance.
Manual Row-Level-Security
Use the following steps to manually add a row-level security setup.
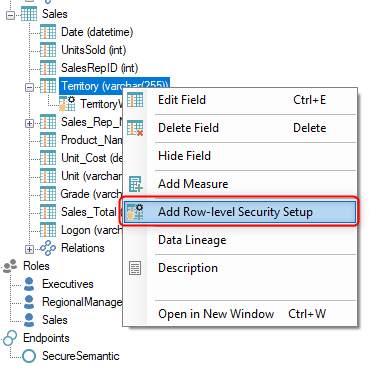
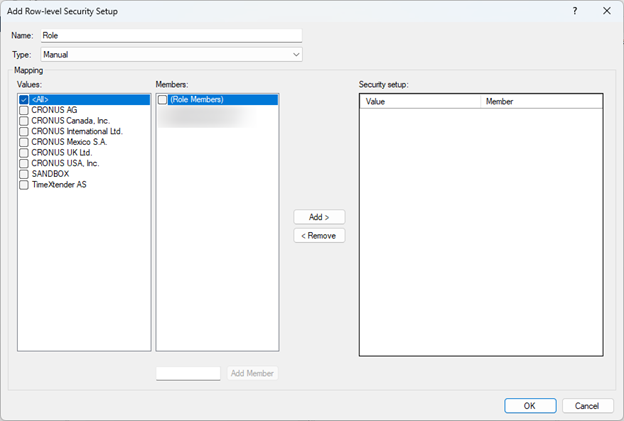
Right-click a field and select Add Row-level Security Setup to open the following window.
In the Name box, enter a name for the setup.
In the Type menu, keep the default setting of “Manual.”
Complete the following steps to add one or more security setups:
From the Values list, select one or more of the available field values.
From the Members list, check the (Role Members) box to apply the setup to the members of the Role(s) that the setup will later be associated with.
(Optional) Additional members can be added to the Members list using the Add Member box below, which provides a way to configure access for users that are not members of any role. Enter a username in the text box and click the Add Member button to add a user or group to the Members list. Usernames may need to be Full Qualified in order to resolve properly, i.e. specified in the following format: <DomainName\UserName>.
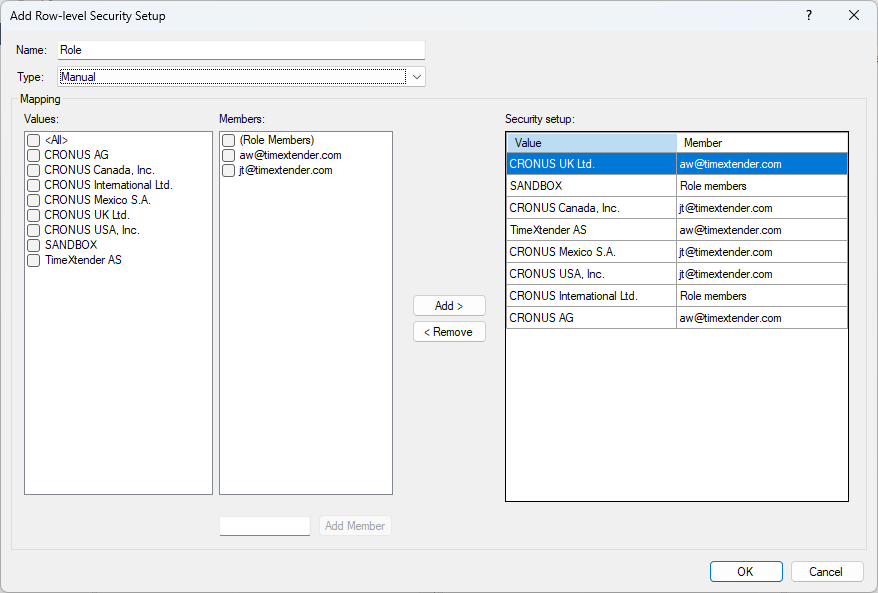
Click the “Add >” button to map the selected values to the selected members.
Note: Users added as Additional Members may not work with all Endpoints. Verify that access is working properly for all Additional Members added to Row-Level Security Setups that are associated with Roles that are associated with Endpoints.
The Add Row-Level Security Setup dialog may appear similar to the following once a series of setups have been added. In the list of setups above, some of the field values are mapped to role members while other field values are mapped to specific additional users.
Add Dynamic Row-Level-Security
Use the following steps to add a dynamic row-level security setup. It may be helpful to have the security setup outlined in a view or text file ahead of time, in order to assist in validating that the security access is working properly.
A Dynamic Row-Level Security Setup uses a data set within the Prepare instance to get the values that will be mapped to the members. Use the following steps to create a Dynamic Row-Level Security Setup.
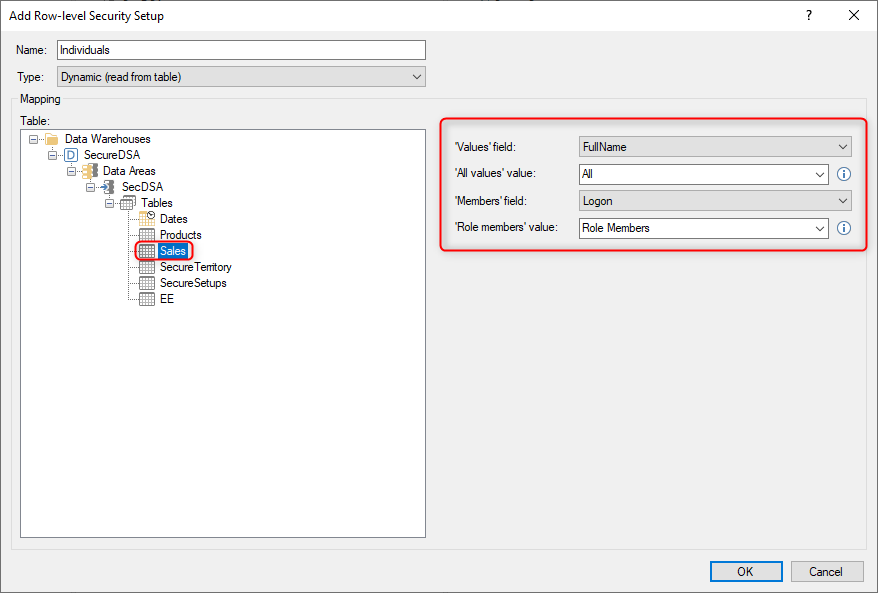
Right-click a field and select Add Row-level Security Setup.
In the Type list, select Dynamic.
In the Table list, click the table or view that contains the field whose values will be used for the mapping.
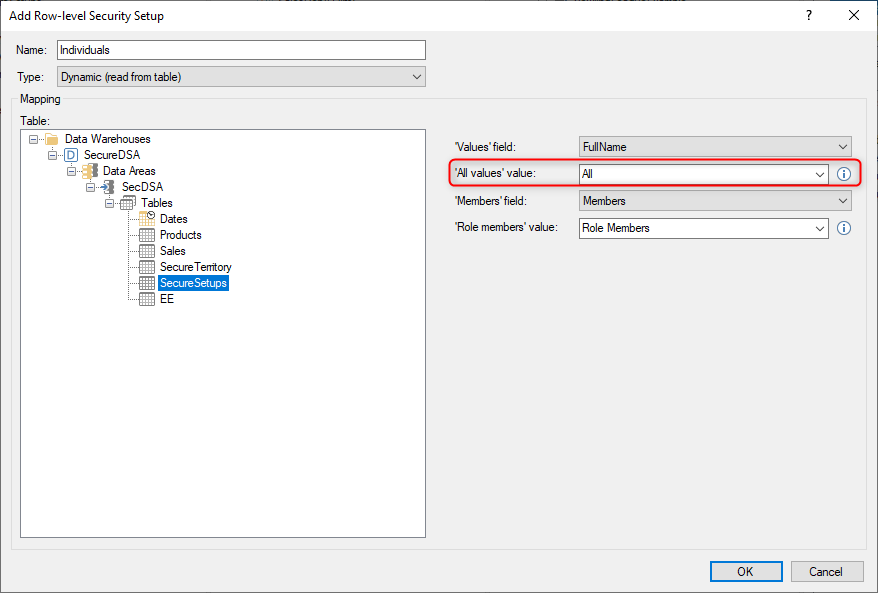
In the 'Values' field list, select the field that contains the values that will be used to filter the data, which corresponds to the field that the Dynamic Row-Level Security Setup is being created under.
In the 'All values' value box, select an existing field value, or enter a new value that will be used to represent or map to all of the field values, i.e. All.
In the 'Members' field list, click the column that contains the values that correspond to the role members, i.e. “Logon”.
In the 'Role members' value box, select an existing value or enter a new value that will be used to indicate any member of any role that has been mapped to this row-level security setup, i.e. Role Members.
Click OK to save the setup.
Mapping a Row-level Security Setup to a Role
Mapping a Row-Level Security Setup to a Role restricts access to data on that endpoint to the field values that have been mapped to the Role Members as part of the setup.
Use either of the following two methods to map a Row-Level Security Setup to a Role.
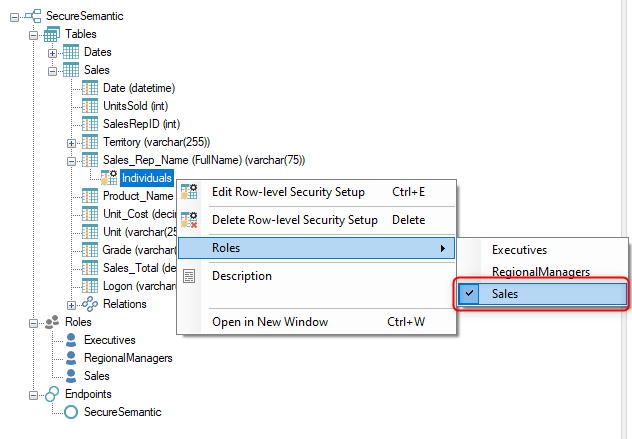
Right-click the Row-Level Security Setup, select Roles, and then select the specific Role from the Roles list.
Drag the Row-Level Security Setup onto the Role.
Setting Up Row-level Security
There are different ways of setting up row-level security depending on the type of endpoint(s) and how security is handled in your organization. Click on the following link for more information on How to Setup Up Row-level Security
Multiple Roles can be associated with the same Row-Level Security Setup and vice-versa, providing flexibility in the deployment of the access security.
The two basic approaches are as follows:
One role and one setup:
Add one Role. If you target SSAS Tabular, all users and groups that require access must be added to the role to have access. If you only target Qlik, the role can be empty since it only serves as a link between the security setup and the endpoint
Add one Row-Level Security Setup. Map the relevant Values to the Members (or Users)
Using Active Directory groups as role members can expedite the setup and maintenance of the security setup
Many roles and setups:
Add a role for each user or group that should have access to a specific subset of data
Add a setup for each of the roles. Map the relevant values to "(Role Member)" in the Members list
Map the security setups to the roles and the roles to the endpoint(s)
This approach is basically using roles as user groups in the deliver instance
As hinted above, Analysis Services and Qlik handles security differently:
On Analysis Services, access is granted to a role and TimeXtender Data Integration uses DAX scripting to provide users and groups with row-level access.
Qlik does not have roles, so all access is granted on the users/groups-level. For Qlik, roles in the deliver instance are simply an ad hoc collection of users and groups that have access to the same data.
Dynamic Row-Level Security Setup examples using a security table in a Prepare instance
Example 1: Using “All” to represent all the field values:
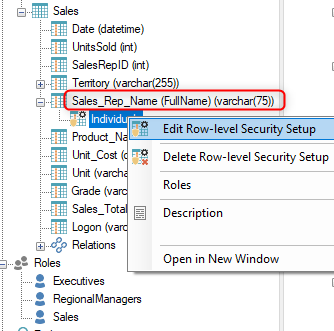
“FullName” is the original name of the Deliver instance model field that the Dynamic Row-Level Security Setup is created under as shown below.
The “FullName” field has been renamed from “FullName” to “Sales_Rep_Name” in the Deliver instance, but the original name of “FullName” is still visible inside of the parentheses, and this is the name that should be used for the field in the security table, since it matches the name of the field in the Prepare instance source table.
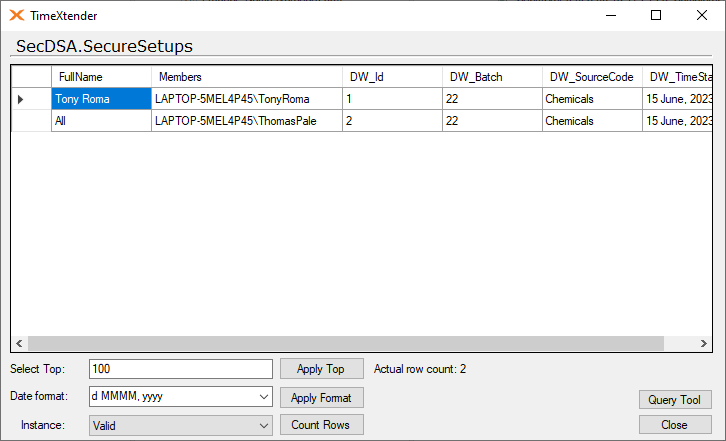
A security table in a Prepare instance is populated with the “FullName” field values and the Members that the field values will be mapped to.
The Security table has the following two entries:
The FullName field value of “Tony Roma” is mapped to the Tony Roma member logon, which configures row-level security so that Tony Roma only has access to his own data.
The FullName field value of “All” is mapped to the Thomas Pale member logon, which means that Thomas Pale has access to the data for all of the FullName field values. This works because “All” has been configured in the Dynamic Row-Level Security Setup to represent all of the field values as shown below.
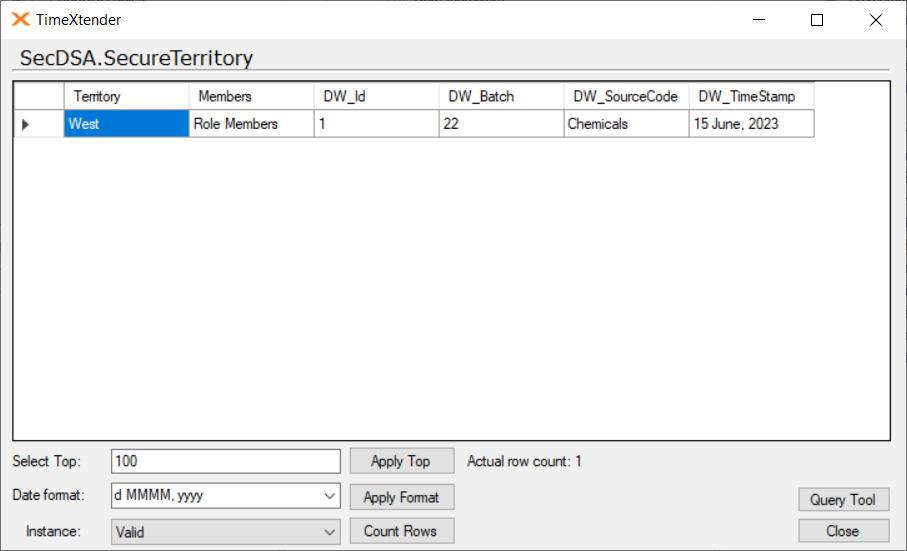
Example 2: Using “Role Members” to assign a specific field value to all the role members.
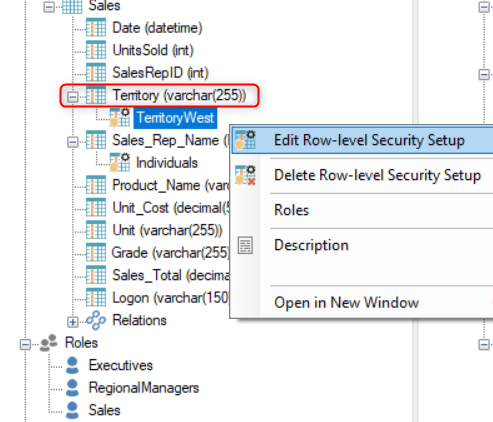
“Territory” is the name of the field that the Dynamic RLS Setup is created under as shown below.
A security table in a Prepare instance is populated with the “Territory” field values and the Members that the field values will be mapped to.
The security table only has one entry, which maps the Territory field value of “West” to all of the members of the role that is associated with this Dynamic Row-Level Security Setup. “Role Members” is used to represent all of the role members as configured in the security setup.
The result is that all the members of the role associated with this security setup will only have access to data in the “West” territory.
Did this topic help you find an answer to your question?
We use 3 different kinds of cookies. You can choose which cookies you want to accept. We need basic cookies to make this site work, therefore these are the minimum you can select. Learn more about our cookies.