
This article explains how you can transfer data from a source to a destination of your choosing using TimeXtender Data Transfer Packages.
Note: This article is about a feature available in TimeXtender O&DQ. For the similar functionality in TimeXtender Data Integration, see the Ingest section.
Supported data sources include SQL Server, PowerShell, Console, MySQL, Analysis Services, and ODBC. In version 25.1, a merge functionality was introduced for SQL Server destination data providers, allowing you to update existing records in the destination when changes are detected in the source.
Data Transfer Packages can be used to transfer data from any Data Provider to an SQL Server destination. Common usage scenarios are:
- Staging data from a web service to be able to limit requests and join between multiple endpoints
- Create a historical table for later use
The Data Transfer Packages support every Data Provider as the source and can be quickly deployed.
Create the Data Transfer
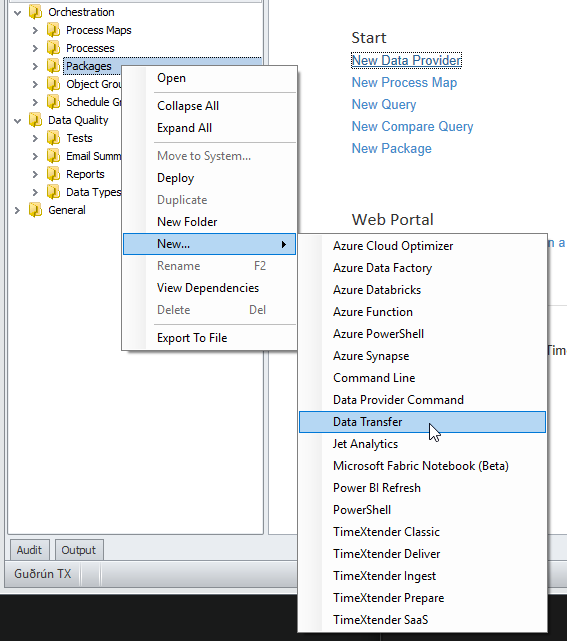
Create a new Data Transfer Package by right-clicking Packages and selecting New Data Transfer
Setting up the Source
Supported source Data Providers (SQL Server, PowerShell, Console, MySQL, Analysis Services, and ODBC) can be used as a source in Data Transfer.
- Start by selecting the appropriate source Data Provider. In this case, we are talking to a web service and select PowerShell as the Data Provider.
When selecting SQL Server or Oracle as Data Provider, you are able to select a preexisting table or a view from the Tabledropdown. - Customcan be used to write specific queries against the data provider.
- After selecting a table or writing a custom query, click Preview to see the data.
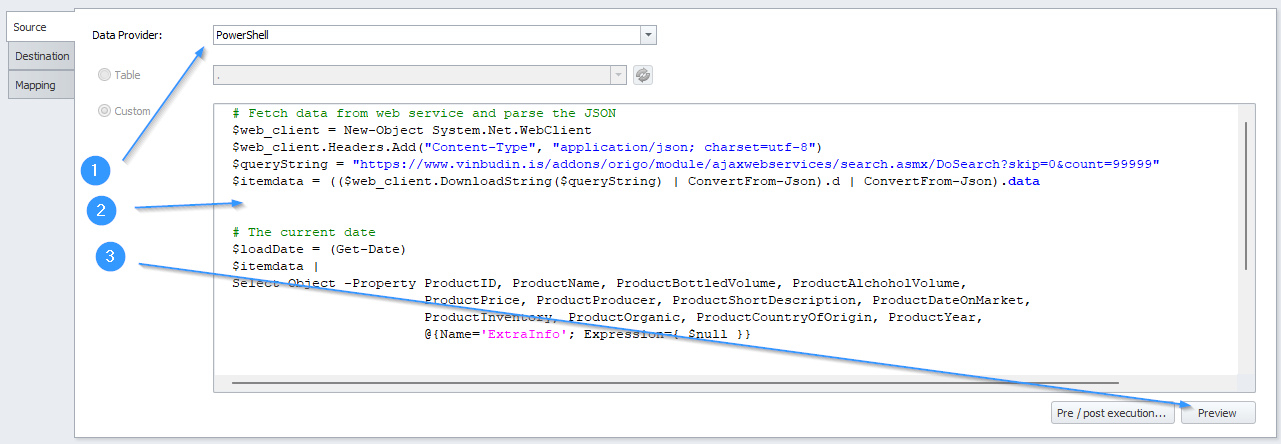
# Fetch data from web service and parse the JSON
$web_client = New-Object System.Net.WebClient
$web_client.Headers.Add("Content-Type", "application/json; charset=utf-8")
$queryString = "https://www.vinbudin.is/addons/origo/module/ajaxwebservices/search.asmx/DoSearch?skip=0&count=99999"
$itemdata = (($web_client.DownloadString($queryString) | ConvertFrom-Json).d | ConvertFrom-Json).data


# The current date
$loadDate = (Get-Date)
$itemdata |
Select-Object -Property ProductID, ProductName, ProductBottledVolume, ProductAlchoholVolume, ProductPrice, ProductProducer, ProductShortDescription, ProductDateOnMarket, ProductInventory, ProductOrganic, ProductCountryOfOrigin, ProductYear, @{Name='ExtraInfo'; Expression={ $null }}
In some cases, you might want to run a pre-or post-execution script on the source data provider. To do this, click Pre/post execution to enter those scripts.
Note: When your Execution Connection is set to Local you have a set of PowerShell commands you can use. If you require other commands you must set up a Gateway and use that as your Execution Connection
Configuring the Destination
SQL Server and PowerShell Data Providers are fully supported as destination options. Other Data Providers may also work as destinations, depending on your specific setup and configuration. If you have additional requirements or scenarios you would like us to review, please contact Support.
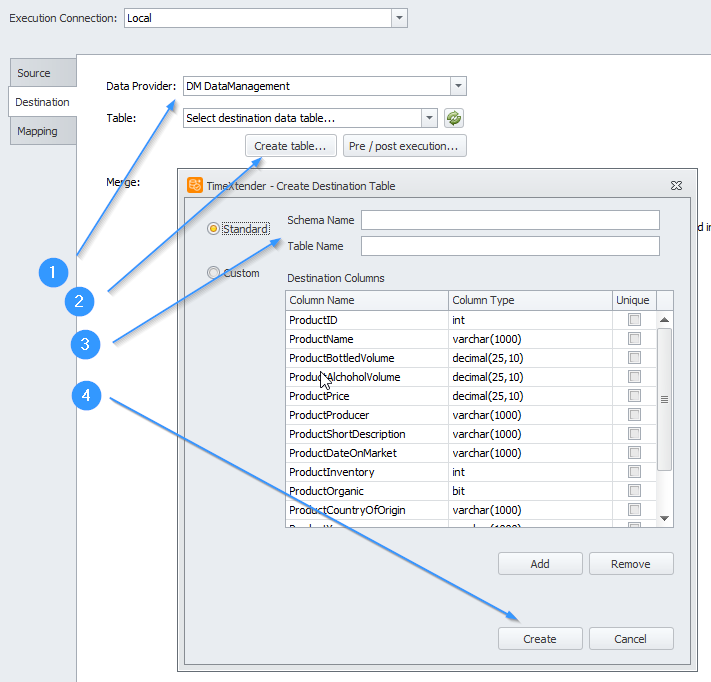
- Select a Data Provider ;and a destination table.
- If you have not already created the destination table, you can use Create table to create the table (applies to SQL destinations)
- If you are using the TimeXtender Orchestration and Data Quality database as a destination, it's most common to use the client or staging schema.
- Here, you can also set a Pre / post-execution script to be executed before or after the transfer. This can be useful for merging to final tables. Finally, click Create
PowerShell Destination: Writing Source Data to a CSV File
One example for using PowerShell as a destination is writing to a CSV file. In scenarios where you want to export data from PowerShell to a CSV file, you can use the Export-Csv cmdlet. This is particularly useful for data integration, reporting, or simply archiving query results.
Example: Exporting Data to a CSV File
The following PowerShell script demonstrates how to write source data to a CSV file. In this example, the data is stored in the variable $exMonResult, and you want to export the ProductName property as a column named Territory in the CSV file.
# Define CSV output path
$CsvPath = "C:\DataTransferDestination\results.csv"  # Adjust path as needed

# Process results and export to CSV
$exMonResult | Select-Object @{Name="Territory"; Expression={$_.ProductName}} |
    Export-Csv -Path $CsvPath -NoTypeInformation -Force
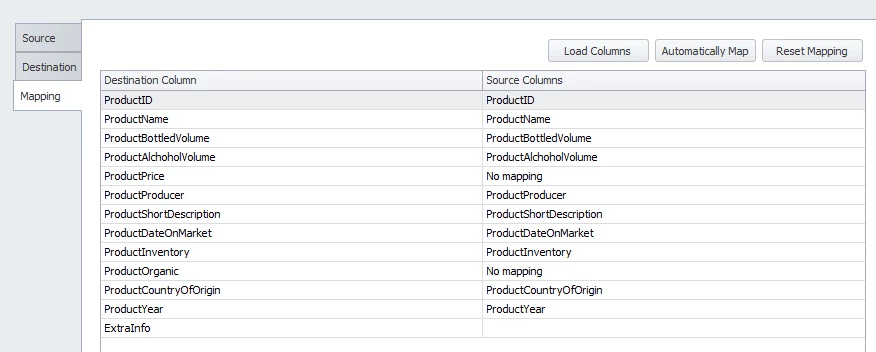
Column Mapping
The final step is to set a mapping between the source and destination data. TimeXtender Orchestration and Data Quality will try to autocomplete this mapping if the names are the same.
Create the Data Transfer with Merge (v. 25.1 and newer)
We are harnessing the power of merging by introducing staging tables in our Data Transfer packages within O&DQ. This feature allows you to update destination data automatically when changes are detected in the source. By default, merging is enabled for all new Data Transfer packages.
Note: The merge functionality is only supported for SQL Server destination data providers. Existing tables will not be affected until this feature is explicitly enabled, as described below.
To create a new Data Transfer package and enable merging follow the steps below.
If you already had created a package and would like to enable the feature, skip to step 3.
You create Data Transfer packages the same way as before. On the Destination page you can configure your merge setup.
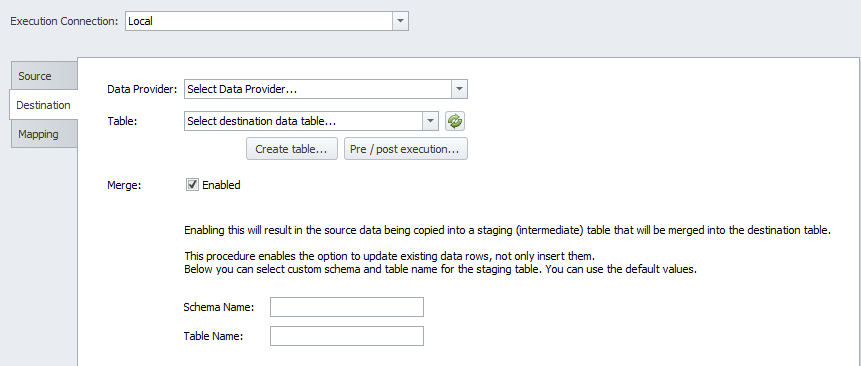
Creating a new package or duplicating an old DT package will enable merging by default.
When you select a destination table, the schema name and table name for the staging table will be automatically populated. However, you can modify these values as needed.
Note: The merge functionality is only supported for SQL Server destination data providers. The database user specified in the data provider must have permission to create tables and insert data into both the destination table and the staging table.
Once you save the package a validation will run to verify if that schema name and table name are not in use. In addition, if needed, the database user will be verified for schema creation permissions.
The staging table will be reused and truncated during every execution. An audit table will be created alongside this staging table and will contain information on the process execution and will also record errors.
Differences in Column Mapping for when Merge is enabled
When Merge is enabled the Column Mapping page will look like this:
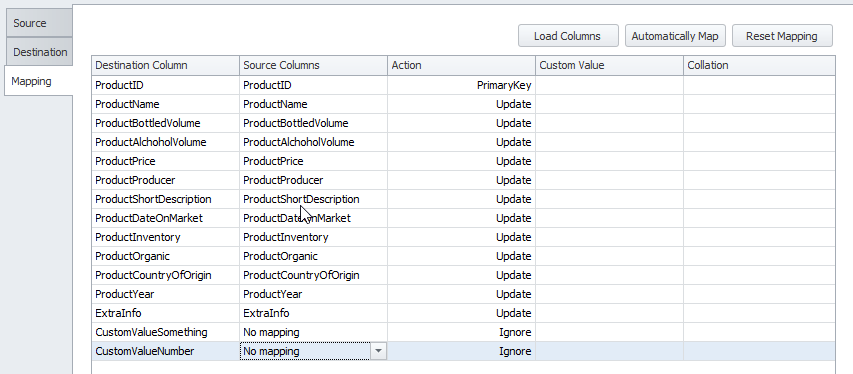
The Action column enables user to make the choice to:
- Ignore - do not make any changes to this column
- PrimaryKey - use this column as Primary Key in the merge process.
- Update - update this column if the Primary Key matched and the source data has been changed
Note: At least one column must be selected as Primary Key for the merge to work
In the Source column dropdown, you will see a list of all available columns from the source, as well as the options "No mapping" (used when you want to ignore the column) and "Custom Value." The Custom Value option allows you to enter strings, integers, or basic SQL statements such as GETDATE().
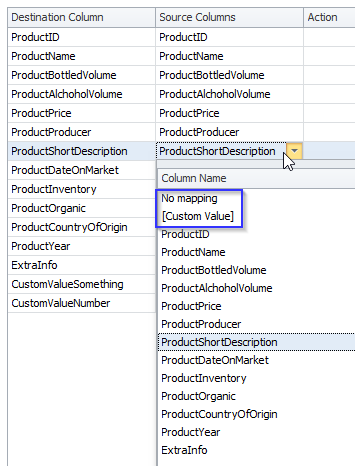
The SQL statement will be evaluated only during the merge procedure. The results will appear in the destination table.
We have also added a Collation column. You can set it to be used when the data is selected from the source table.
After setting up the Mapping tab follow the standard procedure to save, deploy and execute the Data Transfer package.
What will be the result of running this package?
Original Data Transfer / No Merging: Data from the source is directly copied to the destination in its entirety. There is no data updated, replaced or omitted.
Data Transfer with Merging: Data from the source is merged to the destination via a staging table:
- 1st run: All data is copied to destination.
- Consecutive runs, only new entries appeared in the source: Only new entries are transferred to the destination
- Consecutive runs, existing source entries got updated: Existing entries in the destination table get updated to match the source,
- Consecutive runs, some source entries got updated and new entries appeared in the source: Existing entries in the destination table get updated to match the source, new entries are inserted
Destination data does not get removed or table truncated.
Next steps
The data transfer is now ready. The next steps could be:
