


Semantic models represent the culmination of all the extraction, transformation, and loading that happens prior to the tables being added to the Semantic layer.
Security allows developers to implement role based access to a Semantic endpoint, providing access to either the entire data set, or a subset of the data that is related to specific field values.
Model-level Security is configured by creating a role that is not associated to any Row-Level Security Setup, and then associating that role to an endpoint. This association will grant full access to the endpoint for all the members of that role.
Row-level Security (RLS) filters the data that is available in the endpoint using a set of one or more field values that are configured in a Row-Level Scurity Setup and then associating these field values with either Role members or a user’s logon credentials. As such, different users may have access to different data when accessing the same endpoint. Row-Level Security is configured according to the following general steps that are outlined using examples in more detail below.
- Creating Roles that are comprised of users or groups of users
- Creating Row-Level Security Setups that grant access to one or more specified field values
- Associating Row-Level Security Setups to specific Roles
- Associating Roles with specific Endpoints
A Row-Level Security Setup is created under a specific field and specifies which field values that a role or a specified user will have access to, which means that that role or user will also not have access to any data that is not related to the field values that are specified as part of the Row-Level Security Setup. In this way, Row-Level Security Setups associated to Roles work together to implement the security access to the endpoint based on the identity of either the Role members or specified user logons that may be accessing the endpoint through a presentation application like Power BI.
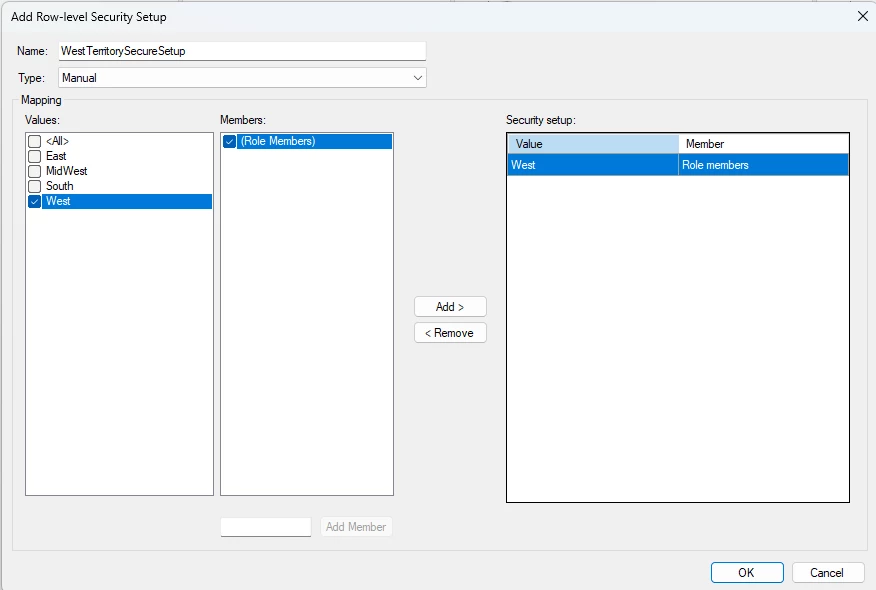
As an example, the “TerritoryWest” Security Setup shown below has been created based on the “Territory” field and is granting access to the subset of data that is related to the “West” Territory field value. Any role associated with this security setup will only have access to the “West” associated data and not have any access to data that is not associated with the “West” territory.

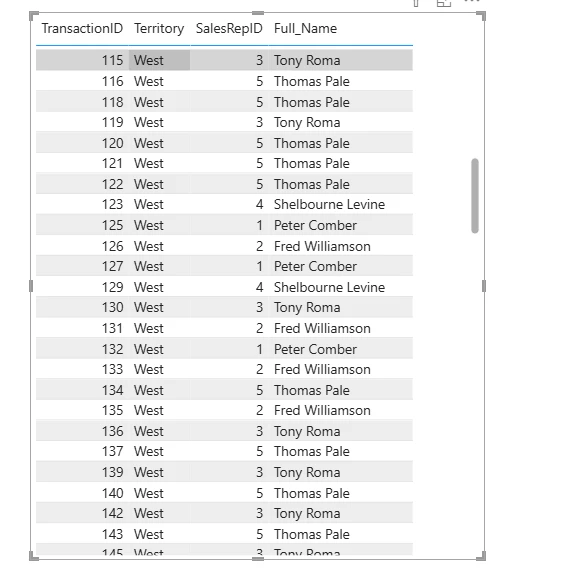
This can be confirmed by connecting to the endpoint in Power BI as one of the Role Members associated with the Security Setup above and verifying that only “West” Territory entries are displayed in the Sales table.
The steps to implement the different types of security are outlined in detail using examples below.
How to Implement Model-Level Security
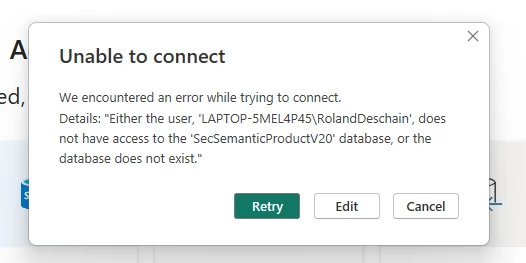
Model-Level security grants full access to the endpoint data and is done by creating a Role and associating a Role with an Endpoint. Once a Role is associated with an endpoint, then only Role Members will be able to access the endpoint. There can be more than one Role that is associated with an endpoint, but if a user that is not a Role Member and tries to access the endpoint then they may get an error message similar to the following.
Adding a Role to the Semantic Model
Use the following steps to add a role.
- In the Semantic Model tree, right-click Roles and select Add Role.

- The Add Role window opens as follows:

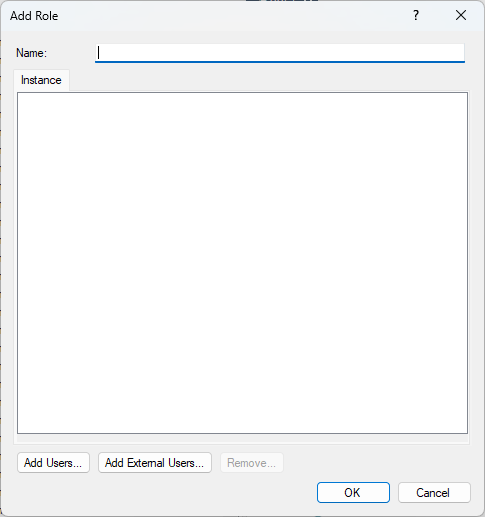
- In the Name box, enter a name for the role.
- Click the Add Users button to add users from the Local Computer Users directory, which will open the normal Select Users and Groups dialog. A group of users has been added in the example above.
- Click the Add External Users button to add external users, such as those in Azure Active Directory. The Add External Users window will appear as follows:

- Enter the user’s email address and click the Add button. Active Directory Groups can also be added, provided their name is specified in the following format: <obj:groupid123@tenantid123>.
- Click OK to return to the Edit Role window, which will list out the new users in the Instance pane below. Note the format for the different types of user as shown below.

- Click OK to add the role.
Mapping a Role to an Endpoint
Mapping a role to an endpoint will provide model-level access to that endpoint for the members of that role, provided the role does not have an associated row-level secuirty setup. Use the following steps to map a role to an endpoint.
In the Semantic model tree, expand the Roles folder, and use either of the following two methods to complete the mapping.
- Right-click a role, select Endpoints, and then select the specific endpoint for the role mapping.

- Left-click and drag the role onto the endpoint as shown in the GIF below.

A Role associated with an endpoint is all that is needed to implement Model-Level security and grant full access to an endpoint. For Model-Level Security, this means that the Role is not associated with any Row-Level Security Setups. Once a Role is associated with a Row-Level Security Setup, then the Role is no longer being used to implement Model-Level Security and is implementing Row-Level Security instead. This is described in more detail below using different examples to clarify the various ways Row-Level Security can be configured.
Adding a Row-Level Security Setup
Note: This setting applies to SSAS Tabular, PowerBI Premium and Qlik endpoints only.
Row-Level security is implemented by associating a Row-Level Security Setup to an existing role. Therefore, the process for Row-Level Security entails following the same steps involved in implementing Model-Level Security, and then adding a Row-Level Security Setup to the Role that is associated with an endpoint.
There are two types of Row-Level Security Setups that can be used:
- Manual - Values and members are mapped in the security setup dialog.
- Dynamic - Mappings are configured to be read from a table in the data warehouse.
Manual Row-Level-Security Example using Multiple Roles and Multiple Security Setups
The following steps outline how to configure a Manual Row-Level Security Setup.
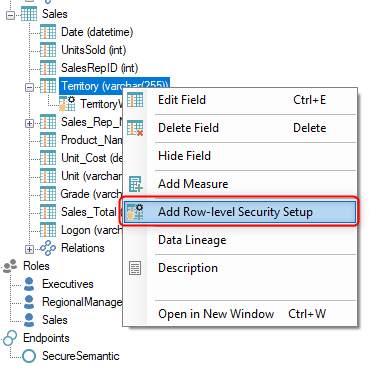
- Right-click on a Semantic model field and select Add Row-level Security Setup to open the following window.
- In the Name box, enter a name for the setup.
- In the Type menu, keep the default setting of “Manual.”
- Complete the following steps to add one or more security setups:
- From the Values list, select one or more of the available field values.
- From the Members list, check the (Role Members) box to apply the setup to the members of the Role(s) that the setup will later be associated with.
- (Optional) Additional members can be added to the Members list using the Add Member box at the bottom, which provides a way to configure access for specific users. Enter a username in the text box and click the Add Member button to add a user to the Members list. Usernames may need to be Full Qualified in order to resolve properly, i.e. specified in the following format: <DomainName\UserName>.
- Click the “Add >” button to map the selected values to the selected members.
-
Note: Users added as Additional Members may not work with all Endpoints. AD Groups may also not work as Additional Members. Verify that access is working properly for all Additional Members added to Row-Level Security Setups that are associated with Roles that are associated with Endpoints.
Note: If you want to select (Role Members) to be associated with the selected values, then it may be necessary to have multiple Roles and Security Setups, and for each Security Setup to only be associated with its own particular Role. The following is an example of this where there are 5 different Roles (West, East, All, MidWest, South) and each Role has its own Security Setup, i.e. the West Role is associated to the WestTerritorySecureSetup, and the East Role is associated with the EastTerritorySecureSetup, and so on. The benefit of this approach is that you can use AD Groups for the Role Members and as such the Roles and the Security Setups do not need to be amended or updated when Role members change, i.e. people join or leave the organization.

Completed Multiple Roles and Multiple Security Setup Example
- 5 Roles with each Role having a different AD Group as its members.
- 5 Security Setups with each one mapping a different field value to (Role Members).
- Each Security Setup is mapped to a different Role.
- All 5 Roles are associated with the same endpoint.
The following GIF shows what this setup looks like in TimeXtender Classic once complete.

Manual Security Setup using Additional Members
If you do not want to use (Role Members) that may entail multiple security setups, it is possible to Add Members individually using the “Add Member” button down below. In that way, you can directly tie the members specified to just those values you want them to see, and you can specify different values for different members in the same Security Setup, similar to the following.
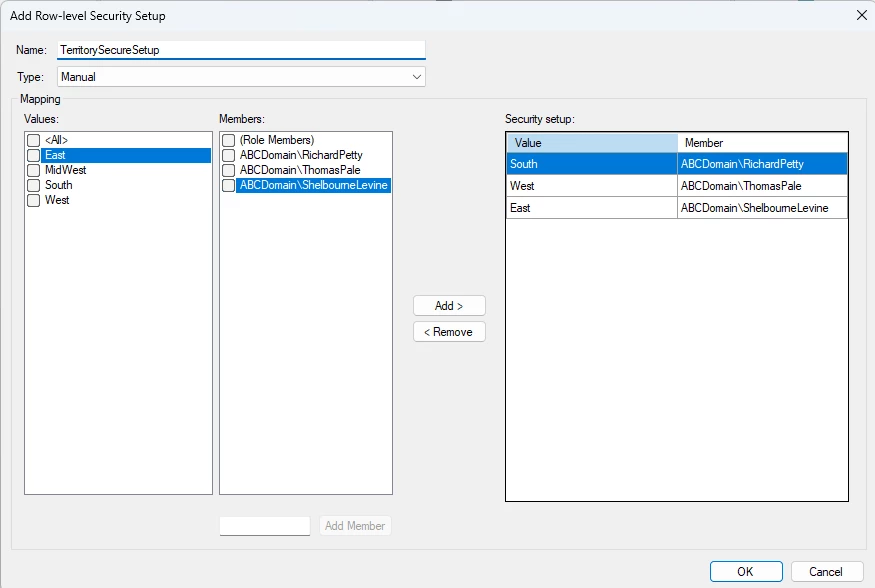
Note: By using Additional Members and specifying domain usernames explicitly, different users can be mapped to different field values in the same Security Setup. This type of setup simplifies the amount of objects needed to deploy the entire Security infrastructure, but it may also create an on-going maintenence issue as the Security Setup will need to be amended when users need to be added or removed from the setup.
Dynamic Domain Logon to Name Security Setup Example
The following example uses a Dynamic Row-Level Security Setup to filter the data in a Semantic Model based on the domain username of the person viewing the Semantic endpoint in a presentation application, i.e. Power BI.
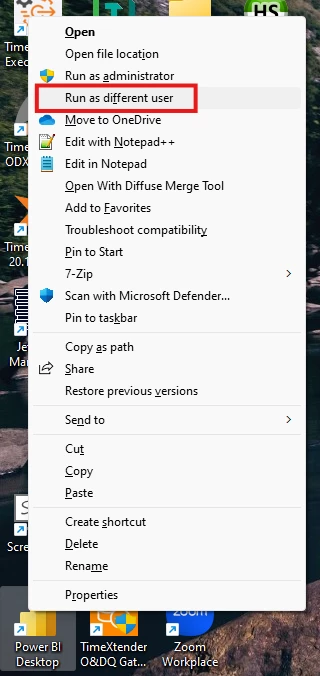
It is recommended to open the Semantic endpoint in a presentation application like Power BI before creating the Security Setup and create a table that can be used to verify that the Security Setup is working as expected once it is configured, deployed, and executed. If you have the desktop install of Power BI, you can shift+right-click on the Power BI Desktop icon to open the context menu where you can run the application as a different user.
The approach will allow you to open the Semantic endpoint as different users and confirm that each user only has access to that portion of the data model that is associated with their own name or domain logon.
The first step is to create a Role that will be associated with the Security Setup. In this example, we will be filtering the data in the model based on the logon of the Sales Rep. Therefore, our Role will have as its members the AD Group that contains all of the Sales Reps.

A Dynamic Row-Level Security Setup uses a table in a data warehouse to get the values that will be mapped to the members. In this example, the data warehouse table that will be used for this type of mapping includes the following two columns:
- “FullName” field that contains the name of the Sales Rep as it appears in the Sales fact table.
- “Members” field that contains the domain username or Logon for the Sales Rep.
The following is a preview of this data warehouse table:

Once the Semantic Role has been created and the corresponding data warehouse table that connects the Role members to their names in the Semantic model has been deployed and executed, then you are ready to create the Dynamic Security Setup, which may be done similar to the following:
- Right-click on the appropriate field that corresponds to the values in the data warehouse table and select Add Row-level Security Setup.
- Enter an appropriate name for the security setup.
- In the Type list, select Dynamic.

- In the Table list, click on the data warehouse table or view that contains the fields that will be used for the mapping.
- In the 'Values' field list, select the field in the data warehouse table that contains the values that correspond to the Semantic field values that will be used to filter the data. In this example, that is the FullName field as it corresponds to the values in the Sales table Full_Name field in the Semantic model.
- In the 'All values' value box, select an existing field value, or enter a new value that will be used to represent or map to all of the field values, i.e. All.
- In the 'Members' field list, click the column that contains the values that correspond to the Role members. In this example, this is the “Members” field in the data warehouse table that contains the domain usernames of the users that will be viewing the Semantic endpoint in Power BI.
- In the 'Role members' value box, select an existing value or enter a new value that will be used to indicate any member of any role that has been mapped to this row-level security setup, i.e. Role Members.
-
Click OK to save the setup.
Mapping a Row-level Security Setup to a Role
After the Dynamic Security Setup has been created, it needs to be mapped to the Role, which can be done as follows:
- Right-click the Row-Level Security Setup, select Roles, and then select the specific Role from the Roles list.

- Drag the Row-Level Security Setup onto the Role.
The following GIF shows the entire completed Dynamic Row-Level Security Setup that is described above.

The setup above will filter the model so that each Sales Rep will only see their own Sales when they open the endpoint, which is done by matching their domain username to their full name as is captured as a field in the Sales table. Each Sales Rep only sees that part of the model that is relavent to themselves. By using a Dynamic Row-Level Security Setup, it is not necessary to update any of the configurations in TimeXtender when new Sales Reps join the firm. As long as they are added to the Data Warehouse “SecureSetups” table, they will be picked up automatically when everything is executed.
Dynamic Domain Logon to Territory Field Values Secure Setup Example
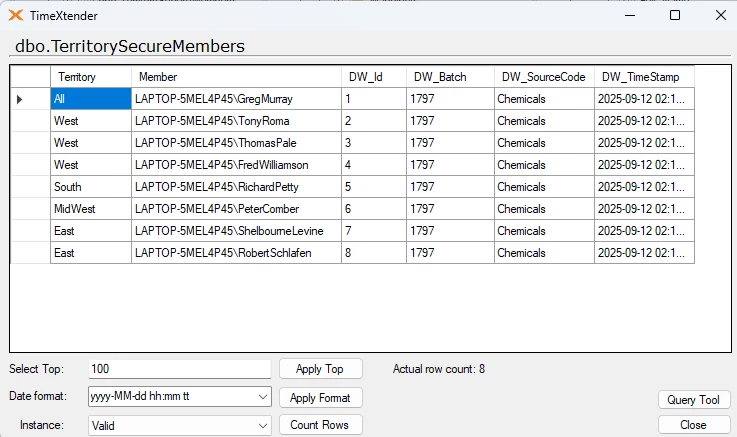
The Manual Secure Setup Example above required us to create 5 Roles and 5 Secure Setups. We can accomplish the same thing using a Dynamic Secure Setup that only has 1 Role and 1 Secure Setup, however, this Secure Setup will need to use a table that delineates all of the users and which Territory value they below to. In this example, the Secure Setup data warehouse table appears as follows:
Once this table is available in the data warehouse, the Security Setup that uses that table can be created as follows:

Afterwards, the Secure Setup needs to be associated to a Role that contains all the members as listed out in the table, and that Role needs to be associated with the endpoint. The complete setup is shown in the following GIF.

Dynamic Product Security Example using Role Members
Another common security setup will involve a table that has a large number of entries and you want to restrict what is shown in the model to a subset of those values for a specified group of users, and there is also another group that has access to all of the field values. This can be done using either a Manual or Dynamic Security setup.
Dynamic Security Setup
The first step would be to create an AD Group that has all of your users in it, similar to the “SalesReps” group that has been used in the examples above.
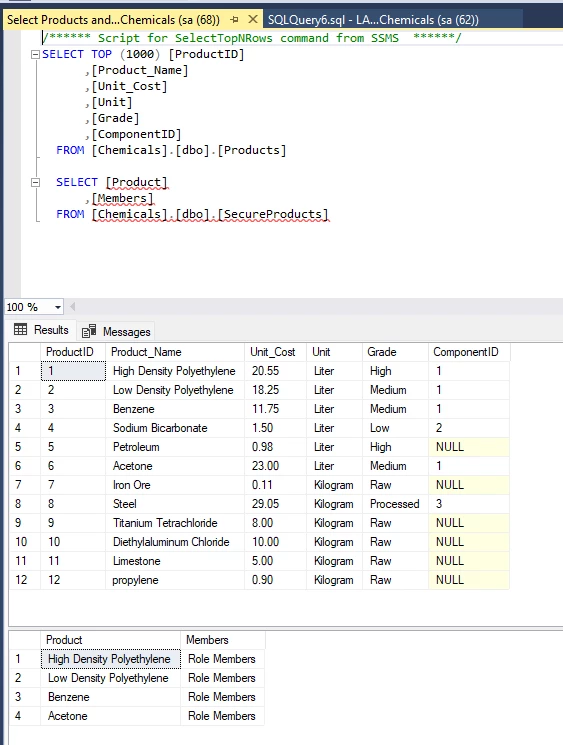
The second step would be to create a table that can be used for the Dynamic Security Setup. The table will have one column for the values that you want to include in the model and the other column is a “Members” column with the value of “Role Members” for all of the rows. In the following example, a “SecureProducts” table has been created that contains a subset of all values in the “Products" table as described above.
The endpoint will then restrict the data shown for the SalesReps so that they only see Sales data related to the 4 products in the “SecureProducts” table.
The Dynamic Security Setup will be created under the Product_Name field and look like the following:

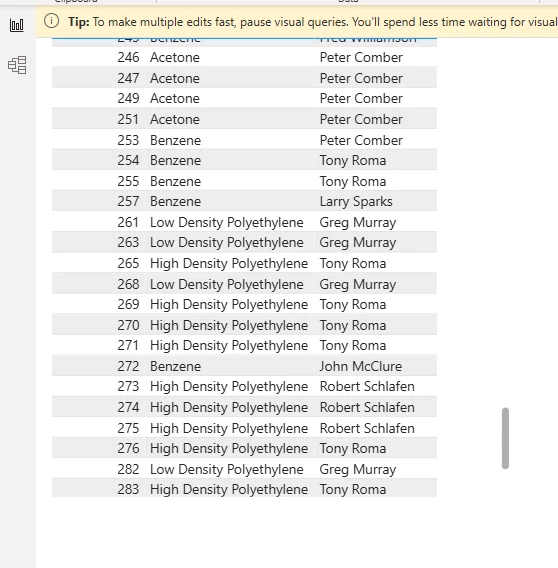
The following screenshot shows what the SalesReps will see when the open the endpoint and how the results only include the 4 products as configured by the Security Setup.
If someone who is not part of a Role that has been associated to the endpoint tries to open the endpoint, then they will receive an error message similar to the following:

Note: the only exception to the “Unable to Connect” error message above would be if the user opening the endpoint is an Administrator to the Analysis Services instance, then that would override the security setup in the Semantic model and they would have full access to all the data in the model.
In order to give some other users full access to the Semantic model data, you simply need to create a Role with those users as members and then associate that Role to the endpoint, without that Role being associated to any Security Setup. This is approach is consistent with Model-Level Security as described at the beginning of this article.
If you want to be more explicit about what the user has access to, you can also create a separate Row-Level Security Setup that associates the user or role members with the “All” field value, and then associate that row-level security setup with its own Role that is also associated with the endpoint, which is the “Managers” Role in my example. In this screnario, however, this is optional, as the same level of access can also be granted using Model-Level Security as described above.
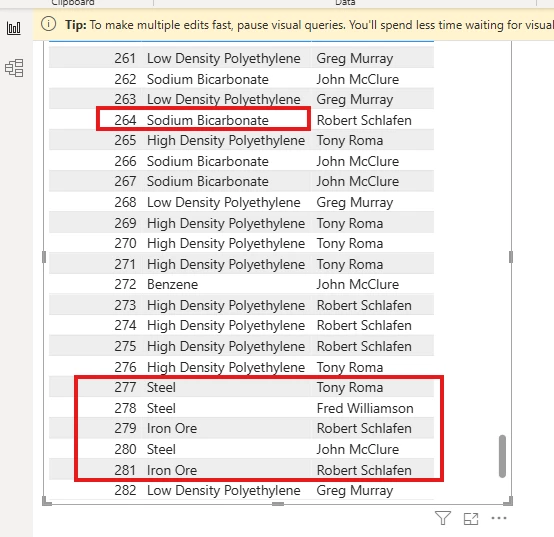
A Manager that has full access to the data in the Sales table will see all of the products in the Sales table when opening the same endpoint.
The following GIF shows the complete setup used in the example above.

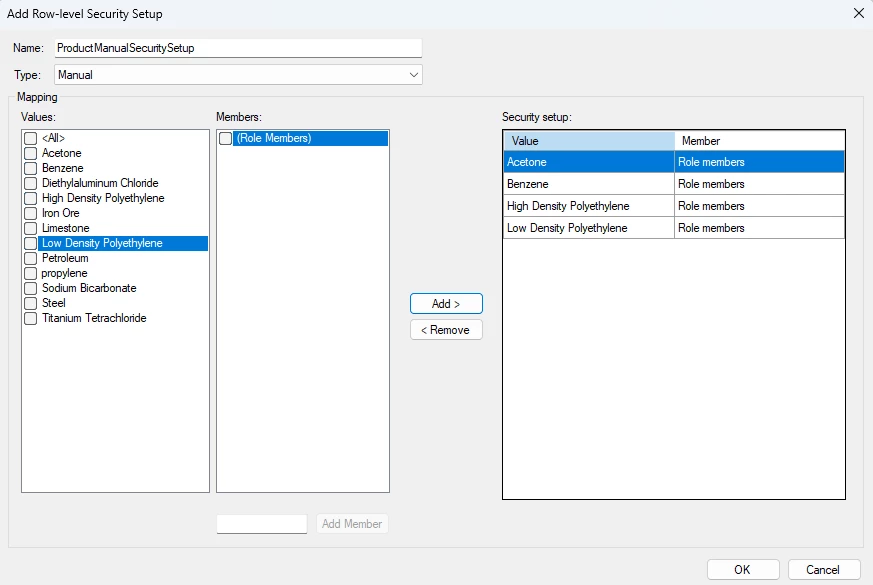
The above could also be accomplished using a Manual Security Setup as follows:
The advantage to using a Dynamic Security setup is that you do not need to amend the security setup should the list of products to include need to be amended, you can simply update the database table that is feeding into the model, and when you execute the data sources, data warehouses, and Semantic endpoint, then the changes will be picked up automatically. However, you have your choice as to which approach to use and can adopt that approach that is most suitable for your circumstances.
Different types of endpoints may implement security differently
In conclusion, there are different ways of setting up row-level security depending on the type of endpoint(s) and how security is handled in your organization.
Multiple Roles can be associated with the same Row-Level Security Setup and vice-versa, providing flexibility in the deployment of the access security.
The two basic approaches are as follows:
- One role and one setup:
- Add one Role. If you target SSAS Tabular, all users and groups that require access must be added to the role to have access. If you only target Qlik, the role can be empty since it only serves as a link between the security setup and the endpoint
- Add one Row-Level Security Setup. Map the relevant Values to the Members (or Users)
- Using Active Directory groups as role members can expedite the setup and maintenance of the security setup
- Multiple roles and multiple setups:
- Add a role for each user or group that should have access to a specific subset of data
- Add a setup for each of the roles. Map the relevant values to "(Role Member)" in the Members list
- Map the security setups to the roles and the roles to the endpoint(s)
- This approach is basically using roles as user groups in the Semantic Model.
As hinted above, Analysis Services and Qlik handles security differently:
- On Analysis Services, access is granted to a role and TimeXtender Data Integration uses DAX scripting to provide users and groups with row-level access.
- Qlik does not have roles, so all access is granted on the users/groups-level. For Qlik, roles in the Semantic Model are simply an ad hoc collection of users and groups that have access to the same data.
It is strongly recommended to run QC testing of the endpont in a presentation application to confirm that the security configured is achieving the desired resuls.
