


In this article you will read how to move TimeXtender Orchestration and Data Quality from on-premise installation to cloud
Moving from On-Premise to the cloud environment requires a few steps.
- Backup the On-Premise TimeXtender Orchestration and Data Quality database and send it to your contact in the TimeXtender team
- The TimeXtender team will restore the database to an TimeXtender SQL Server in the cloud
- The TimeXtender team will create all metadata required for TimeXtender Orchestration and Data Quality to work in the cloud
- The TimeXtender team will make configuration adjustments to the SQL Database so it can work in the cloud environment
- This step might require feedback from you, the customer, to reconcile user's Azure Directory names to their email addresses
- When everything is set up correctly next step is to install TimeXtender Gateways on all servers that execute tasks
- If required, the TimeXtender team can help you with this and tell you which servers require Gateway to work
- You, the customer, will then need to create new Execution connections and Data Providers in the Gateway UI
- If required, the TimeXtender team can help you and tell you which execution connections and data providers are required and in which Gateway they should be created
- The TimeXtender team will then adjust all tasks in the TimeXtender Orchestration and Data Quality database so they use the correct Gateway-created execution connections and data providers
- Lastly, On-Premise TimeXtender Orchestration and Data Quality can be turned off and the TimeXtender team will turn on the cloud version
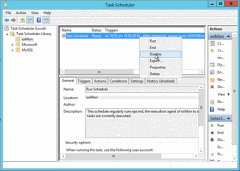
- Turning off On-Premise TimeXtender Orchestration and Data Quality requires opening Task Scheduler on the main TimeXtender Orchestration and Data Quality server and disabling the TimeXtender Orchestration and Data Quality task
Note: For TimeXtender Orchestration and Data Quality in the cloud, the TimeXtender Orchestration and Data Quality database can be hosted by the customer themself. For the setup to work, the TimeXtender team will require the login information of the SQL server hosting the database as well as a db_owner user for the database.
