When you need to gain access to APIs or specifically SharePoint using the normal OAuth authentication methods isn’t always possible. For reference, these grant types are CLIENT, CODE, and PASSWORD.
It may be that the API or SharePoint needs access through the use of a certificate
Here is an explanation of how to set this up for use with Microsoft-based providers and other APIs.
You may also need to generate a pfx (Personal Information Exchange) and cer (Security Certificate) file. One to upload to Azure or in the APIs setup and one to store locally to relate the two.
Create a self-signed certificate
For Azure and likely also other providers, you can start by running this script.
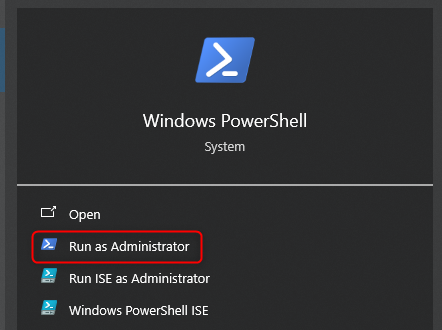
- Start PowerShell as an Administrator

- Add and run the following code on where TimeXtender is installed by importing it into the PowerShell program and clicking the enter button.
#Requires -RunAsAdministrator

<#

.SYNOPSIS

Creates a Self Signed Certificate for use in server to server authentication

.DESCRIPTION

.EXAMPLE

.\Create-SelfSignedCertificate.ps1 -CommonName "MyCert" -StartDate 2015-11-21 -EndDate 2017-11-21

This will create a new self signed certificate with the common name "CN=MyCert". During creation you will be asked to provide a password to protect the private key.

.EXAMPLE

.\Create-SelfSignedCertificate.ps1 -CommonName "MyCert" -StartDate 2015-11-21 -EndDate 2017-11-21 -Password (ConvertTo-SecureString -String "MyPassword" -AsPlainText -Force)

This will create a new self signed certificate with the common name "CN=MyCert". The password as specified in the Password parameter will be used to protect the private key

.EXAMPLE

.\Create-SelfSignedCertificate.ps1 -CommonName "MyCert" -StartDate 2015-11-21 -EndDate 2017-11-21 -Force

This will create a new self signed certificate with the common name "CN=MyCert". During creation you will be asked to provide a password to protect the private key. If there is already a certificate with the common name you specified, it will be removed first.

#>

Param(


[Parameter(Mandatory=$true)]

 [string]$CommonName,


[Parameter(Mandatory=$true)]

 [DateTime]$StartDate,


[Parameter(Mandatory=$true)]

 [DateTime]$EndDate,


[Parameter(Mandatory=$false, HelpMessage="Will overwrite existing certificates")]

 [Switch]$Force,


[Parameter(Mandatory=$false)]

 [SecureString]$Password

)


# DO NOT MODIFY BELOW


function CreateSelfSignedCertificate(){


#Remove and existing certificates with the same common name from personal and root stores

  #Need to be very wary of this as could break something

  if($CommonName.ToLower().StartsWith("cn="))

  {

      # Remove CN from common name

      $CommonName = $CommonName.Substring(3)

  }

  $certs = Get-ChildItem -Path Cert:\LocalMachine\my | Where-Object{$_.Subject -eq "CN=$CommonName"}

  if($certs -ne $null -and $certs.Length -gt 0)

  {

      if($Force)

      {


foreach($c in $certs)

          {

              remove-item $c.PSPath

          }

      } else {

          Write-Host -ForegroundColor Red "One or more certificates with the same common name (CN=$CommonName) are already located in the local certificate store. Use -Force to remove them";

          return $false

      }

  }


$name = new-object -com "X509Enrollment.CX500DistinguishedName.1"

  $name.Encode("CN=$CommonName", 0)


$key = new-object -com "X509Enrollment.CX509PrivateKey.1"

  $key.ProviderName = "Microsoft RSA SChannel Cryptographic Provider"

  $key.KeySpec = 1

  $key.Length = 2048

  $key.SecurityDescriptor = "D:PAI(A;;0xd01f01ff;;;SY)(A;;0xd01f01ff;;;BA)(A;;0x80120089;;;NS)"

  $key.MachineContext = 1

  $key.ExportPolicy = 1 # This is required to allow the private key to be exported

  $key.Create()


$serverauthoid = new-object -com "X509Enrollment.CObjectId.1"

  $serverauthoid.InitializeFromValue("1.3.6.1.5.5.7.3.1") # Server Authentication

  $ekuoids = new-object -com "X509Enrollment.CObjectIds.1"

  $ekuoids.add($serverauthoid)

  $ekuext = new-object -com "X509Enrollment.CX509ExtensionEnhancedKeyUsage.1"

  $ekuext.InitializeEncode($ekuoids)


$cert = new-object -com "X509Enrollment.CX509CertificateRequestCertificate.1"

  $cert.InitializeFromPrivateKey(2, $key, "")

  $cert.Subject = $name

  $cert.Issuer = $cert.Subject

  $cert.NotBefore = $StartDate

  $cert.NotAfter = $EndDate

  $cert.X509Extensions.Add($ekuext)

  $cert.Encode()


$enrollment = new-object -com "X509Enrollment.CX509Enrollment.1"

  $enrollment.InitializeFromRequest($cert)

  $certdata = $enrollment.CreateRequest(0)

  $enrollment.InstallResponse(2, $certdata, 0, "")

  return $true

}


function ExportPFXFile()

{

  if($CommonName.ToLower().StartsWith("cn="))

  {

      # Remove CN from common name

      $CommonName = $CommonName.Substring(3)

  }

  if($Password -eq $null)

  {

      $Password = Read-Host -Prompt "Enter Password to protect private key" -AsSecureString

  }

  $cert = Get-ChildItem -Path Cert:\LocalMachine\my | where-object{$_.Subject -eq "CN=$CommonName"}


Export-PfxCertificate -Cert $cert -Password $Password -FilePath "$($CommonName).pfx"

  Export-Certificate -Cert $cert -Type CERT -FilePath "$CommonName.cer"

}


function RemoveCertsFromStore()

{

  # Once the certificates have been been exported we can safely remove them from the store

  if($CommonName.ToLower().StartsWith("cn="))

  {

      # Remove CN from common name

      $CommonName = $CommonName.Substring(3)

  }

  $certs = Get-ChildItem -Path Cert:\LocalMachine\my | Where-Object{$_.Subject -eq "CN=$CommonName"}

  foreach($c in $certs)

  {

      remove-item $c.PSPath

  }

}


if(CreateSelfSignedCertificate)

{

  ExportPFXFile

  RemoveCertsFromStore

}- It requires you to give it a CommonName, which will be the name of the files.

- Then you set a start date, the current date is a good choice.

- Then you set an end date, two years is a good duration.

- The final step is to give it a password. Remember this as you will not be able to see it again.

- It then will show you a summary of what has been done and where to locate the files. The default folder is C:\Windows\System32.

- I made a CERT folder on my C drive that I use to store them in, which makes it easy to locate the files.

- It requires you to give it a CommonName, which will be the name of the files.
Upload the certificate to your Azure Application
If the data source you need to do this for is an app based on some service made by Microsoft you can upload the certificate to Azure.
- Go to the Azure Portal
- Then to App Registrations.
- Add a new app to use for this or use an existing one. You can see how to make a new app here.
- Once you have an app you want to use to gain access, open it and locate the Certificates & Secrets area.
- In there be sure to click on the Certificates pane and then the Upload certificate button.

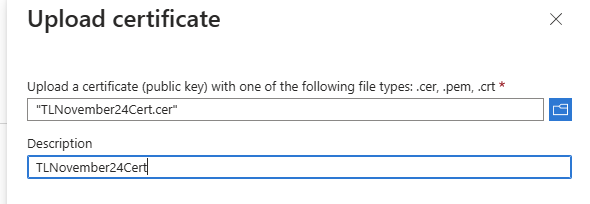
- Once you click on the Upload certificate button you will be shown a menu in the right side of the screen. Click on the icon next to the filename field and locate the cer (security certificate) file that was created.

- Once you have done this you will see its location. Give it a description as well and click add.

- Now you can see the added certificate, its name, its start date, its end date and a certificate id value.

Set up a data source to use the certificate to gain access
For reference, I do this in a CData SharePoint data source, but as mentioned above it could be a REST or similar, it just needs the specific OAuthJWT area and the OAuthJWT auth scheme to work.
- Create or edit a data source. Locate the Auth Scheme field and set it to OAuthJWT.
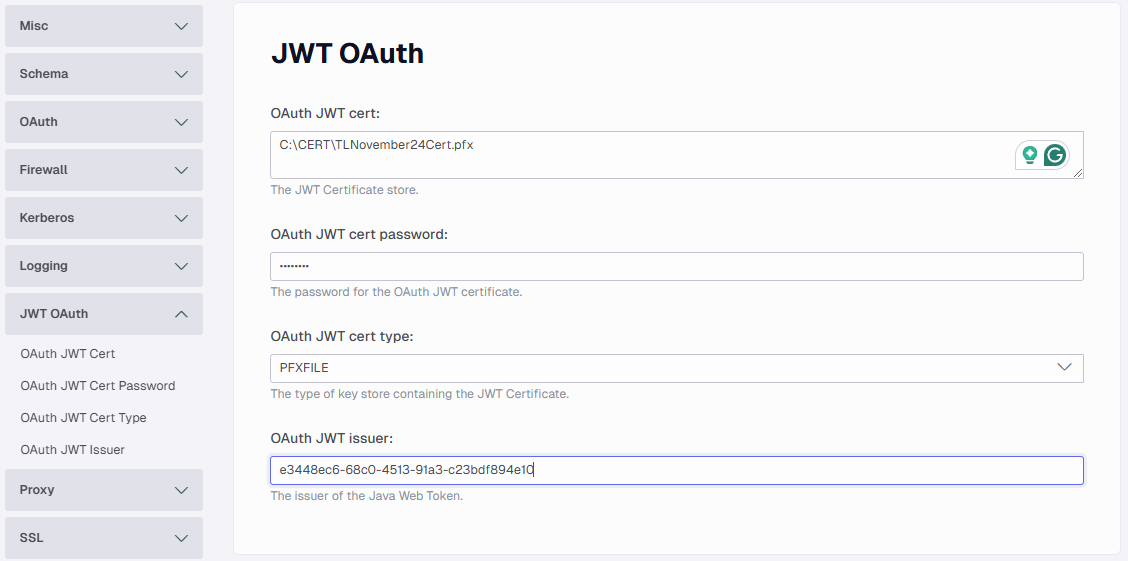
- Locate the OAuthJWT area and make the following setup.
- OAuth JWT cert - The path to the pfx file you just created.
- OAuth JWT cert password - Is the password you set up when you generated the cert
- OAuth JWT cert type - Set it to PFXFILE as that is what we point to in the above field.
- and pfx files.
- OAuth JWT issuer - This is the Client ID of the app you use to gain access.
-

If you are using a certificate that is uploaded to another provider, E.G. not Microsoft Azure, you may need to use it in the SSL section instead. The setup is very close to the above, the only difference is that you should make sure that the Auth Scheme field is empty
- Locate the Auth Scheme field and remove any content, do not choose an option to delete any default setup.
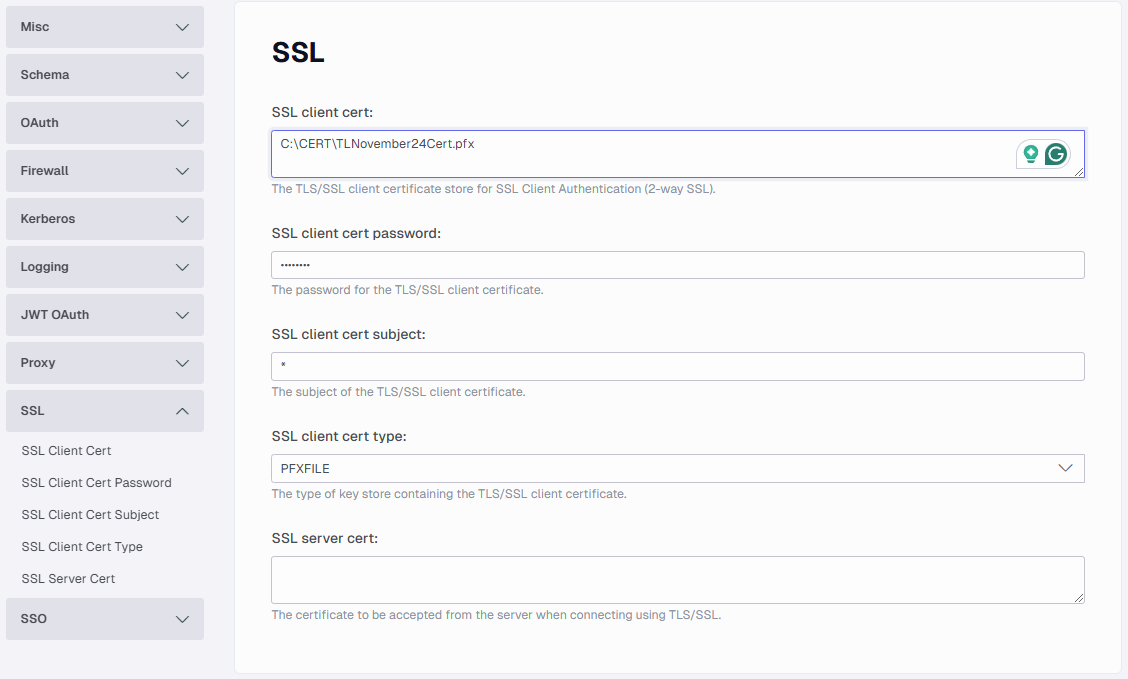
- Locate the SSL area
- SSL client cert - The path to the pfx file you just created.
- SSL client cert password - This is the password you set up when you generated the cert and pfx files.
- SSL client cert Type - Set it to PFXFILE as that is what we point to in the above field.
-


