

Overview
The TimeXtender MCP Server endpoint implements the Model Context Protocol (MCP) to connect AI agents such as Claude, LM Studio, and other compatible tools directly to semantic models deployed in the TimeXtender Data Integration platform. This feature generates a JSON representation of the semantic model that MCP-compatible clients consume to understand the data warehouse schema, relationships, and business context. AI agents use this metadata to generate SQL queries, answer natural language questions, and derive actionable insights from the data warehouse. To learn more review: TimeXtender MCP Server Overview
Prerequisites
- Active TimeXtender Data Integration environment with Portal access
- TimeXtender Desktop installed on the local machine
- Prepare instance with accessible data warehouse
- Read-only database user credentials for MCP server database access
- Claude Desktop application or other MCP-compatible AI tool (for client connections)
Instructions
Create Deliver Instance with MCP Endpoint
- Navigate to the TimeXtender Portal and access your data estate
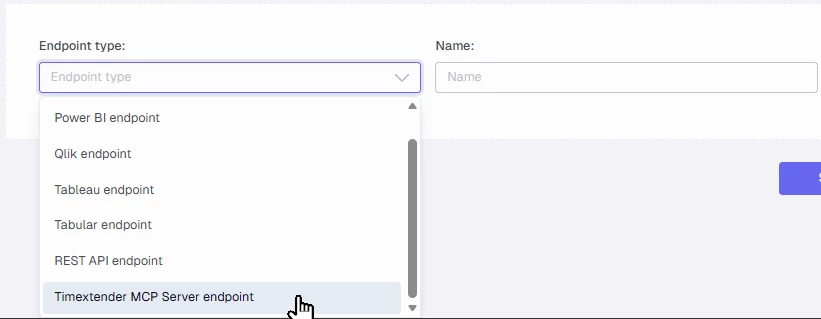
- Click Add endpoint
- Select TimeXtender MCP Server endpoint from the Endpoint type dropdown
- Enter a descriptive Name for the endpoint
- Click Add endpoint to create the deliver instance
- Specify the JSON file location where the semantic model JSON will be stored
- Enter the full file path including the .json extension
- Example: C:\SemanticModels\Sales.json
- The file name must use only letters, numbers, hyphens (-), and underscores (_). No Spaces.
- Configure optional View schema and Postfix settings if required
- Save the endpoint configuration
Build Semantic Model in TimeXtender Desktop
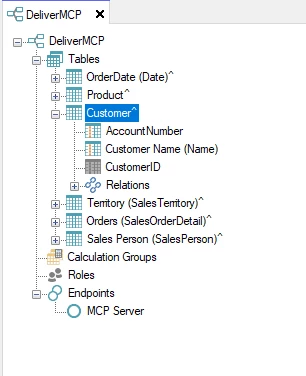
- Open TimeXtender Desktop and connect to your data estate
- Expand the Deliver instance tree and locate the MCP endpoint created above
- Map the fields to include in the semantic model
Add Contextual Descriptions
Clear, specific descriptions are critical for accurate AI queries. Go beyond labels to document business meaning, grain, date logic, filters, and usage rules. Strong metadata prevents AI from guessing, keeps metrics consistent with official reporting, and turns your semantic model into a reliable interface for analytics.
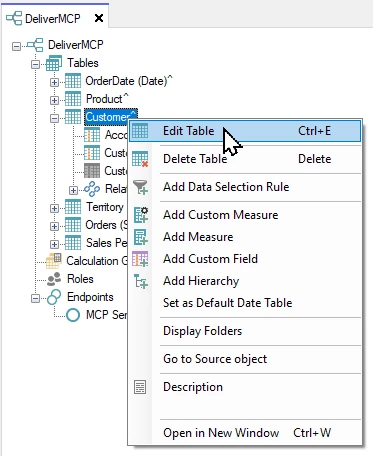
- Right-click a table in the semantic model and select Edit Table
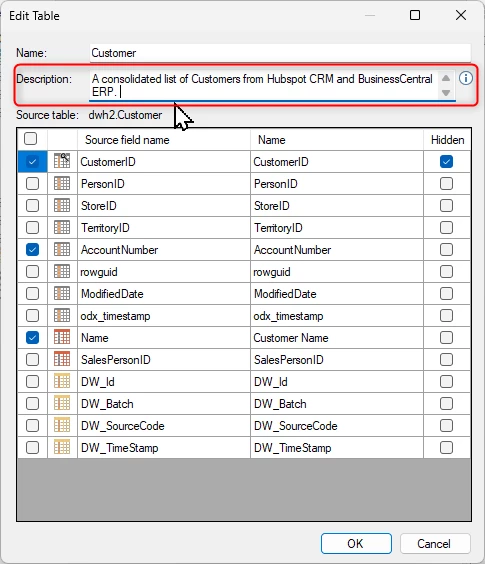
- Enter a detailed Description that explains the business purpose and content of the table
- Include information about data sources, update frequency, and business use cases
- Example: "A consolidated list of Customers from Hubspot CRM and BusinessCentral ERP"
- Click OK to save the table description
- Right-click individual fields and select Edit Field to add field-level descriptions
- Enter contextual information that helps AI agents understand field meaning and usage
- The MCP server passes these descriptions to connected AI tools for query generation accuracy
- Repeat for all tables and critical fields in the semantic model
Deploy Semantic Model
- Right-click the MCP endpoint in TimeXtender Desktop
- Select Deploy to generate the semantic model JSON file
- Verify the JSON file exists at the specified file location
- The JSON file contains the complete schema, relationships, and descriptions
