

Relates to TimeXtender Data Integration 6024.1 and later versions
Using Azure data factory for data movement is ideal for large data sets. By using Azure Data Factory the data is transferred directly from source to target and therefore does not rely on the limited resources of the application server.
TimeXtender Data Integration can use Azure Data Factory (ADF) to move data in the following two ways:
- Source to Ingest instance storage
- Ingest instance storage to Prepare instance storage
The following guide will show you how to:
Create an Azure Data Factory Resource
Note: If you have already created a Data Factory you wish to use, you can skip this step.
- Azure Portal > Create a new Resource > Data Factory > Create
- Select Version = V2
- Assign Subscription name, Resource Group, and Location.
- Git is not required so you can disable this.
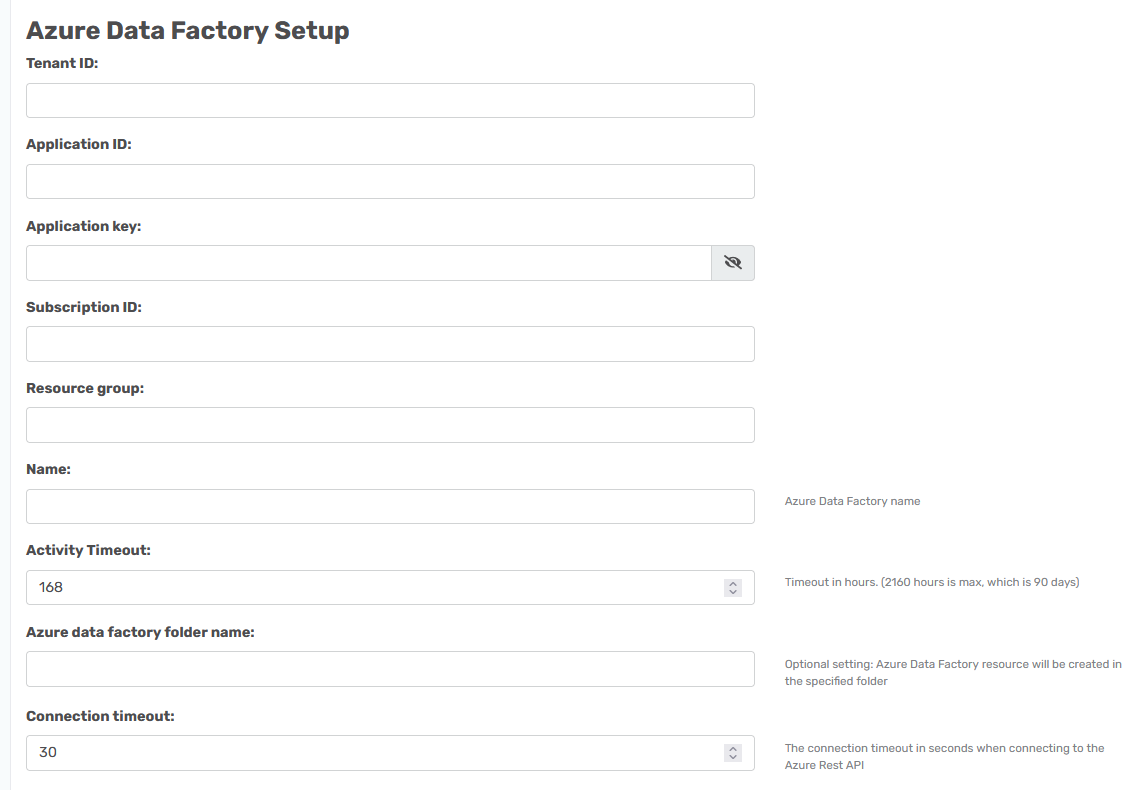
- Once deployed, please note the following properties of the Data Factory which will be needed later:
- Azure Data Factory Name
- Subscription ID
- Resource Group Name
Create an App Registration
In order to access the data factory resources from TimeXtender Data Integration, you will need to configure an App Registration in the Azure portal.
- In the Azure Portal menu, click on Azure Active Directory, then click on App Registrations in the menu bar on the left. Then click New Registration.
- Enter a name and select Accounts in this organizational directory only. The value of Redirect URI is the URL at which your application is hosted. Click Register when you are done.
- For the newly added App Registration, select Certificates & secrets to create a New Client Secret. This key is encrypted after saving, so it needs to be documented somewhere safe. The secret will appear after you click Add.
- Please note the following properties of the App Registration which will be needed later:
- Azure Tenant ID
- Application ID
- Client Secret (Application Key)
Enable App Registration access to Data Factory
After the App Registration is created, you need to configure access to Data Factory.
Note: The following steps for access control describe the minimum permissions required in most cases. In your deployment/ production, you may fine-tune those permissions to align with your business rules and compliance requirements. Refer to Microsoft Azure documentation for details.
- Go back to the resource group where your data factory resource is located and select the Data Factory resource.
- Select Access Control (IAM) and add a role assignment in the menu bar on the left.
- Add the <App Registration Name> you just created to the role of Data Factory Contributor of the resource.
Note: When you add or remove role assignments, wait for 5 minutes before executing a task in an Ingest instance. It can take up to 30 minutes for changes to take effect. For more details, review this article Troubleshoot Azure RBAC
Integration runtime
Are you connecting to a data source located on any source not related to Azure, so a local SQL database on a SQL server running on a VM, an Oracle server or something similar to that you will need to have an Integrated Runtime installed on that location. The same goes if your Prepare instance is running on a local SQL database and you still wants to use Azure Data Factory to do the transfer.
Here is a guide about this from Microsoft Azure Data factory Concepts - Integration Runtime
And an installation guide here Create-self-hosted-integration-runtime
There is also some trobleshooting options for this. for this with the most common issue with this.
Transfer from Ingest instance to Prepare instance using Azure Data Factory
Warning: This option is not supported when using Azure Synapse SQL Pool (SQL DW)
You can configure a separate Azure Data Factory resource for each environment
- In the portal open Instances and click on add new Prepare instance or alternatively edit an existing Prepare instance.
- Set it up as you want with a Name and database type. If you edit it this should already be filled out.
- At the bottom of the menu and locate the Transfer from Ingest instance section.
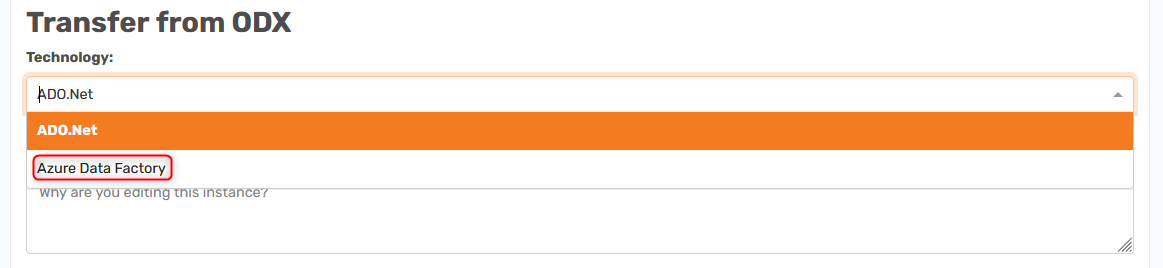
- Change the Technology from ADO.Net to Azure Data Factory.
- The specific requirements to use this will be shown
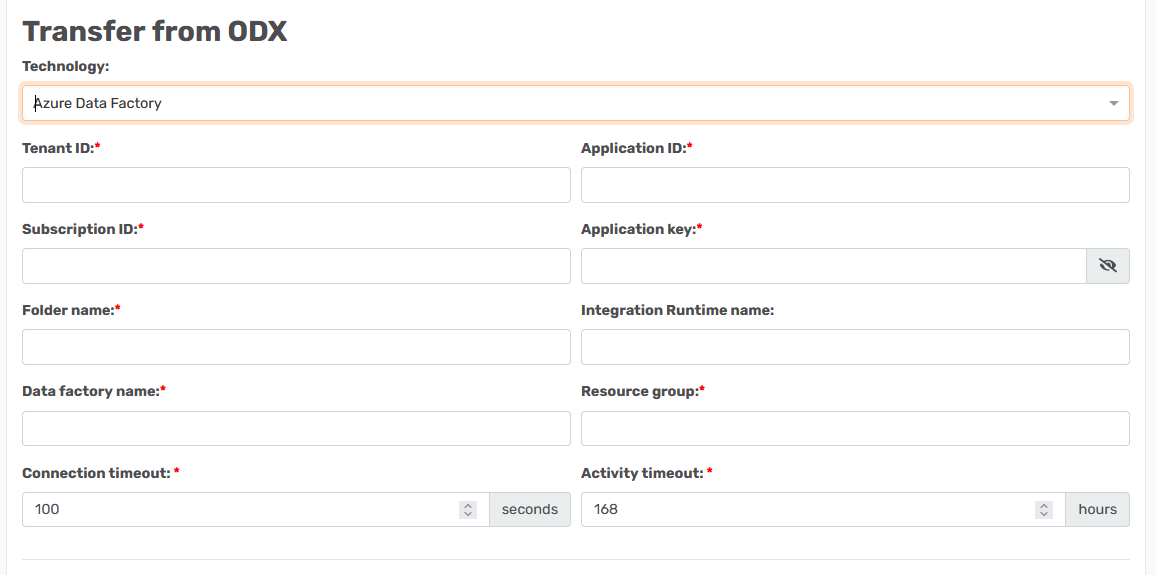
- The options are:
- Azure Tenant ID: Can be found in the overview of the APP you are using
- Subscription ID: The subscription id can be located in the data factory overview in Azure.

- (Optional) Azure Data Factory folder name - pipelines and datasets will be placed in this folder in ADF.
- Azure Data Factory Data Factory Name: the name of your data factory in Azure.
- Azure AD App Registration created in the above section
- Application ID
- Application Key (Client Secret)
- Integration Runtime: Configure a Self-Hosted Integration Runtime
- The ADF Self-Hosted Integration Runtime is ideal for when you are transferring data from/to On-Premise systems.
- Resource Group: The resource group where your data factory is located.
Transfer Data from Source to Ingest instance storage using Azure Data Factory
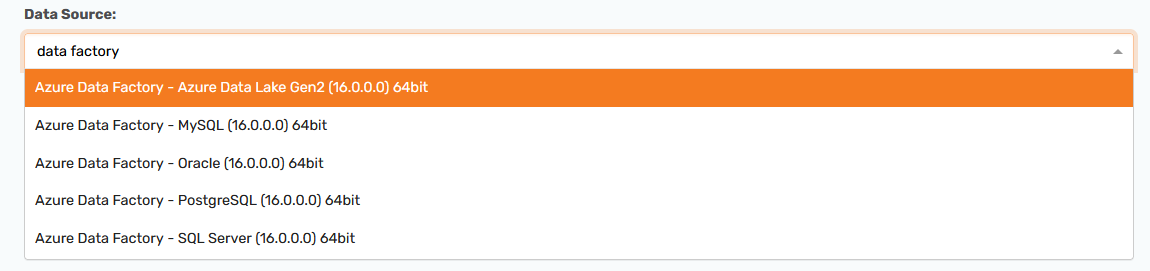
- On the Data sources page, search for data factory to choose one of the available options
- On the Connection Info page, enter the below information and click Next.
- Azure Data Factory Info
- It is at the bottom of the data source type menu, but will always look the same and require the same setup as explained in Data Factory options area.
- The only option missing from this area is the Integration runtime,
- Azure SQL connection
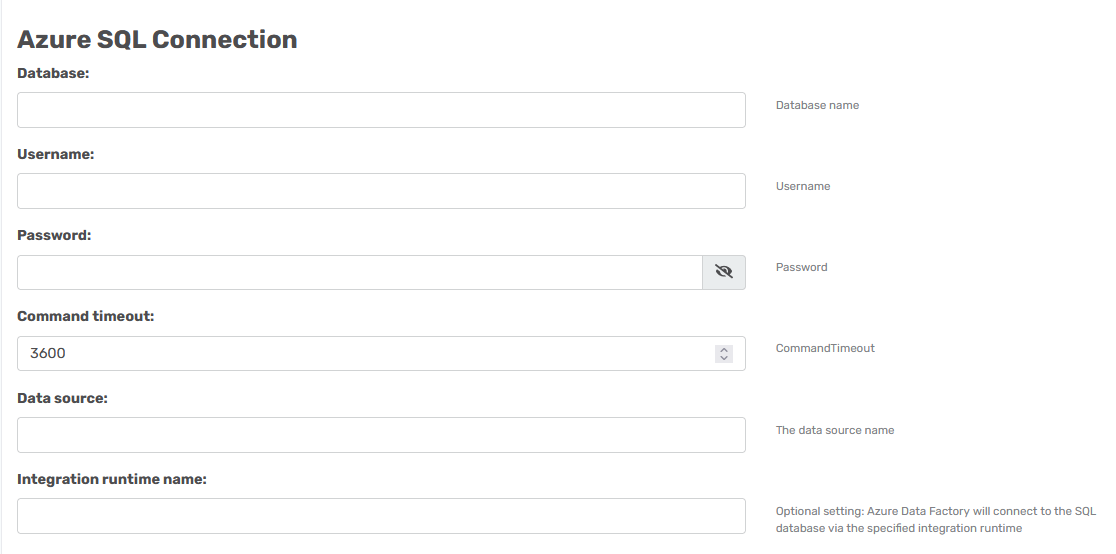
- The SQLAuthentication Authentication type is the only available option
- The Command timeout is in seconds, so the default is 1 hour.
- The Data source is the fully qualified server name of the data source - This is the connection property used by Azure Data Factory when extracting data and when synchronizing metadata (Schemas, Table Names, Field Names & Data Types).
- The Database name you want to connect to on the data source
- Integration runtime name: This is only required when connecting to On-Premise data sources. If using this option, you must also Configure a Self-Hosted Integration Runtime.
- The Username is the SQL authentication user name
- The Password is the password of the above user account
- MySQL Connection

- The Command timeout is in seconds, so the default is 1 hour.
- The Database name you want to connect to on the server
- Integration runtime name: Same as above this is only required when connecting to On-Premise data sources.
- The Password is the password of the user account
- The default Port is 3306
- The Server is the location where MySQL is running
- SSL mode
- The User ID is the account that at minimum has read access to the database.
- Oracle Connection
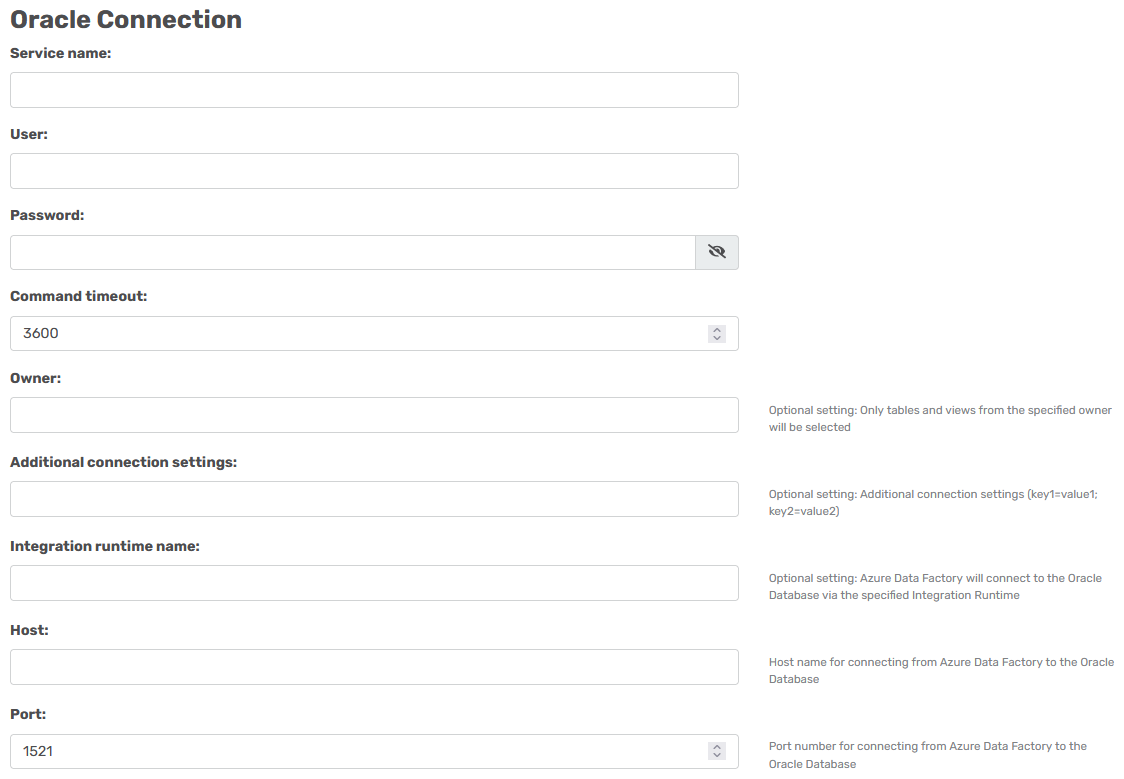
- The setup fields necessary are the same as those defined in the following Oracle guide using the EZ connect.
- The difference is the Host field is the Server field in the other guide and that you again need to have an Integrated Runtime running on the Oracle server.
- Note that if your Ingest Instance is using an Azure Data Lake Gen2 Container for storage, then the Integration Runtime will need to use the Java Runtime Environment in order to be able to write and parse parquet files. The Java Runtime Environment needs to be installed on the same system where the Integration Runtime is installed and can be downloaded at the following link: https://www.java.com/en/download/. For more information, click on the Azure Data Factory Oracle Data Source - Error executing meta data pipeline KB Article.
- Postgre SQL Connection
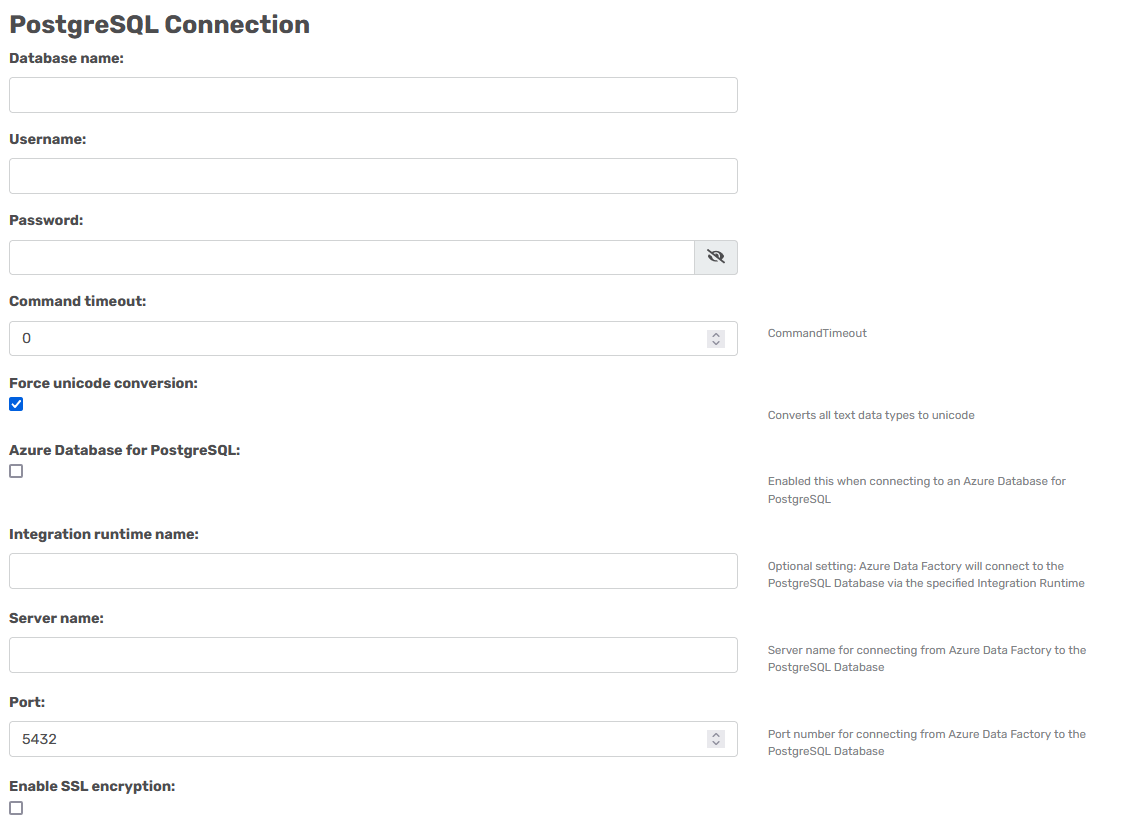
- Database Name: dvdrental
This needs to be a database on the server -
Username: postgres
This is the user name used to connect to and authenticate the PostgreSQL server. Here used is the standard admin account that gets created during installation, but any account that has read rights on the server can be used.
- Password:
This is the password of the admin account or what user is added. - Command timeout: 0
This means that no timeout will be hit it can run unlimited time. The suggested setup would be 3600. - Force unicode conversion: True
A checkbox that set an attempt to force all strings to be NVarChar - Azure Database for PostgreSQL:
A checkbox that sets that the source is in Azure - Integration runtime name:
Is used if the server is on a local server and not in Azure - Server Name: localhost
The server where the server is hosted - Port: 5432
Is the default port used for PostgreSQL
- Database Name: dvdrental
- Azure Data Factory Info
Troubleshooting
Connectivity Error
Error: System.Data.SqlClient.SqlException: A network-related or instance-specific error occurred while establishing a connection to SQL Server. The server was not found or was not accessible
The data source needs to be accessed by both an Azure Data Factory and the Ingest instance. If you receive an error, it is important to isolate which component is unable to access the data source.
If you make changes to Data Lake or Data Factory configuration Access Control (IAM) and role assignment etc.
- Wait until the changes take effect in Azure ( Troubleshoot Azure RBAC )
- Execute Task and verify it succeeds
- Preview Tables in Data Factory to verify it is working OK
- Synchronize Ingest instance against Prepare instance (if you made changes in Data Source)
- Preview Tables in Ingest instance storage to verify the Data Lake setup is working OK
- Deploy and Execute in TimeXtender Data Integration
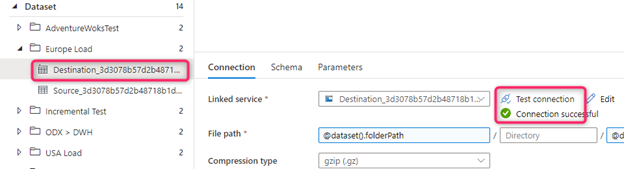
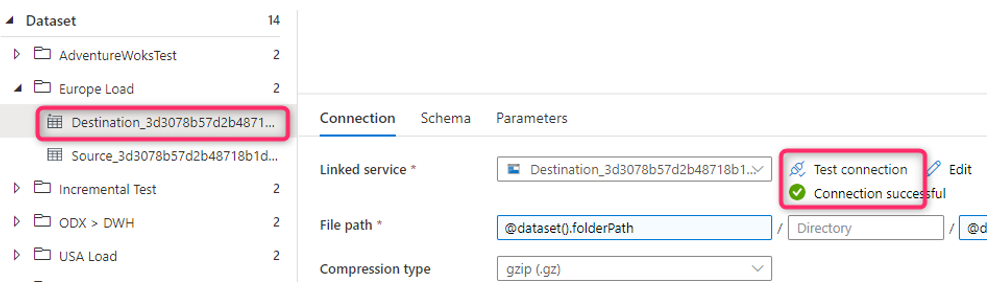
Also, take a look at your Azure Data Factory settings, specifically in the Author pane, under the Datasets section, look for the "Destination" dataset created for this data source. Try and click "Test connection" to see if that works.
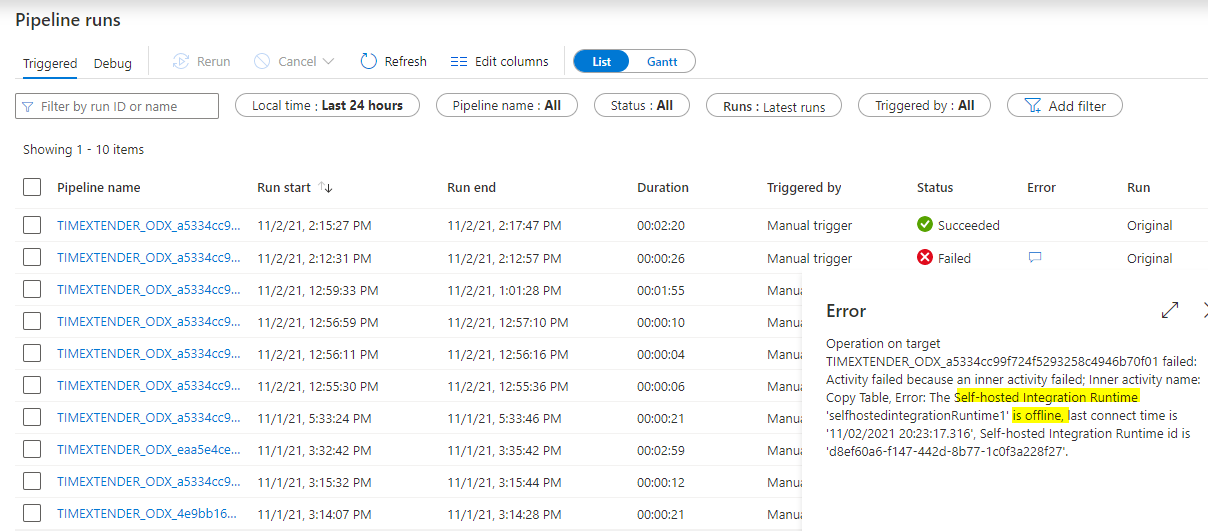
Self-Hosted Integration Runtime Issues
Verify the Self-Hosted Integration Runtime is installed and running.
Study this detailed troubleshooting guide:
Troubleshoot self-hosted integration runtime in Azure Data Factory
Review your Azure Data Factory settings, specifically in the Author pane > monitor > pipeline runs
JreNotFound error
You have a working Ingest instance setup using Azure Data Lake storage. You add a new Azure Data Factory Data Source with Self Hosted Integration Runtime. The Sync task completes successfully, however the Transfer task fails with the following error:
{"errorCode": "2200","message": "Failure happened on 'Sink' side. ErrorCode=JreNotFound,'Type=Microsoft.DataTransfer.Common.Shared.HybridDeliveryException,Message=Java Runtime Environment cannot be found on the Self-hosted Integration Runtime machine. It is required for parsing or writing to Parquet/ORC files. Make sure Java Runtime Environment has been installed on the Self-hosted Integration Runtime machine.,Source=Microsoft.DataTransfer.Common,''Type=System.DllNotFoundException,Message=Unable to load DLL 'jvm.dll': The specified module could not be found. (Exception from HRESULT: 0x8007007E),Source=Microsoft.DataTransfer.Richfile.HiveOrcBridge,'","failureType": "UserError","target": "Copy Table","details": []}
Cause
The Azure Data Factory IR packages the data in parquet format at client side, prior to uploading to Azure Data Lake storage. The parquet format requires Java Runtime Environment (JRE).
Resolution
Install Java Runtime from https://www.java.com/en/download/
Notes
"UserErrorJreNotFound" error message when you run a copy activity to Azure
Invalid Client Secret
Error: Failed to get access token by using service principal .. invalid client secret
Review your Azure Data Factory settings, specifically in the Author pane, under the Datasets section, and look for the "Destination" dataset created for this data source.
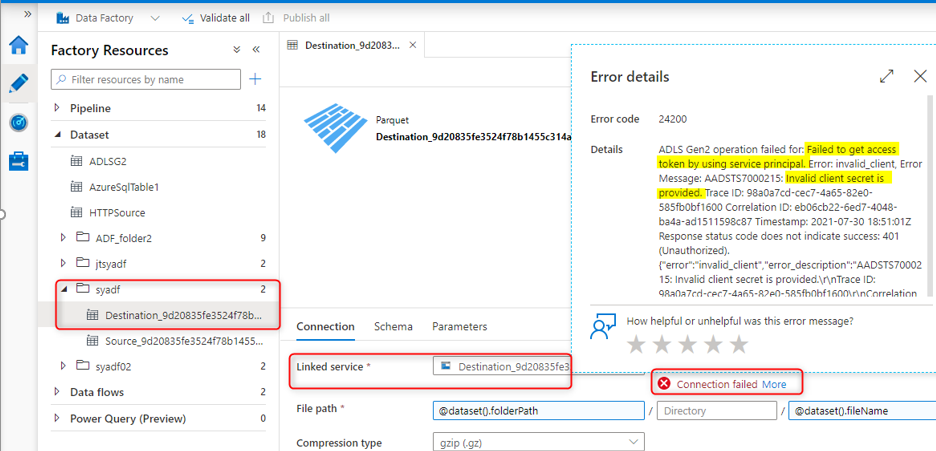
Resolve the access token error, then click "Test connection" to ensure it works.
Failed to Get Access Token by using MSI authenticator
Error: Failed to get access token by using MSI authenticator. Acquire MI token from AAD failed. ErrorCode: invalid_clientA configuration issue is preventing authentication
Check to see if the SQL authentication password has changed. Update and test the linked service in the ADF setup.
Manage > Linked Services, review SQL Server connection
Cannot Set the AccessToken Property
Error: System.Exception: Error executing meta data pipeline: { "errorCode": "2200", "message": "ErrorCode=SqlFailedToConnect,'Type=Microsoft.DataTransfer.Common.Shared.HybridDeliveryException,Message=Cannot connect to SQL Database: '.', Database: '<ODX_Storage_SQL database name>', User: ''. Check the linked service configuration is correct, and make sure the SQL Database firewall allows the integration runtime to access.,Source=Microsoft.DataTransfer.ClientLibrary,''Type=System.InvalidOperationException,Message=Cannot set the AccessToken property if the 'Integrated Security' connection string keyword has been set to 'true' or 'SSPI'.
If your Ingest instance storage is on a SQL server, change its connection from "Windows authentication to "SQL authentication" with a user and password.
