TimeXtender Data Integration (TDI) includes security functionality that provides a way to set both row level and object level permissions for objects within a data area.
The Security folder in the data area tree contains all of the security setups. Right-click on the Security folder to see the options needed to configure a new security setup, which is done according to the following two general steps:
- Create a database role based on an SQL Server login.
- Use the database role to set up either object level or row level security.
According to step 1 above, creating a Database Role in the data area is a prerequisite for configuring row level permissions. For a detailed explanation of creating a database role, see:
Assigning Row Level Permissions
In addition to configuring access on the object level, the data available can be filtered based on individual Active Directory users or SQL Server database roles. For example, a particular salesperson can be configured to only have access to their own sales data. See the example at the end of this article for how this might be implemented.
Data level security is based on the following four concepts that allow for the creation of a security model that can later be reused for other tables.
- A securable column contains the values to be used in the filter. For the salesperson example above, this column could be the “sales region id” in the “sales regions” table.
- A securable column setup is a mapping between selected securable column values and the associated users or database roles. Each securable column can have multiple securable column setups.
- A secured column is a table column containing the fitlered data. For the salesperson example, this could be the “Logon” column in the “Sales Transactions” table.
- A secured view is a view that filters out all the data that the user does not have access to. For the salesperson example, this would be all the “sales transactions” rows that do not match the “Logon” of the salesperson. When using row level security, the secured view should be used for reporting instead of the table it secures.
Use the following steps to assign row level security to a table.
- Expand the table that contains the column where permissions are to be set. Right-click the field and select Add Securable Column.

- (Optional) In the Display Column list, click the column value to be displayed in lieu of the column that is being secured. For example, if the securable column contains a data value that is obscure to read, then it might be more helpful to select something that is easier to understand, like the “Name” column instead.
- (Optional) In the <All> Value box, type a value that will be used to indicate “All Values”, which should be a value that is guaranteed to not be existing in the secured column as a value.
- Click OK, which will open the Add Securable Column Setup window.
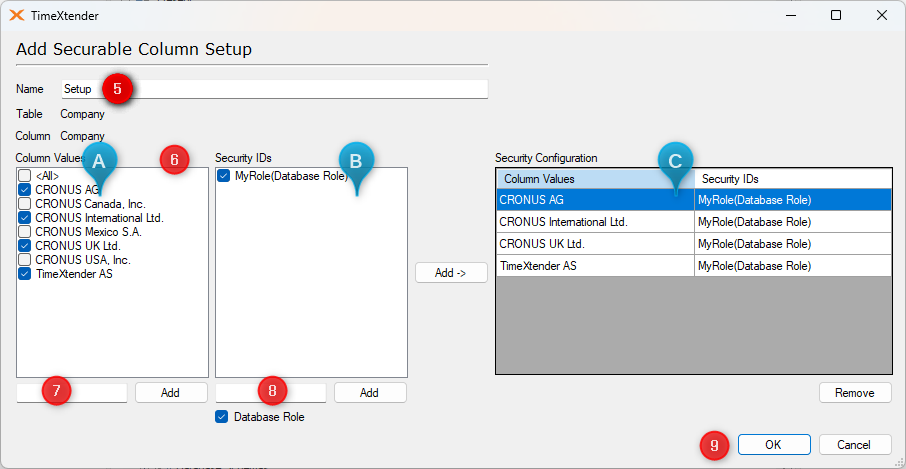
- In the Name box, enter a name for the securable column setup.
- Column values and database roles are selected and then added to the Security Configuration list on the right to grant object access according to the following steps.
- Select the column values from the Column Values list on the left.
- Select one or more database roles as listed out under Security IDs.
- Click the “Add->” button to add these associations to the Security Configuration list on the right.
- (Optional) If you need to assign permissions to a value or a security ID that is not in either list, type the value or name in the box under the appropriate list and click the Add button.
- (Optional) A Database Role can be added as opposed to an Active Directory user. For more information on database roles, see Adding a Database Role.
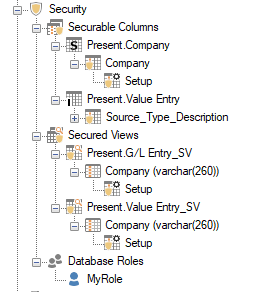
- Click OK to save the securable column setup, which can later be found under Security folder as Securable Columns, [table name], [securable column name].
Applying Row Level Permissions
Use the following steps to use a securable column setup to configure row level permissions on a table.
- Drag and drop a securable column setup on a field in a data area table. A secured view is created and can be found under Security, Secured Columns, [table name], [setup name]_SV.
- To add further permissions to the view, drag and drop a securable column setup on the view, which will open the Add Field window.
- In the Field Name list, select the field that contains the values to be filtered with the securable column setup.
- Click OK. The field is added to the secured view.
In addition to being used to create row level permissions, database roles can also be used to create object level Permissions. Click on the following link to open the article regarding the configuration and setup of object level permissions. Data Area Security - Object-Level Security
Sales Rep Example:
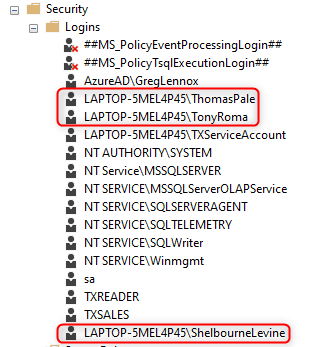
There are three sales reps:
- Tony Roma
- Thomas Pale
- Shelbourne Levine
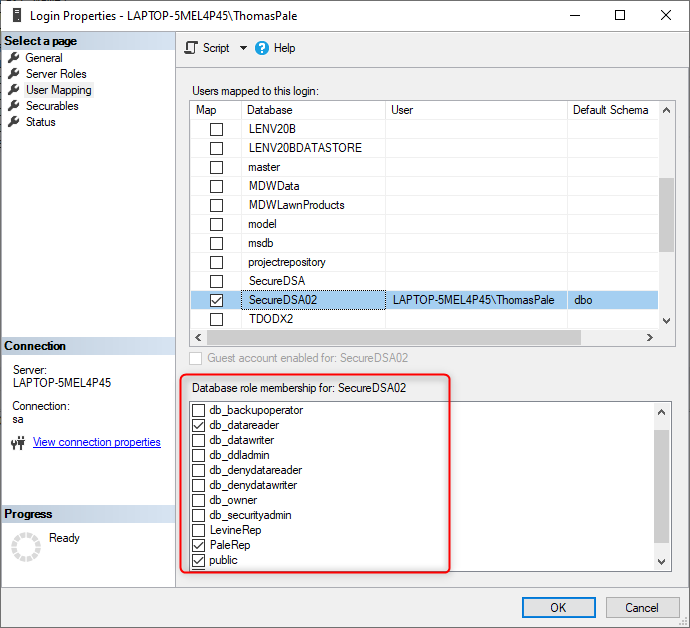
The logon for each sales rep is setup in SSMS under Security and logons so that they have a user mapping to the SecureDSA02 database.
The logon properties for the three users are setup as follows:
- On the Server Roles tab, check the box for “public”. It is not necessary to check other boxes.

- On the User Mapping tab, select the database for the data area and check the following boxes below:
- db_datareader.
- Public.
- Database role created in TDI, which is “PaleRep” in this example.
In TDI, the “SecureDSA02” data area is setup as follows:
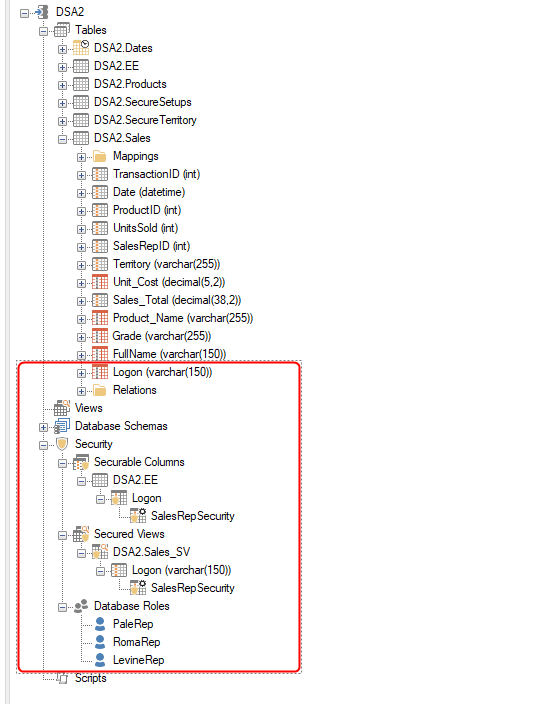
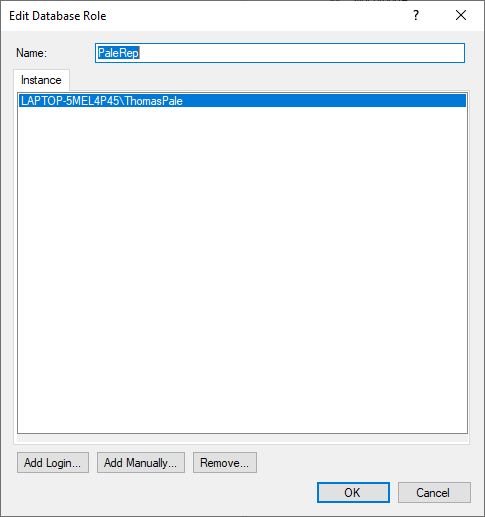
There are three database roles, one for each sales representative. In this example, the following is the database role for Thomas Pale referencing the logon that matches the one setup in SQL Server Management Studio.
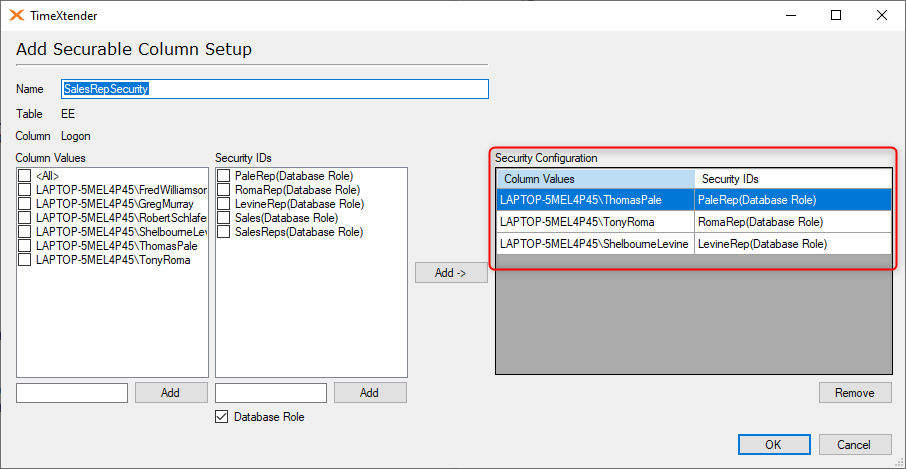
The Securable Column Setup includes the logons for each sales rep tied to their individual database roles.
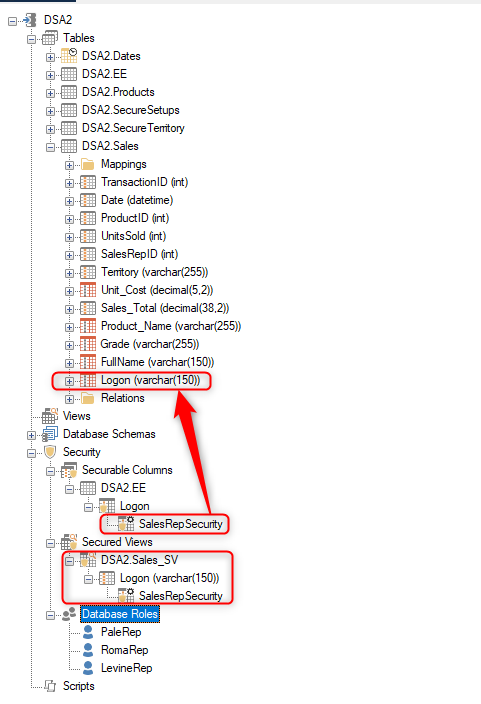
To create the Secured View, drag the “SalesRepSecurity” securable column onto a field in the data area. In this example, the “Sales” facts table includes the “Logon” field that has been mapped over from the “EE” table. The “SalesRepSecurity” securable column setup was then dragged onto the “Sales” table’s “Logon” field to create the “DSA2.Sales_SV” secured view.
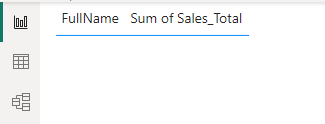
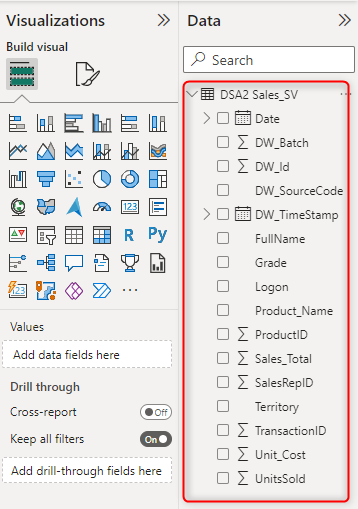
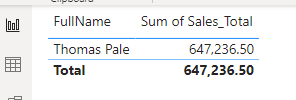
Using the logon of “ThomasPale”, connect to the data area using a reporting tool, i.e. PowerBI, and click on the “DSA2.Sales_SV” secured view, which will include all of the fields in the “Sales” table where the “Logon” field is located.
The data available is filtered to only show the information related to the “ThomasPale” logon.
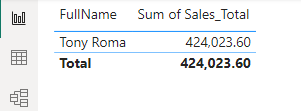
If logging on to PowerBI as “TonyRoma”, then only the “TonyRoma” information is available.
If logging on to Power BI as a user that is not listed in the Securable Column Setup, then no information is available in the secured view.