This article describes how to add a CSV Endpoint to a Deliver instance. If you want to use data from the Deliver instance in an endpoint that is not natively supported by TimeXtender Data Integration, you can use the CSV endpoint to create files that can be read by almost everything under the sun. When you execute the endpoint, a file is created for each table in the model. Only regular fields are supported, not measures or custom fields.
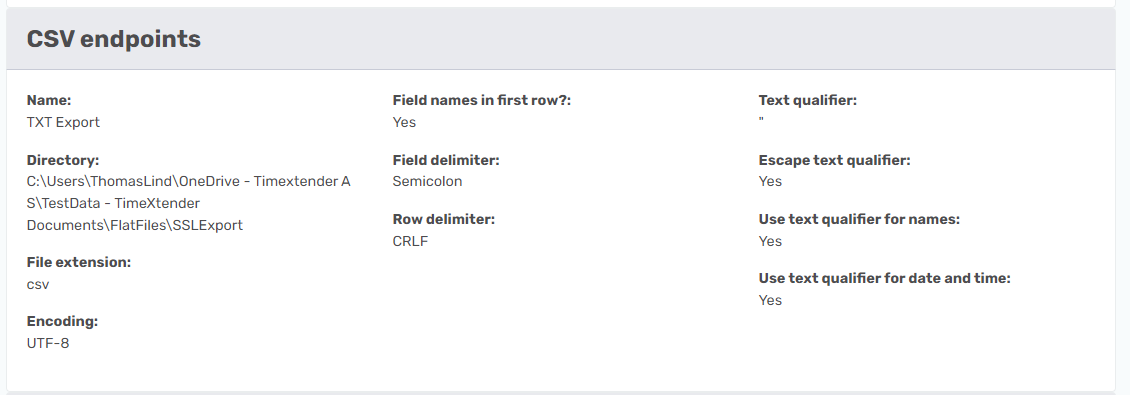
In the TimeXtender Portal navigate to Data Estate > Instances, click Add Instance> Add Deliver instance. Select CSV Endpoint from the Add endpoints list, then click Add an endpoint. Fill out the following fields in the form.
- In the Directory box, enter the path to the folder where the files should be placed
- In the File extension box, enter the file extension you want to use (usually "txt" or "csv")
- In the Encoding list, click on the encoding you want to use.
- In the Field names in first row, click No if you do not want the field names to be output as the first line in the files.
- In the Field delimiter list, click on the character you want to use for separating columns of data. To use a delimiter not on the list, click Custom and enter the custom delimited in the Custom field delimiter box. For both field and row delimiters, it is possible to use special characters by setting the first value to "$" followed by "char[x]" where "x" is the special character, e.g. "$char[13]char[10]" will be translated into "\\r\\n".
- In the Row delimiter list, click on the character you want to use for separating rows of data. To use a delimiter not on the list, click Custom and enter the custom delimited in the Custom row delimiter box.
- In the Text qualifier box, type the character you want to use to qualify text. Default is double quotes.
- In the Use text qualifier for names list, click Yes if you want to use the text qualifier for the column names.
- In the Use text qualifier for date and time list, click Yes if you want to use the text qualifier for fields where the data type is date or time.