

Connect Claude or ChatGPT to the TimeXtender MCP Server using your own Auth0 tenant as the identity provider, so users sign in with OAuth 2.1 instead of an API key.
Verify your Auth0 configuration before you connect a client. Claude and ChatGPT cache the OAuth metadata they read from your server URL at organization level and do not read it again. A first connection attempt against an incomplete configuration makes that URL unusable, and recovering it requires an organization administrator. Complete every section up to and including Configure the MCP Server first.
Prerequisites
- An Auth0 tenant, in any region, where you can create an API and an application.
- A deployed MCP Server, reachable over HTTPS at a stable public hostname.
- Rights to add a connector in Claude or ChatGPT. Both desktop apps use a connector created in the browser, so you need browser access for either one.
- Administrator access to the MCP Server host, to run the TimeXtender MCP Configurator.
Under Auth0, the MCP client registers itself. Your MCP Server supplies a pre-registered Auth0 application when a client asks for one, so adding a Claude connector requires no change in Auth0. ChatGPT requires one additional step per connector. If your identity provider is Microsoft Entra ID, use Connect to MCP using Microsoft Entra ID instead.
Decide your MCP Server's public URL before you start. The same value becomes the Auth0 API Identifier, the server's Audience, and the server's canonical resource URI. Auth0 compares its API Identifier to the token exactly, with no normalization, so copy the value between steps rather than typing it each time.
Understanding the Auth0 objects
This procedure creates two objects in Auth0 with different jobs.
| Object | What it represents | Scope |
|---|---|---|
| The API | The MCP Server, as a resource to be protected. Its Identifier is the token audience. | One per MCP Server deployment |
| The application | The MCP client. Your MCP Server supplies this to clients that register themselves. It holds only the callback URLs. | One per tenant, and it can serve several deployments |
Create one API per MCP Server deployment, identified by that deployment's public URL. The Identifier is the audience a token is issued for, so two deployments sharing one API would each accept tokens issued for the other.
Do not reuse an app registration created for another TimeXtender feature. The Entra ID service principal used for Microsoft Fabric or Azure SQL data access has a different purpose, as does the TimeXtender Cloud sign-in used to register the server with the TimeXtender Data Platform. Create new Auth0 objects for this procedure.
Create the Auth0 API
- In the Auth0 Dashboard, go to Applications > APIs > Create API.
- Enter a name that identifies the deployment, for example
TimeXtender MCP Server. - Enter your MCP Server's public URL as the Identifier, for example
https://mcp.contoso.com. - Set Signing Algorithm to
RS256, then select Create. - On the API's settings, confirm that JSON Web Encryption (JWE) is turned off, so Auth0 issues RS256 signed tokens rather than encrypted ones.
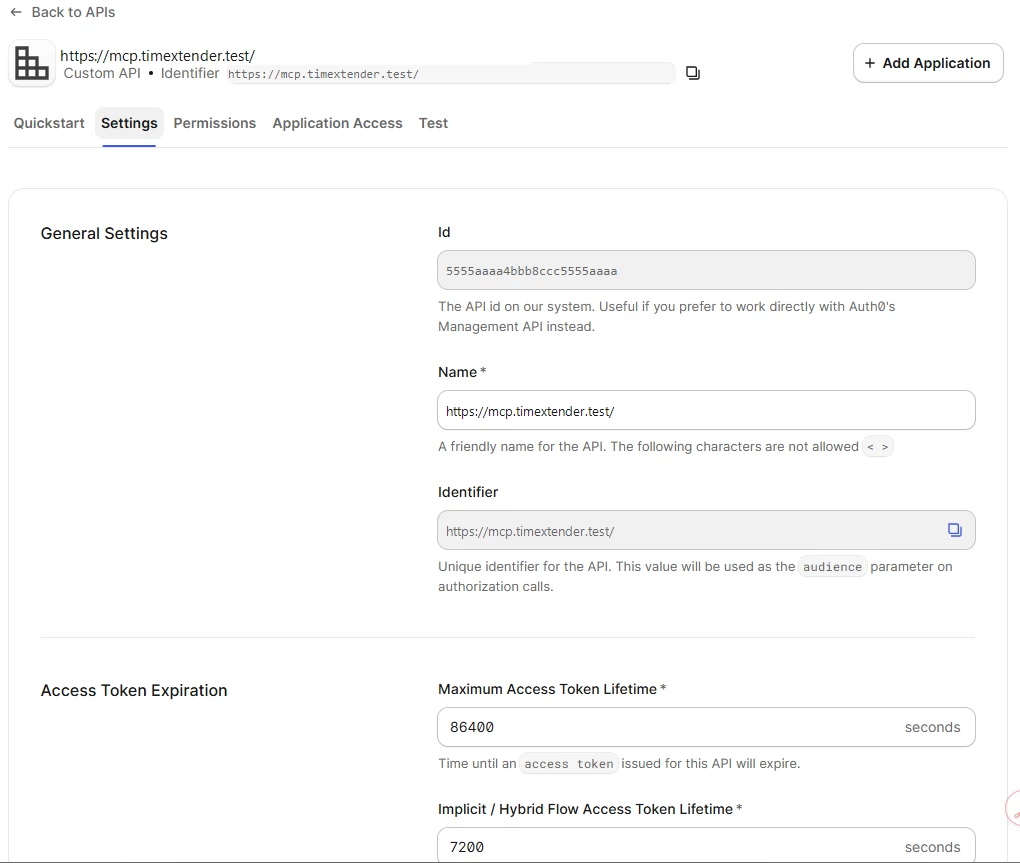
The Auth0 Create API dialog, with the Identifier set to the server's public URL and RS256 selected.
The Identifier must match the server's Audience exactly. The Configurator derives the Audience from your MCP Server's public URL, and Auth0 compares that identifier to the token character for character.
Auth0 never calls the Identifier. It is an opaque name that takes the form of a URL.
Create the Auth0 application
- Go to Applications > Applications > Create Application.
- Enter a name, select Single Page Application as the type, then select Create.
- On the Settings tab, enter the callback URLs for the client you are setting up in Allowed Callback URLs. See Callback URLs below.
- Enter
https://claude.aiin Allowed Web Origins. Leave Application Login URI empty. - Confirm First Party is turned on. This is the default for new applications.
- Select Save Changes, then record the Client ID from this page. You enter it into the MCP Server configuration later.
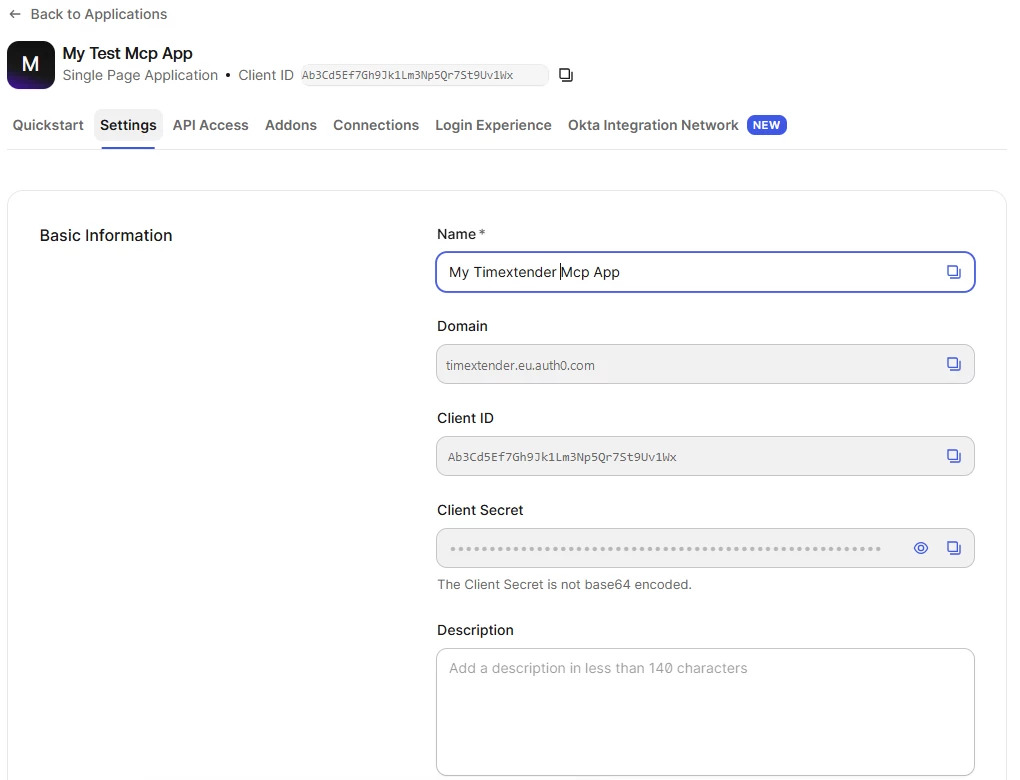
The Auth0 application Settings tab, showing the application type, Client ID and allowed callback URLs.
Select Single Page Application even though the MCP Server is not a single-page app. In Auth0 the application type determines how the token exchange is authenticated. Single Page Application makes it a public client: no secret is expected, and Auth0 enforces PKCE. That matches what your MCP Server supplies to a connector that registers itself, which is a client ID with no secret. A Regular Web Application is a confidential client that expects a secret the connector does not send.
There is no authentication method to set and no client secret to use. Auth0 shows a Client Secret field on the Settings tab for all application types. Leave it alone, and do not put it in the server configuration.
First Party matters. Auth0's own Dynamic Client Registration creates third party applications, which cannot have sign-in connections turned on, so users reach the login page and see that no connections are configured. Your MCP Server supplies this first party application instead.
Callback URLs
| Client | Callback URLs to add |
|---|---|
| Claude |
|
| ChatGPT | One per connector, in the form |
Add both Claude URLs. The client uses one or the other depending on which domain the user is on, and a missing URL produces an intermittent failure that follows the user rather than the configuration. Registering both also lets the Configurator verify your Audience, because that check requires a callback Auth0 already allows.
If you are setting up ChatGPT only, add nothing here yet.
Authorize the application and turn on sign-in
- Go to Applications > APIs > your API > Application Access.
- Find the application you created. Auth0 also lists a test application it created alongside the API, which is not the one you want. Search by name, or paste the Client ID into the search box.
- Grant the application User-delegated Access, then select Save. Client Access is the machine to machine grant and is not used here.
- Go to Applications > Applications > your application > Connections.
- Turn on the connections your users sign in with, such as a database connection, a social connection, or an enterprise connection. At least one is required.
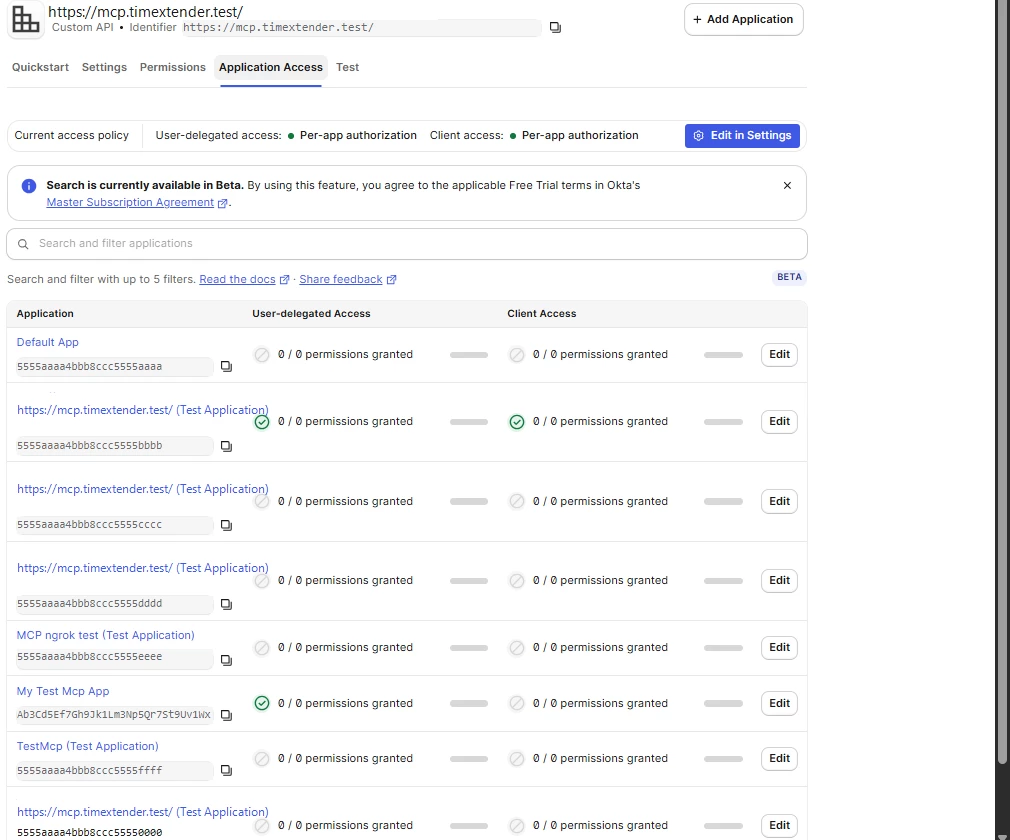
The API's Application Access tab, with the connector application granted user-delegated access.
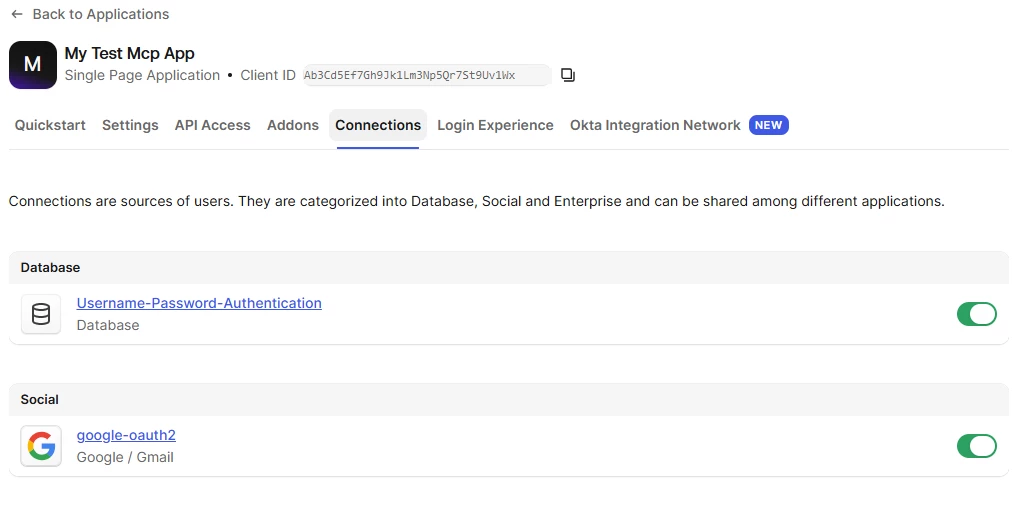
The Connections tab on the application, with sign-in connections turned on.
Older tenants label the first tab Machine to Machine Applications, with a single Authorized toggle.
Auth0 tenant administrator credentials are not application users. Signing in with the account you administer Auth0 with is rejected at the login form. Use an account in one of the connections you turned on.
Configure the MCP Server
Complete this on the machine that runs the MCP Server.
- Open the TimeXtender MCP Configurator.
- Go to the OAuth tab.
- For Identity provider, select Auth0.
- Complete the fields listed below.
- Turn on Enable OAuth sign-in.
- Select Save Configuration, and restart the service when prompted.
| Field | Value |
|---|---|
| Domain | Your Auth0 domain, for example |
| Authority | Read only. Computed as |
| Client ID | The Client ID you recorded from the Auth0 application. |
| Audience | Read only. Derived from your MCP Server's public URL. |
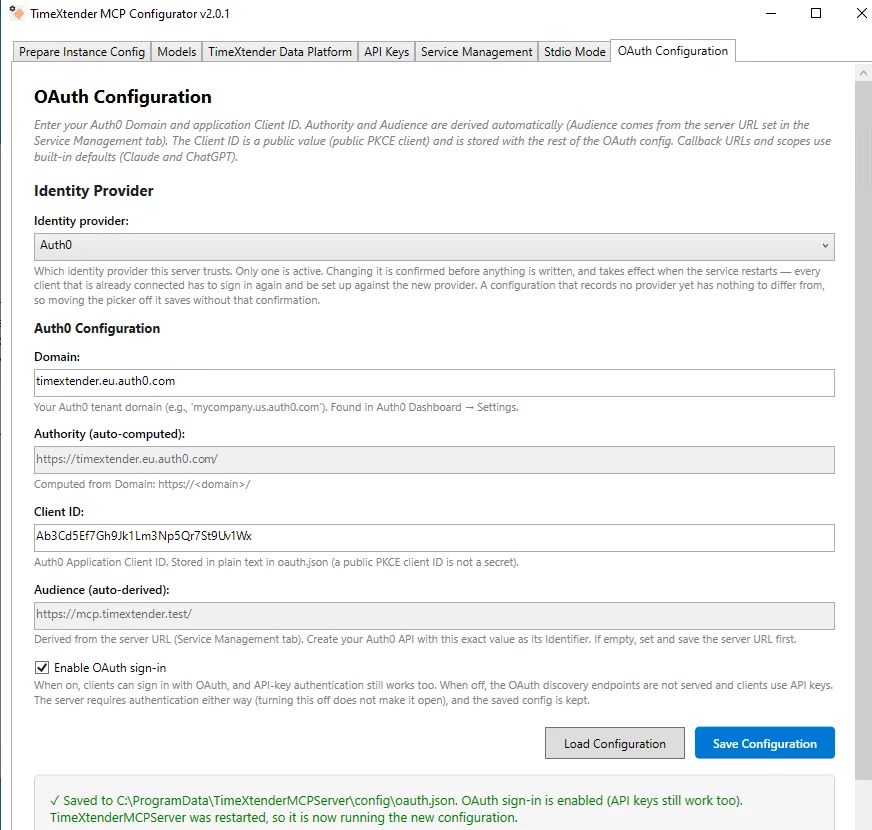
The OAuth tab in the TimeXtender MCP Configurator, with Auth0 selected and the fields completed.
The tab offers to restart the service and reports the result, so there is no separate restart step. API key authentication continues to work whether or not OAuth is turned on. Turning on OAuth adds a second way to authenticate.
If the Audience field is empty, set your MCP Server's public URL on the Service Management tab first. The Audience is derived rather than entered, because the server requires it to agree with the canonical resource URI. A URL that is not https:// is not a valid source for that derivation, and the Configurator asks you to set the server URL rather than reporting that the URL is not HTTPS.
What the save checks
Before writing anything, the Configurator asks Auth0 whether an API exists under the derived Audience. If no API exists, or Auth0 cannot be reached, nothing is written and the tab reports which of the two occurred. There is no override in the Configurator, so an OAuth configuration cannot be saved from a machine with no route to Auth0. The message names the manual alternative.
Two saves are not subject to this check:
- A save that turns OAuth off, so you can always return to a working state.
- A save where Auth0 rejected every callback the check tried, because that result says nothing about the audience. This save proceeds with a warning.
A tenant configured for ChatGPT only produces that warning, which is expected. The check sends a callback URL and only ever tries Claude's two, and your ChatGPT callbacks do not exist yet. If the Audience is genuinely wrong, it appears later as an unknown client error. See Troubleshooting.
Keep the server URL and the Audience aligned
The Configurator derives both the Audience and the canonical resource URI from your server URL, so they cannot disagree at the point of writing. Use the Configurator rather than editing files.
They diverge if the server URL is changed on the Service Management tab and the OAuth tab is not saved again. The Configurator warns you at the point of change, with a confirmation dialog that defaults to No. If you continue, startup logs an error naming both values, the discovery endpoints return 404, and bearer tokens are refused. API key clients are unaffected.
To correct a divergence:
- Create or rename an Auth0 API whose Identifier is exactly the current server URL.
- Save the OAuth tab again, which re-derives both values and restarts the service.
This order is required, because the save verifies the Audience against your tenant before writing.
A split public and internal URL is not supported. If you terminate TLS under an internal name and publish a different public name through a proxy, the server treats that as a divergence. Set both to the public name clients use, and make sure your certificate covers it. Case, port, a trailing slash and IDN spelling are normalized and are not treated as a divergence. A proxy that terminates TLS in front of a plain HTTP server binding is unaffected.
Turning OAuth off is not a way to revoke access. It stops the server advertising its OAuth surface, so no new connector can discover it, but the server continues to accept bearer tokens. Tokens Auth0 has already issued keep working, and a client that already holds the client ID and endpoints can obtain new ones. The MCP Server performs no revocation check. To remove a connector's access, revoke or unauthorize it in Auth0.
Connect Claude
Complete every preceding section first. The first connection attempt against a URL fixes what the client stores about that URL.
- In Claude, add a custom connector.
- Enter a name, and enter your server's
/mcpendpoint as the Server URL, for examplehttps://<your-mcp-server-host>/mcp. - For Sign-in, select Sign in now.
- For OAuth client, select Register automatically.
- Complete the connector, then sign in with an account in one of the connections you turned on.
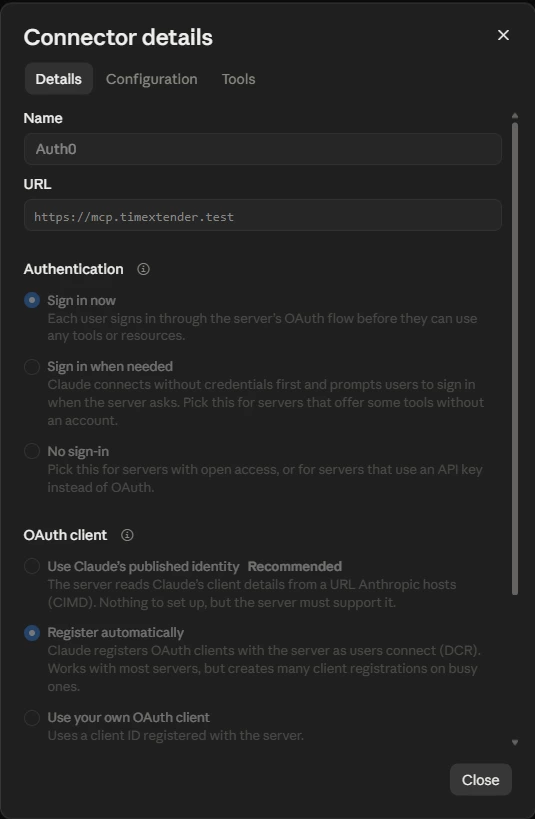
Claude's connector details, with Sign in now and Register automatically selected.
You enter no client ID and no secret. Your MCP Server supplies a pre-registered application when Claude asks for one, so there is nothing to copy from Auth0.
Claude also offers Use Claude's published identity, marked as recommended. Do not select it. That mode uses a Client ID Metadata Document, which the MCP Server does not advertise by default, so it cannot complete.
When the connector is connected, the read-only tools are listed and can be called. The server log records the registration response and confirms that the token validated against your issuer and audience. The service log is at %ProgramData%\TimeXtenderMCPServer\logs\service\mcp-server-<date>.log. Note the service folder, because sibling folders hold logs for other components.
Claude Desktop uses the connector you created in the browser. There is nothing else to configure.
Connect ChatGPT
ChatGPT uses the same Auth0 configuration, with one additional callback URL per connector.
- In ChatGPT, create a connector pointing at your server's
/mcpendpoint. - Set the registration method to DCR, not CIMD.
- Copy the Callback URL that ChatGPT displays, in the form
https://chatgpt.com/connector/oauth/<callback-id>. - In the Auth0 Dashboard, go to Applications > Applications > your application > Settings.
- Add the callback URL to Allowed Callback URLs, separated by a comma from the existing entries, then select Save Changes.
- Return to ChatGPT and sign in.
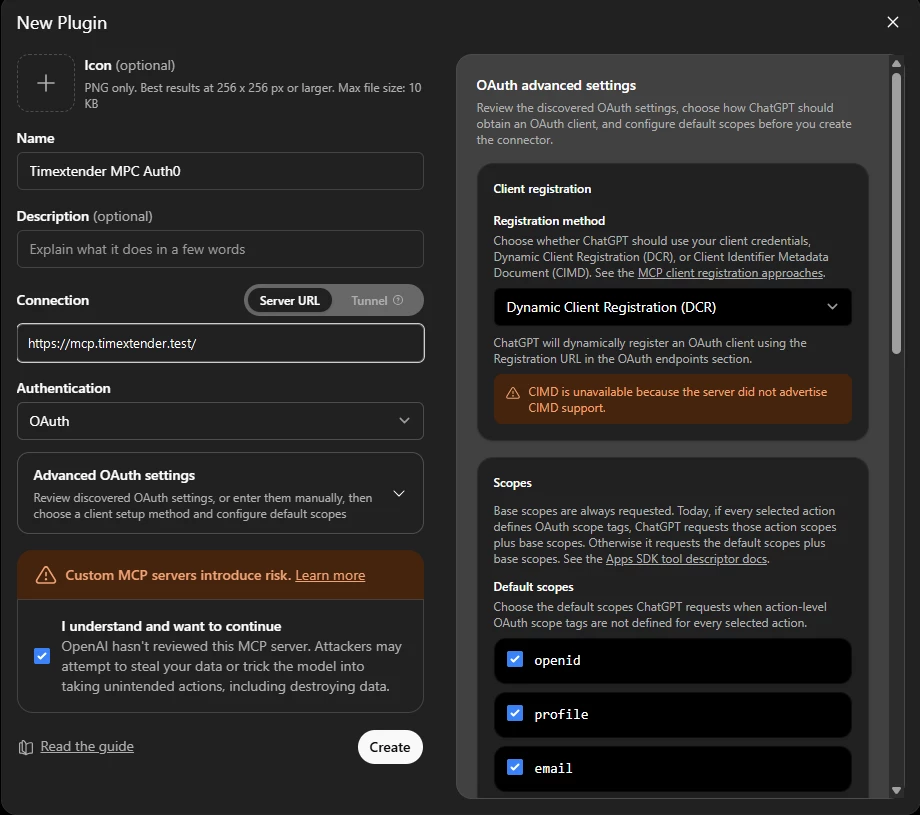
ChatGPT's connector creation dialog, with the server URL entered and the registration method set to DCR.
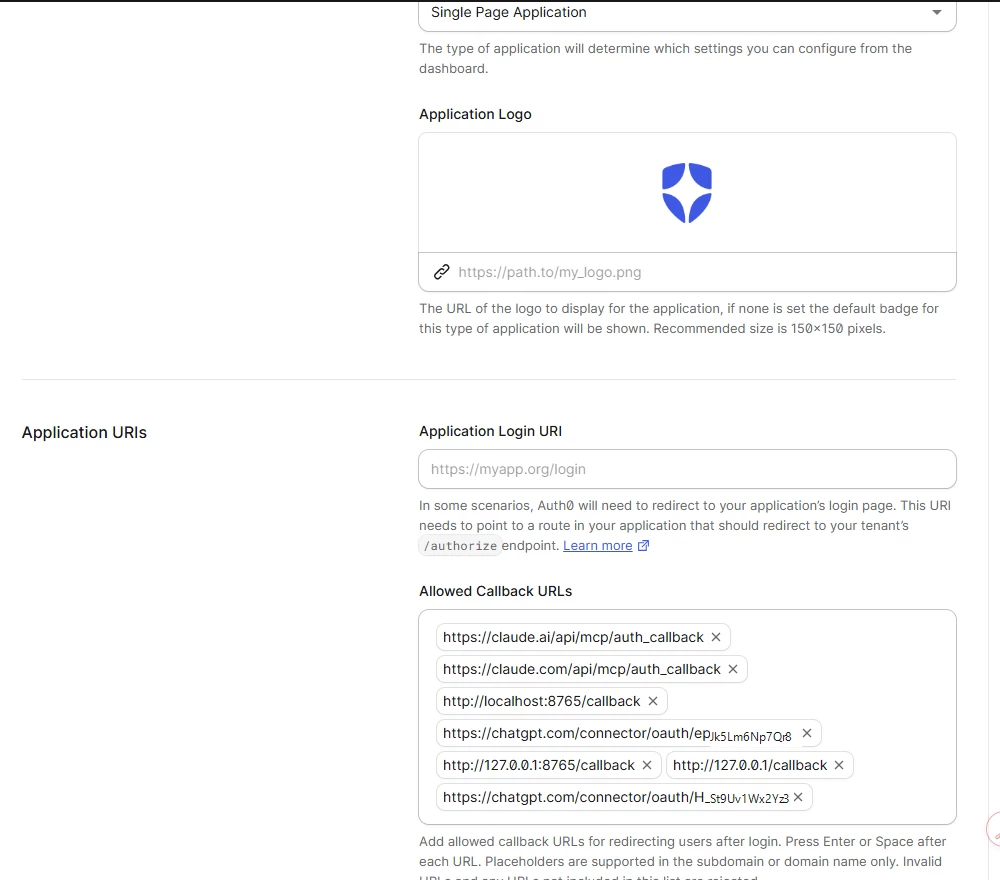
The Allowed Callback URLs field in Auth0, with the ChatGPT connector callback added alongside the Claude entries.
Add the callback URL to Auth0 before you sign in. Signing in first produces an unknown client error.
ChatGPT prefers CIMD when a server advertises it, but Auth0 does not resolve CIMD documents end to end and returns an unknown client error. The MCP Server therefore does not advertise CIMD, and ChatGPT falls back to DCR, which reaches the server's registration endpoint and receives the pre-registered Auth0 application.
Where to get the callback URL
Take the callback URL from the ChatGPT connector setup screen. This is the only source you should use.
Do not copy the callback URL out of the server log. The log records what a registration request contained before the server validated it, and that endpoint is unauthenticated by protocol design, so anyone can write a plausible entry naming a redirect they control. Registering a forged value in Auth0 would make an attacker's callback valid for your application, which is enough to intercept sign-ins for every user of the connector. Use the log to confirm what arrived, not to source what you register.
Each connector needs its own entry, and Auth0 does not support wildcards in callback URLs. Recreating a connector produces a new identifier, so the old entry stops working and the new one must be added. A workspace level connector is a single entry shared by everyone in the workspace, and per-user connectors produce one entry per user per recreation.
A connector published to OpenAI's directory uses one stable redirect URL instead, which reduces this to a single entry. Publication requires review by OpenAI and produces a publicly listed connector, so it suits a productized connector rather than a self-hosted server.
ChatGPT Desktop uses the connector you created in the browser. There is nothing else to configure.
How the authentication flow works
This describes what happens at run time. There is nothing to configure here.
- The client posts to
/mcpwith no credentials, and receives a401naming where to find the server's protected resource metadata. - The client reads the protected resource metadata, which names this server as the authorization server.
- The client reads the authorization server metadata. The MCP Server serves Auth0's own metadata, with the registration endpoint pointed at itself and the audience added to the authorization endpoint.
- The client registers, and receives the pre-registered first party Auth0 application's client ID, with no secret.
- The client runs the Auth0 authorization flow with PKCE. The user signs in, and Auth0 returns an authorization code.
- The client exchanges the code at the Auth0 token endpoint for an RS256 access token.
- The client posts to
/mcpwith the token, and the server serves its tools.
Two parts of this design are worth noting. The server serves Auth0's metadata rather than pointing clients at Auth0 directly, because Auth0's own Dynamic Client Registration creates third party applications, which cannot have sign-in connections. Serving the metadata lets the server supply a first party application instead. The server also adds the audience to the authorization request, because Auth0 issues signed JWTs only when the request names an audience, and issues opaque tokens otherwise. The MCP specification has no field for this parameter.
The MCP Server validates the issuer, the audience, the token lifetime and the signature. It does not check scopes or roles. Any token that passes those four checks can call every tool the server exposes.
Troubleshooting
| Symptom | Cause | What to do |
|---|---|---|
| Auth0 reports an unknown client | The connector's callback URL is not in Allowed Callback URLs, which is the usual cause for ChatGPT. It must match character for character. | Add the callback URL. See Connect ChatGPT. |
| Auth0 reports an unknown client | The connector was created with CIMD instead of DCR | Recreate the connector with DCR. |
| Auth0 reports an unknown client | The Client ID in the Configurator is a different application, or belongs to a different tenant than the configured Domain | Enter the Client ID from the application you created. |
| Client is not authorized to access resource server | The application has not been granted access to the API | Grant User-delegated Access. See Authorize the application and turn on sign-in. |
| No connections configured, at the login page | No sign-in connection is turned on for the application | Turn on at least one connection. If the connector registered itself directly against Auth0 rather than through your MCP Server, the application Auth0 created is third party and cannot have connections turned on. Recreate the connector against the server. |
| The login form rejects your credentials | You are using an Auth0 tenant administrator account, which is not an application user | Use an account in one of the connections you turned on. |
|
| The server's registration endpoint refused the redirect URL. Callbacks under | Take the value from the ChatGPT interface, not from the server log. |
| Tokens are rejected, or sign-in returns to the start | An audience mismatch. The Auth0 API Identifier and the server's Audience must be the same public server URL, character for character | Correct it in the Configurator and save again, rather than editing files. The file the Configurator writes loads last and overrides values set elsewhere. |
| Decryption or opaque token errors, such as | Auth0 issued an opaque token instead of a signed one, because the authorization request named no audience | Confirm JSON Web Encryption (JWE) is turned off and that the Audience matches the API Identifier exactly. |
| A discovery or registration endpoint returns | The OAuth surface is not being served: OAuth is turned off, the Auth0 configuration is incomplete, the server URL and canonical resource URI have diverged, or the server is configured for a different identity provider | Check the startup log, which names the missing field. For a divergence, see Keep the server URL and the Audience aligned. API key clients are unaffected in every case. |
| A generic credentials error, with nothing in the server log | Stale cached metadata for this URL. The failure occurs before your MCP Server is contacted | See Recover a client that cached the wrong metadata. |
An incomplete server configuration does not produce an unknown client error. The server withholds its registration endpoint entirely, so Auth0 is never contacted, and the result is a 404.
Recover a client that cached the wrong metadata
This failure has a distinctive signature: a correctly configured server, a generic credentials error, and no entries in the server log.
The only known recovery is to give the MCP Server a new hostname. The cached state is held against the origin rather than against a connector record, so deleting the connector does not clear it, at organization level or personal level, and neither does connecting from an account that has never reached the server. In testing, changing only the DNS name, with everything else unchanged, allowed the connection to succeed on the first attempt.
Changing the hostname means a new DNS name, a new TLS certificate, an updated canonical URL on the Service Management tab, a service restart, and repointing every existing client of that server. Contact TimeXtender support before you do this.
