Generating End-to-End Tasks

You can refer to Generate End-To-End Tasks and Execution Packages for more detailed instructions on this process. A high-level overview of the steps involved is as follows: 

  1. Open the desired Deliver instance that this orchestration will populate and create an execution package. Ensure that the Semantic model within the Deliver instance is added to the "Include Steps". 
  2. Right-click on the execution package and select "Generate End-To-End Tasks and Packages" from the context menu.
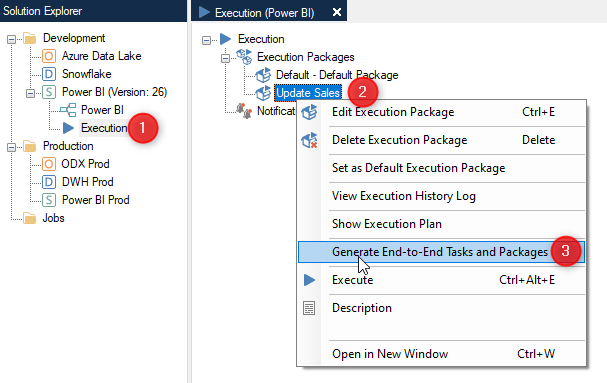
    • Note: If any changes are made to the semantic model, you can update the auto-generated objects by repeating this step.

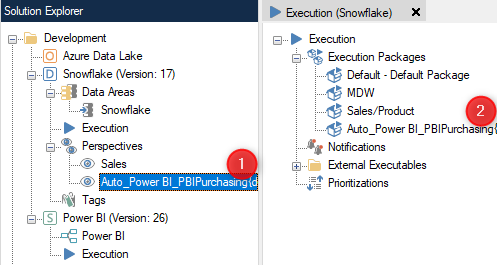
  3. This will auto-generate a perspective, an execution package in the relevant Prepare instances, and transfer tasks in the relevant Ingest instances and data sources.
 

Create Jobs

You can refer to Scheduling Executions using Jobs for more detailed instructions on job creation. A high-level overview of the steps is as follows: 

  1. Right-click on the "Jobs" node in the left-hand pane of the Solution Explorer and Select "Add Job" from the context menu.
  2. Provide a name for the job and click "Next".
  3. Include the following in the same or separate jobs: 
    • The Execution Package in Deliver instances and 
    • The auto-generated execution packages in Prepare instances
    • The auto-generated Tasks in Ingest Instances
  4. Job Scheduling can be done in either of the two following ways: 
    • Add a schedule as part of the job creation dialog 
    • Use TimeXtender Orchestration to handle the scheduling.

Configuring On-Demand Ingestion (Optional)

The On-Demand Ingestion is a quick and easy way to ensure the data is always refreshed from the source when the Prepare instances are executed. Alternatively, you can skip this step and go down to the Configure TimeXtender Orchestration section to enable end-to-end monitoring with a process map that will orchestrate the execution of all the jobs created above. (Do not enable data on demand if you are going to use TimeXtender Orchestration to run the jobs.)

The high-level steps for using the On-Demand Data option is as follows: 

  1. Identify the data sources that are used to populate the model. 
    • You can do this be examining the data lineage of the desired semantic model or
    • See which data sources have an auto-generated task. 
  2. Right-click on the Data source and click "Edit Data Source"
  3. Click on "Advanced Settings" for the data source and check the box for Enable data on demand
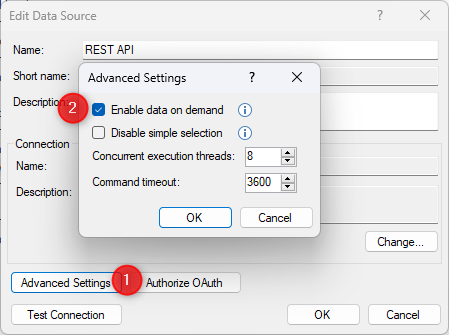
     

  • This option allows the data source to transfer data into Ingest instance storage before the Prepare instance ingests the data.

Configure TimeXtender Orchestration

Refer to Getting Started with TimeXtender Orchestration for more detailed instructions on this process. The high-level steps are as follows: 

Add the Data Provider

  1. Generate an API Key in the "Security and Permissions" of the TimeXtender Portal. 
  2. In the TimeXtender O&DQ Desktop, add a new Data Provider with "Demo Customer" as your system and "TimeXtender SaaS" as the data source type.
  3. Paste the API key generated in the previous step and test the connection.

Create a Package

  1. Add your TimeXtender Data Integration jobs in TimeXtender O&DQ by right clicking "Packages" > "New" > "TimeXtender SaaS (Beta)".
  2. Select the job you want to add to the TimeXtender O&DQ and save it. 
  3. Repeat this process for all the jobs you wish to orchestrate. 

Add Multiple Packages to a Process

  1. Right-click on "Processes" > New > Process
  2. Click the button to Add Steps
  3. Drag & Drop Packages from the right-side pane
  4. Save your Process

Create a Process Map

  1. Rick-click "Process Map" >"New" > Process Map.
  2. In the right-side pane find the "Process" property, and link the process map to the process you just created.                              
  3. Click "Background" to design the process map
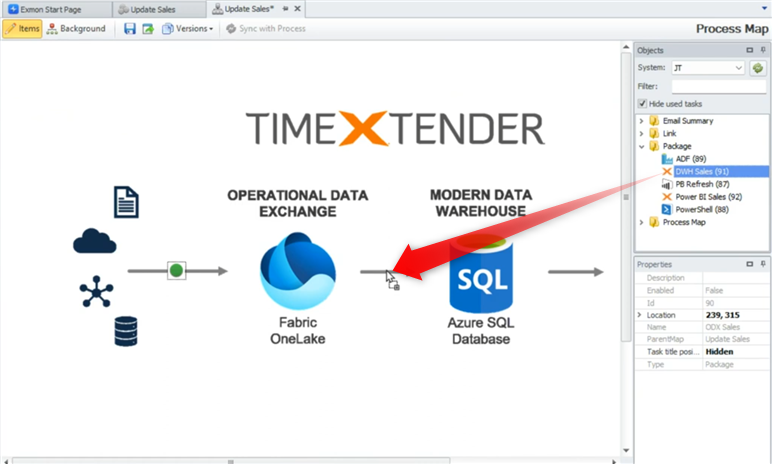
  4. Click "Items" & drag & drop your packages from the right-side pane, onto your map to display them.
     

Add a Schedule

  1. Select a Predefined Schedule Group, or create a new one. 
  2. Drag and drop your desired process.
  3. Configure your schedule.


  4. Be sure to save & deploy your changes. 

Dear Greg,

nice to see this TimeXtender- Exmon feature enabled for all TimeXtender clients.
I also love the visualisation map as well. 
One snag I found is that, when autogenerating perspectives in the DWH, based on my semantic model, the RLS tables were not included in the generated perspective.  Is this on purpose or a working point?


Regards,

Dirk

Hi @Greg Lennox,
Has this been registered as a bug? 

Kind regards,
Andrew


Hi Andrew & Dirk,

Thank you for your patience. Our Product Team has looked into this and provided the following clarification:

“Upon investigation, we found that the RLS table does not appear in the auto-generated perspectives or in the DWH because it is an automatically generated table that users should not have access to from their client. The RLS table is created directly in the database when SSL is deployed. After the endpoint is deployed, the RLS table is then created in the Analysis database and remains hidden by default.”


Hi Greg,

be that as it may, the repository does contain all the references to decide that these tables do need a refresh of data, when the rest is refreshed, via the “membership” in the perspective, and thus, should also be included.  Can you ask the team to give this due attention? RLS is an essential part for a proper functioning Power BI model.


Hi team, 

I think there is a misunderstanding. TimeXtender creates auto-generated tables under water which are not visible and of course not in the perspective. 

But it appears that tables from the data warehouse which are used to populate dynamic RLS members in an SSL instance, are not reloaded during the auto-generated package, as they are not included in the perspective. So they must be added manually afterwards and re-added each time ‘generate’ is clicked again. 

Is that the issue you are facing @Dirk Meert ?

Kind regards,

Andrew


Hi @Dirk Meert,

It looks like this issue has been resolved in version 6766.1, according to the release notes: 

TimeXtender Data Integration 6766.1 | Community

Kind regards,

Andrew


Reply