Adding Data Source Connections in TimeXtender Portal
Follow the steps in Add and map a data source connection
Configuring a Data Source in TimeXtender Data Integration
To add a new data source, follow the steps in Configuring a data source in TimeXtender Data Integration
Data Source Settings
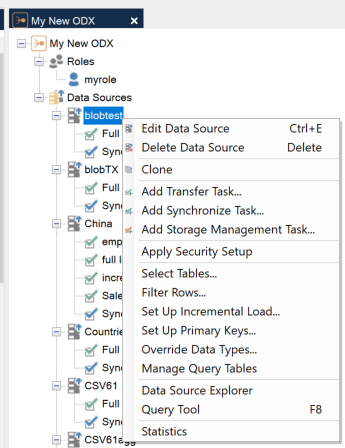
Right-click on a data source to open its context menu, which displays all of the data source settings that can be accessed and configured.
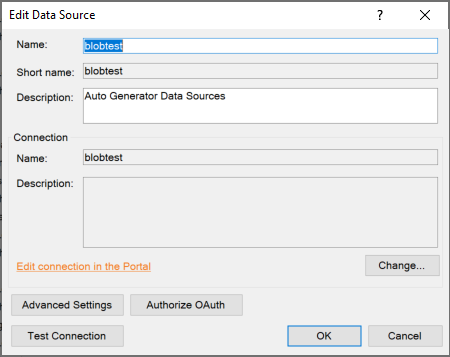
1. Edit Data Source
Shows the basic information for the data source based on input in the TimeXtender Portal. By selecting Change… the data source connection can be changed to another data source that has been defined in the Portal. Furthermore, Advanced Settings can be adjusted, which may depend on the provider, but typically include data on demand and concurrent execution threads. Click the Test Connection button to test the connection to the data source. An unsuccessful test connection indicates that the data source properties in the TimeXtender Portal may need to be adjusted in order for the connection to be successful.
2. Delete Data Source
This deletes the data source connection in the TimeXtender Data Integration. However, the data source will still exist in the TimeXtender Portal, and a connection to the data source can be setup again by right-clicking on Data Sources and selecting Add Data Source.
3. Clone
This clones the data source connection in the TimeXtender Data Integration. The data source will not be cloned in the TimeXtender Portal. After cloning, the data source connection will be duplicated in the TimeXtender Data Integration. Cloning can be helpful in creating copies of data source connections that are heavily customized.
4. Add a Transfer Task
When executed transfer tasks transfer data from the source to Ingest storage. Multiple transfer tasks can be added and scheduled. One transfer task can be setup to load large fact tables nightly, while another transfer task can be setup to load smaller tables throughout the day. See Tasks in an Ingest Instance for more information.
5. Add a Sync Task
Executing a Synchronize task loads the meta data from the source into Timextender. No data can be copied from a source where objects have not been synchronized since the Ingest Server would not know what tables are available on the data source. When you add a data source, a Synchronize task is added automatically. More Synchronize tasks can be added if necessary, and scheduled to synchronize the data source on regular intervals. The synchronize task can also be executed manually to synchronize the data source immediately. See Tasks in an Ingest Instance for more information.
6. Add a Storage Management Task
Designed to free up storage, these tasks can be added and scheduled to execute automatically. See Tasks in an Ingest Instance for more information.
7. Apply Security Setup
This applies to security roles in an Ingest instance. Right-click on the data source that the role applies to and select apply security setup, to ensure that the security role takes effect.
8. Select Tables
See Table and Column Selection in an Ingest Instance for more information.
9. Filter Rows
All rows of data are transferred from a table unless a row filter rule is added that matches the table. The rule defines the criteria a row needs to have to be included, e.g. an ID over a specific number or a timestamp later than a specific date.
To filter out rows of data from transfers, follow the steps below.
- Right click the data source and click Filter Rows…
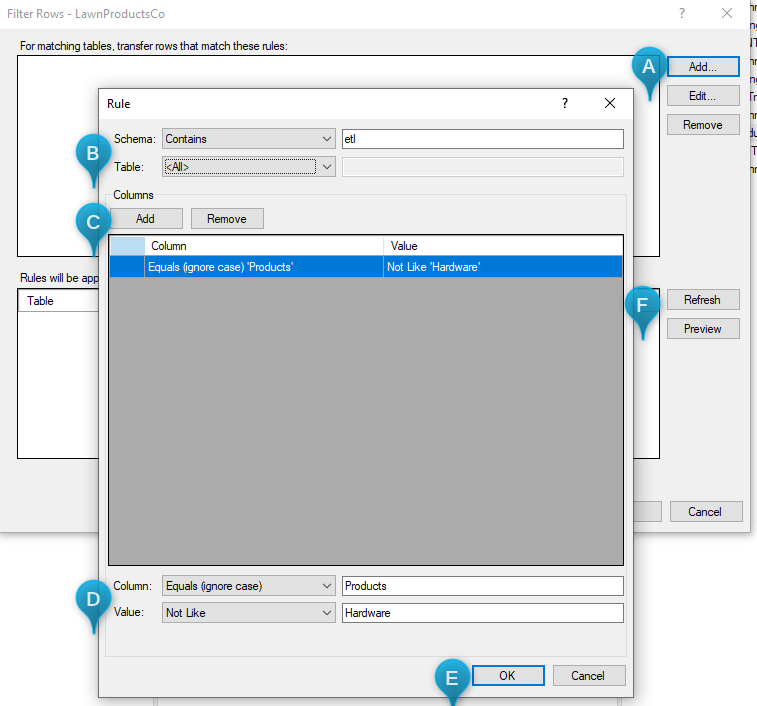
- Click Add... to add a new rule.
- If you want the rule to apply to specific tables, enter the schema and/or table names that they need to match. In the Schema/Table list, click on the operator you want to use and type text to match in the box.
- Click Add to add a new column and value combination.
- In the Column list, click on the operator to use and type the text to match in the box. In the Value list, click on the comparison operator to use and enter a value in the box.
- Click OK to add the rule.
- (Optional) In the Filter Rows window, click Refresh to see a list of affected tables. Click Preview to open the query tool with a preset query to see what rows will be transferred from a specific table.
10. Set Up Incremental Load
The Ingest Server can load data incrementally to get the latest data quickly and with minimal load on the data source. Since the Ingest is built for handling sources with a lot of tables, you do not pick individual tables to load incrementally. Instead, you define the rules for when incremental load should or should not be applied. For information on how to setup incremental load, see the following guide:
11. Set Up Primary Keys
To handle updated and deleted records in the source on incremental load, the Ingest server needs to know the primary key on each table. There is a rule-based interface available for defining primary keys. To set up primary keys for a data source, follow the steps below.
- Right click the data source and click Set Up Primary Keys....
- Click Add... to add Primary Keys Setup Rule.
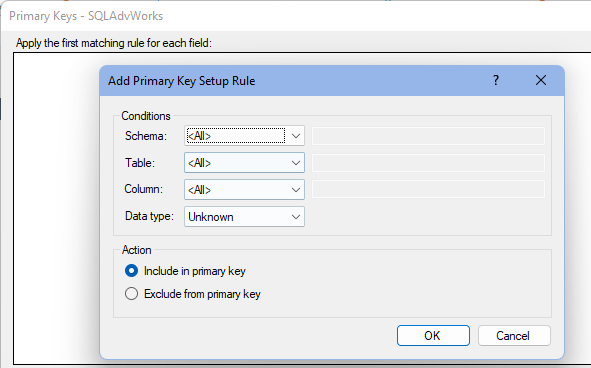
- Under Conditions, define the conditions a field needs to match to be included in or excluded from the primary key.
- Under Actions, click on the action to apply to the fields that match the conditions above from the following options:
- Include in primary key
- Exclude from primary key
- Click OK to add the rule.
12. Overriding data types
Data types can be overriden in order to make fields from the data source "fit" the data type on an Ingest storage. For information on how to override data types, see the following guide:
13. Managing Query Tables
With the query tables feature, you can enter a SQL query that the Ingest will turn into a table that works just like any other table in the Ingest . This is useful, for instance, when a table cannot be extracted from the data source by the regular Ingest logic. To add a query table, follow the steps below.
- Right-click the data source that contains the data to extract and click Manage Query Tables.
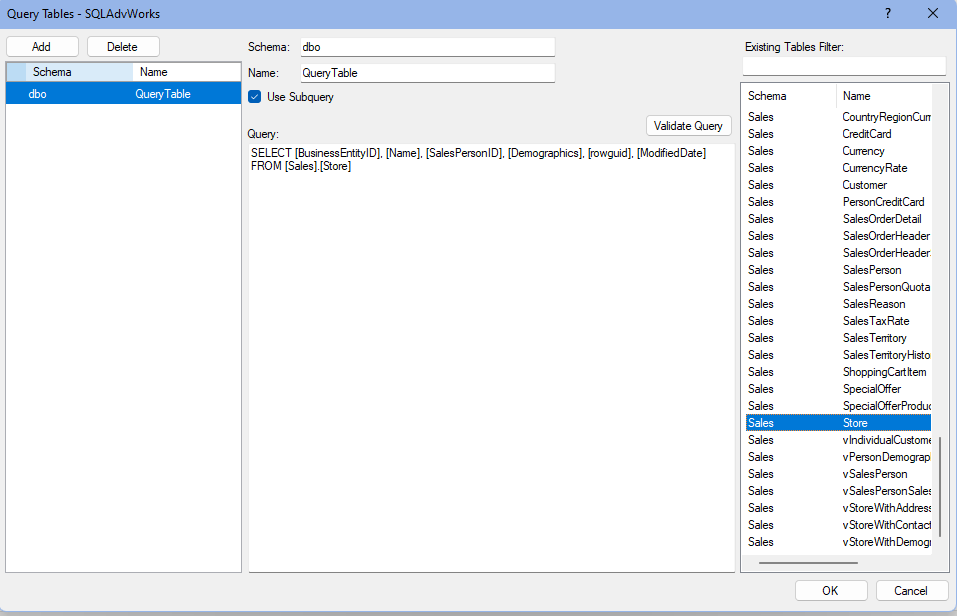
- Click Add to add a new query table to the list.
- (Optional) In the Schema box, type the Schema name you want the table to use.
- In the Name box, type a name for the table.
- In some cases, clearing Use subquery can lead to better performance. This includes query tables that will not be incrementally loaded or where the query does not contain an alias or a WHERE clause.
- In Query, enter the query to use for creating the table. The query should contain a SELECT statement and follow the syntax required by the source. You can drag a table in from the list in the right-hand side of the window to add a SELECT statement that includes all fields in the table to use as a starting point.
- (Optional) Click Validate Query to check whether the query is valid for creating a query table.
- Repeat steps 2-6 to add amy more query tables, as needed.
- Click OK to save the query tables.
- Right-click on the data source and click on Select Tables in order to ensure that the new query table is selected. Synchronize the data source to make the query table(s) available for transfer to the data warehouse. Add the query to a transfer task and then execute the transfer task to transfer the data to Ingest storage using the query table.
Note: Row filter rules are not applied on query tables.
14. Data Source Explorer
To select the correct data to move into the data storage and on to the data warehouse, it is important to know what data is in the data source in the first place. In addition to that, it is useful to see how the Ingest "sees" the data source. The Data Source Explorer works on the meta data stored in the Ingest instance, and allows you to browse the tables and columns in the data source to give you an overview of the structure of the data source. In addition to that, you can see how the different rules that have been set up in the Ingest affect the source.
- To open the Data Source Explorer, right-click the data source and click Data Source Explorer
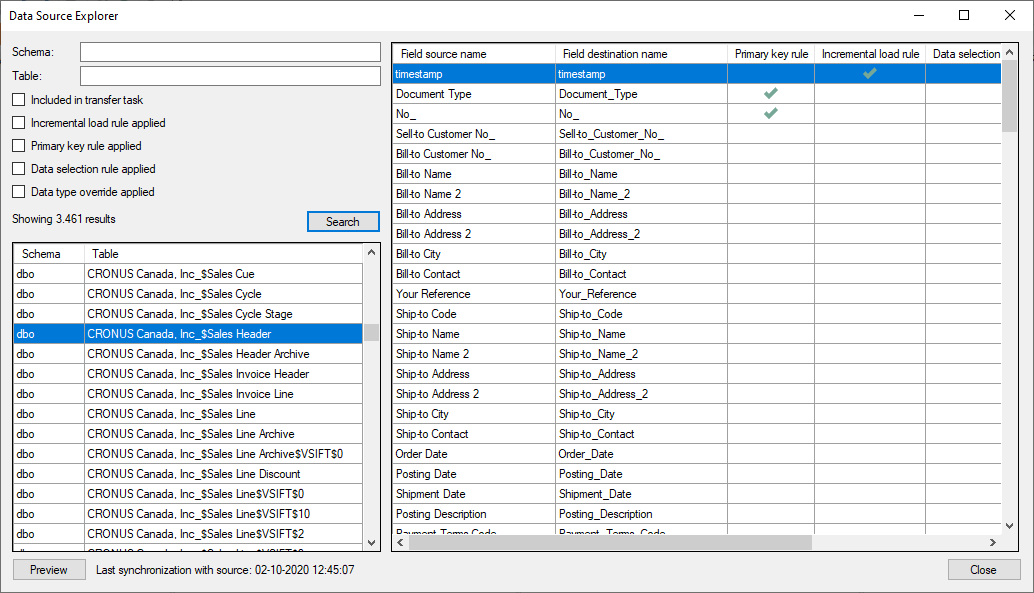
- To see all tables click Search. You can search for specific tables and and filter the search results to see only tables that e.g. are being transferred to data storage or support incremental load. On the field list, two names are listed for each field. The Field source name is the name of the field in the source, while the Field destination name is the name used in the Ingest data storage and onwards to the data warehouse. Check marks indicate fields that are "hit" by a primary key, incremental load or data selection rule. The data type of the field is also displayed, along with the new data type if a data type override rule is applied to the field.
- Select a table and click Preview, to launch the Query Tool from the Data Source Explorer with data from the selected table
15. Query Tool
- The Query Tool works directly on the source and allows you to preview the data stored in the data source using various SQL queries.
- To preview a table in the Query Tool, right click the data source and click Query Tool. Drag a table from the list in the left-hand side to the Query box to generate a SELECT statement that selects all rows from the table. If the Query box is not empty when you drag in a table, a complete SELECT statement will not be generated. Instead, the schema and table name, e.g. [dbo].[Customers] will be inserted. You can edit the generated SELECT statement, for instance adding a WHERE clause. (Optional) In Max. no of rows, enter the maximum number of rows you want the query to return. When you are ready to run the query, click Execute. In the Results list, the returned rows will be listed.
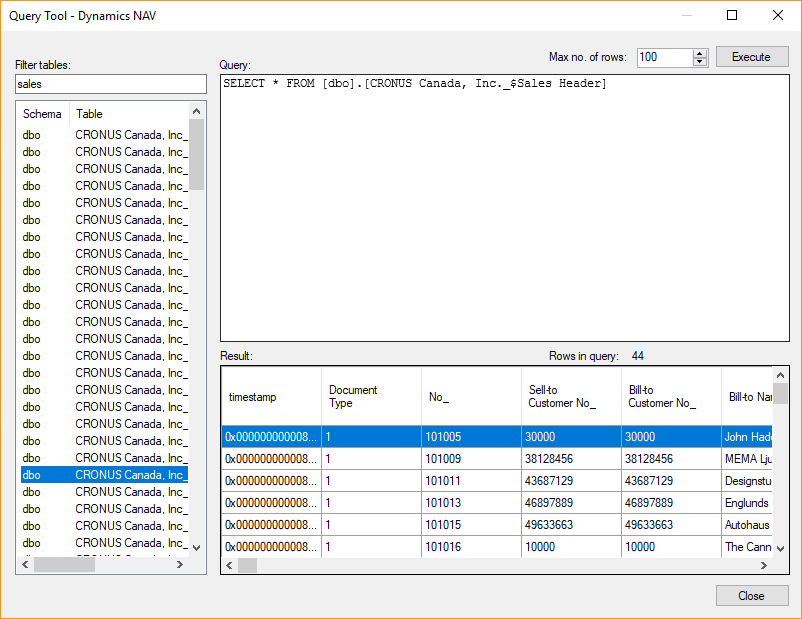
- As it is standard in other tools, the Query Tool will execute any selected text in the Query box instead of everything when you click Execute.
15. Validate Data Source Connection
The data source connection can be validated to see whether the data source provider is up to date. If it is up to date then the following message will be displayed. See the following article for more information on how to update a data source provider.
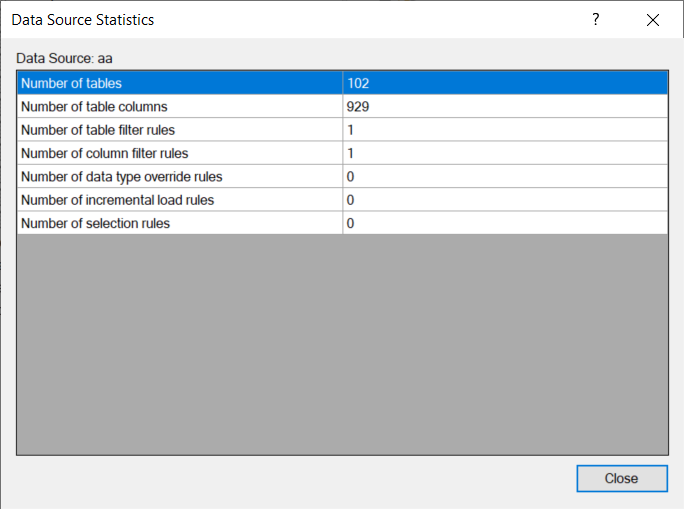
16. Statistics
To see the number of tables and columns as well as the rules applies to the data source, right-click on the data source and select Statistics.