

This is a standard reference architecture to implement TimeXtender Data Integration fully in Azure, the goal is to balance performance and cost, when working in the cloud.
To prepare your TimeXtender Data Integration environment in Azure, here are the steps we recommend.
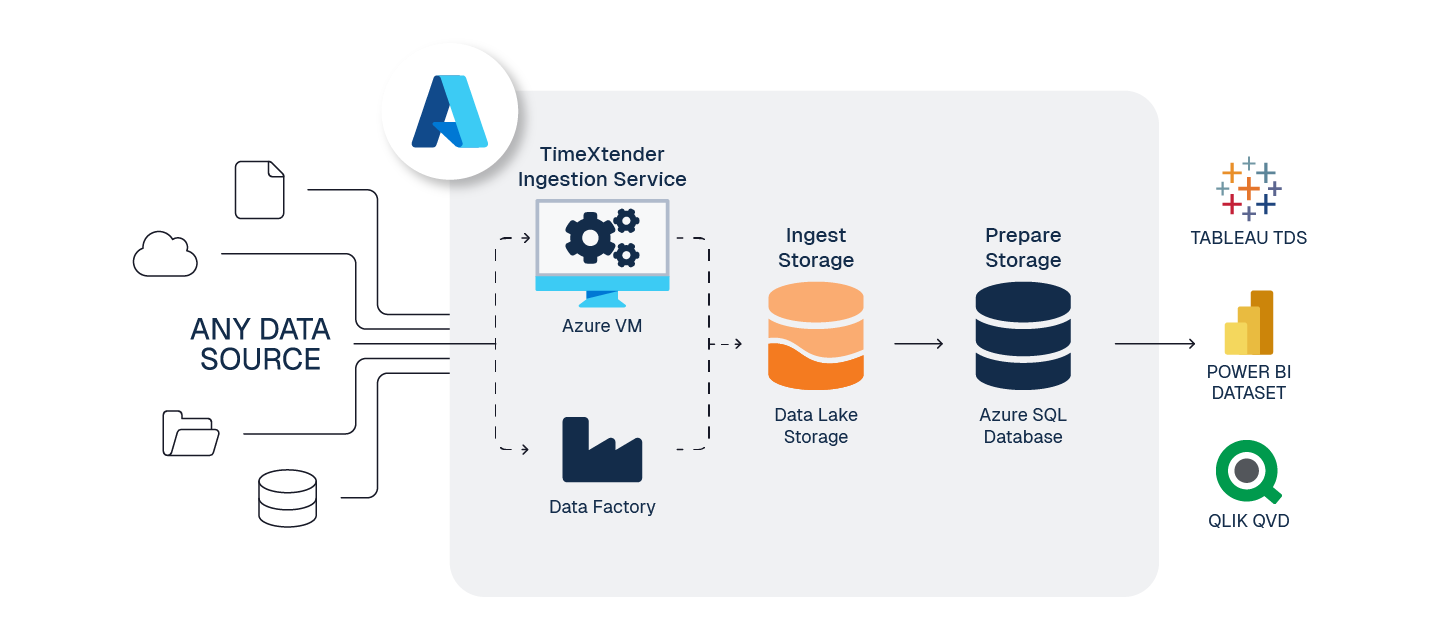
1. Create Application Server - Azure VM
To serve the TimeXtender Data Integration application in Azure, we recommend using an Azure Virtual Machine (VM), sized according to your solution's requirements.
Guide: Create Application Server - Azure VM
Considerations:
- Recommended Sizing: DS2_v2 (for moderate workloads). See Azure VM Sizes documentation for more detail.
- This VM will host the below services, and must remain running for TimeXtender Data Integration to function
- TimeXtender Ingest Service
- TimeXtender Execution Service
2. Create Storage for Ingest instance - Azure Data Lake Storage Gen2
ADLS Gen2 is highly performant, economical, scalable, and secure way to store your raw data.
Guide: Create Storage for Ingest instance - Azure Data Lake Storage Gen2
Considerations:
- When creating the ADLS Gen2 data lake service, you must enable Hierarchical Namespaces
- TimeXtender Data Integration writes files in Parquet file format, a highly compressed, columnar storage in the data lake.
- It is possible for Ingest instances to store data in Azure SQL DB (rather than in a data lake), but this adds cost and complexity but no additional functionality
- When using Azure Data Lake for Ingest instance storage and SQL DB for the Prepare instance storage, it is highly recommended to use Data Factory to transfer this data.
- ADLS will require a service principle, called App Registration in Azure, for TimeXtender Data Integration to access your ADF service.
- Both Data Lake and ADF, may share the same App Registration if desired.
3. Prepare for Ingest and Transport - Azure Data Factory (optional)
For large data movement tasks, ADF provides amazing performance and ease of use for both ingestion and transport.
Guide: Prepare for Ingest and Transfer - Azure Data Factory (recommended)
Considerations:
- When creating ADF resources use Gen2, which is the current default
- A single ADF service can be used for both transport and ingestion
- Ingestion from data source to Ingest instance storage
- Transport from an Ingest instance to a Prepare instance
- The option to use ADF is not available for all data source types, but many options are available.
- ADF Data sources do not support Ingest Query Tables at this time.
- ADF's performance can be quite costly for such incredible fault-tolerant performance
- ADF will require a service principle, called App Registration in Azure, for TimeXtender Data Integration to access your ADF service.
- Both Data Lake and ADF, may share the same App Registration if desired.
4. Create Storage for Prepare instance - Azure SQL Database
Azure SQL Database offers flexible compute tiers and auto-pause capabilities that provide cost-effective storage solutions for TimeXtender Data Integration Prepare instances across development and production environments.
Guide: Create Storage for Prepare instance - Azure SQL DB
Considerations:
- Development Prepare Storage:
◦ General Purpose Service Tier with Serverless compute
◦ Auto-Pause duration: 1 hour - enables minor storage costs with $0 compute cost when inactive
◦ vCore Configuration: Match Min and Max vCores to prevent scaling-related connection drops- Configure execution retry logic with 2–3 minute delays to handle database resume operations when using Serverless compute tier.
- Configure execution retry logic with 2–3 minute delays to handle database resume operations when using Serverless compute tier.
- Production Prepare Storage:
◦ Hyperscale Service Tier with Provisioned compute and Premium-series Hardware
◦ Start with 4 vCores and scale up as needed
◦ Hyperscale with Premium-Series hardware delivers optimal Log throughput (150 MiB/s) for TimeXtender ETL workloads - For production workloads requiring consistent performance, use Orchestration Cloud Optimizer or PowerShell to scale compute up before scheduled executions and scale down after completion.
- The Serverless compute tier provides cost savings when databases run less than 50% uptime. For higher utilization requirements, Provisioned compute delivers better economics and reliability.
5. Configure Power BI Premium Endpoint (Optional)
If you have Power BI Premium, deploy and execute Semantic Models within Deliver instances directly to the Power BI Premium endpoint.
Guide: Configure PowerBI Premium Endpoint (Optional)
6. Estimate Azure Costs
Balancing cost and performance requires monitoring and forecasting of your services and needs.
Guide: Estimate Azure Costs
Considerations:
- Azure provides a pricing calculator to help you estimate your costs for various configurations
Note: this Azure pricing calculator does not include the cost of TimeXtender instances and usage

