

In a Prepare Instances Data Area tables can be configured in many different ways, providing developers with the a great deal of flexibility in the way that data is loaded, transformed, and presented. This article outlines the table validation & performance settings available such as simple mode, compression, partitions, Incremental load, history, and much more.
Right-click on a data table and select “Table Settings” to open the dialog where the various table settings that are outlined below can be configured.

General Tab
The Table Settings dialog will open up on the General tab by default, which contains the following.
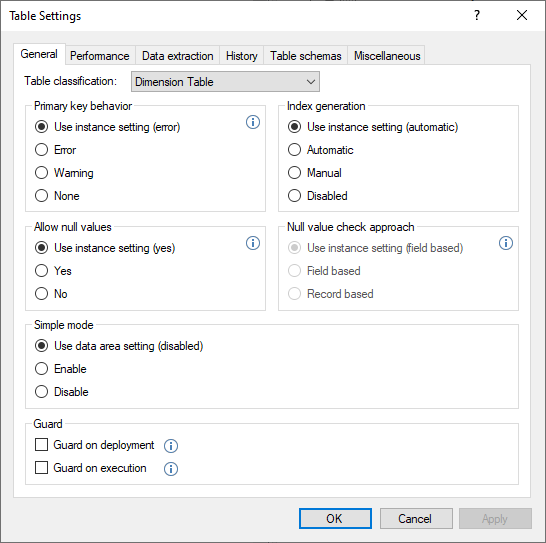
Table Classification
Choose from one of the following four options, whichever is most appropriate:
- Dimension Table
- Dimension Table - Large
- Fact Table
- Fact Table - Large
The table classification is primarily used when an Execution Package has the Managed Excecution setting set to “Classification.”

Primary key behavior
This section determines how primary key constraint violations are handled.
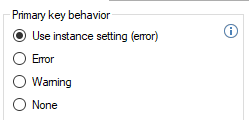
- Use instance setting (error)
This refers to the default setting of the instance - Error
This will send a row to the Errors view and avoid adding the row to the valid table when there is a violation. - Warning
This will send a row the the Warnings view and not remove the row from the valid table when there is a violation. - None
This will do nothing when a violation occurs. This setting is only recommended for debugging use only.
The Instance setting behavior is the same as explained above. Click on Primary Keys to open the tutorial for a more detailed description of primary key configuration in TimeXtender.
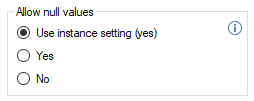
Allow null values
This “Allow null values“ setting is set to “Yes” by default, which means that it is okay for fields to contain null values. Change this setting to “No” to move any rows with null field values to the Error table.
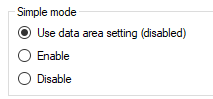
Simple Mode
Simple Mode aims at maximizing performance when large amounts of data need to be copied into a database to create an exact copy. See Simple Mode for more information.
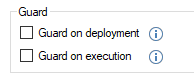
Guarding a table
Guarding a table tells TimeXtender to skip the table on execution or deployment, which may be necessary depending on the type of data contained within the table. For example, when the table contains old data from a legacy system that is no longer running.
Index Generation
Configure index automation at the table level from the following four options.
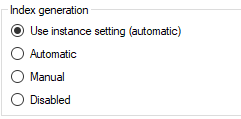
- Use instance setting (automatic)
This refers to the default setting of the instance - Automatic
TimeXtender manages the creation and maintenance of the index as needed. - Manual
TimeXtender creates indexes but does not manage them. - Disabled
TimeXtender will use the legacy index generation behavior, generating during execution as needed by the data cleansing procedure.
Click Indexes to open the tutorial clarifying the above settings in more detail. Note that the settings above do not apply to TimeXtender “Incremental Load” and “History” tables. Click on Maintaining SQL Indexes on “Incremental Load” and “History” tables to open the KB article that clarifies when and how to manage the indexes for these types of tables.
Null Value Check Approach
This setting determines how null values within records are advised, whether just the record itself is indicated or whether the name of the specific field that contains the null value is included as well.
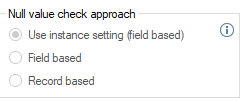
- Use instance setting (field based)
This refers to the default setting of the instance - Field based
Both the record and which field within that record contains the null value are advised. - Record based
Only the record that contains the null value is advised. The specific field that contains the null value is not indicated.
Click on Instances and Settings to open the KB article with a more detailed explanation of these.
Performance tab
The second tab under Table Settings includes those items that can be configured to optimize performance, which may be needed when dealing with large data sets.
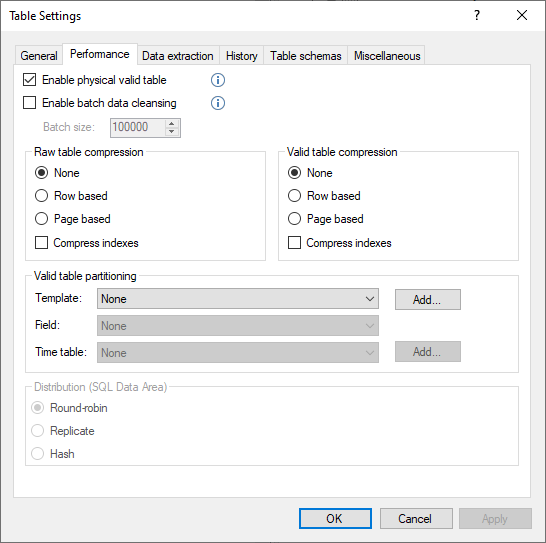
Enable Physical Valid Table
By default, each table consists of three elements:
- Physical raw table
- Transformation view of the raw table.
- Physical valid table of the clean data from the transformation view.
By unchecking the “Enable physical valid table option”, each table will no longer include the physical valid table, and only be comprised of the first two elements;
- Physical raw table
- Transformation view of the raw table.
This can improve performance when a table is only used once as a source and does not include any transformations, as the step that copies the data from the transformation view to the valid table is no longer needed.
However, if your table has no transformations, consider enabling the “Simple Mode” option on the General tab, as this will mean that a table only consists of a single element of the physical valid table.
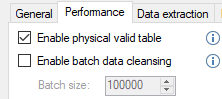
Enable Batch Data Cleansing
The INSERT statement used during data cleansing can be split up into batches to improve performance when copying data from the transformation view for a table to the physical valid table. This saves log space on the SQL Server and provides for better performance for large tables with 100,000s or millions of rows. The default batch size is 100,000 records, but this can be amended as appropriate.
Raw Table and Physical Table Compression
SQL Server supports row and page based compression on tables, indexes and partitions. Compression reduces the amount of storage space needed from the table, which can lead to reduced I/O and better performance. However, compression may also result in additional CPU usage that in some cases might outweigh the benefits of the data compression. A proper evaluation of your data in terms of whether compression will be beneficial should be performed prior to employing these settings.
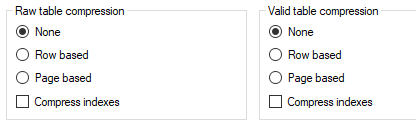
- None
No compression is the default setting. - Row based
This compression only changes the physical storage format of the data that is associated with a data type, but not its syntax or semantics. Row based compression is a subset of page compression. - Page based
Page compression will compress the following items in the order listed:
– Row compression
– Prefix compression
– Dictionary compression -
Compress Indexes
The compression of indexes is a separate setting from the above and is unchecked by default.
Create Fixed Date Range Table Partitioning
Partitioning is the database process where very large tables are divided into multiple smaller individual tables. As a result, queries that access only a fraction of the data may run faster since there may be less data to scan.

Click the Template “Add” button to create a partition template.
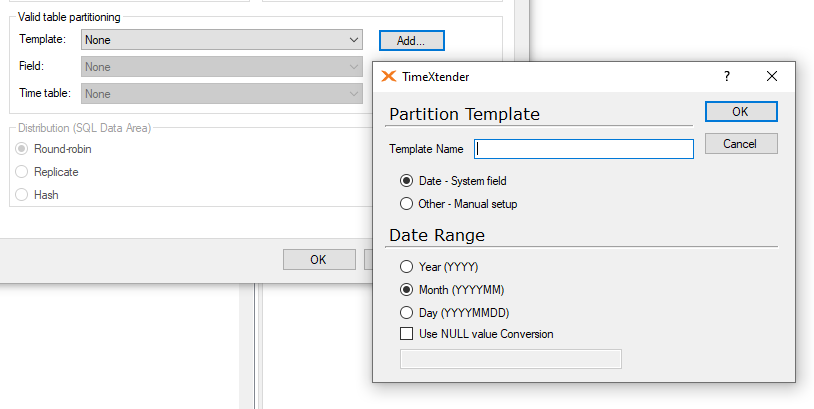
Selecting the “Date - System Field” bullet point will open the date range menu underneath, where the following options are available.
- Year (YYYY)
- Month(YYYYMM)
- Day (YYYYMMDD)
- Use NULL value Conversion
The “Use NULL value Conversion” checkbox allows developers to specify a value that will be used in lieu of any null date values, should they be present. Enter the value to be used in place of the null date value in the field below.
How the data is queried generally determines the optimal partitioning period. For example, if queries are commonly performed on monthly based data, then partitioning by Month(YYYYMM) would normally be the appropriate date range to select for partitioning.
For the scenario above, complete the configuration by setting the appropriate date field and time table, which is usually your Date table and used to compare the date data.
Create Custom or Dynamic Date Range Table Partitioning
There may be instances where partitioning based on set time periods is not optimal, as there may be dynamic ranges that do not adhere to only one timeframe. A custom partition may be used to accommodate these types of partitioning situations.
Click on Table Partitioning to open the KB Article that explains table partitioning including how to set up dynamic partitioning date ranges.
Set Distribution for Tables on Azure Synapse Analytics
For tables on a Prepare Instance deployed on Azure Synapse Analytics, additional settings are available on the Performance tab in Table Settings. The Distribution option controls how data in the table is distributed among the 60 distributions and x amount of compute nodes on the server. Click on Set Distribution for Tables on Azure Synapse Analytics to open the KB Article the explains the different distribution options for this type of Prepare table.
Data Extraction Tab
This tab includes the settings that configure how data is loaded into the table. For example, whether an execution will truncate the table and reload all of the data or whether data will be incrementally loaded.
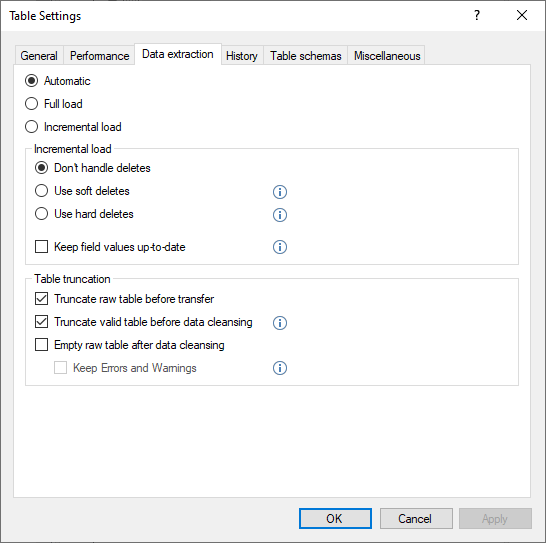
Data Loading Options.
Select from the following data load options.
- Automatic: inherit the load settings that are applied on the source table that the data is mapped from. This is the default setting.
- Full Load: All data will be fully loaded from scratch.
- Incremental Load: Only new data will be loaded based on the cutoff value of where the previous load ended.
Incremental Load Deleted Records Options.
If data will be loaded incrementally, then the following additional options are available relating to any data that was deleted in the source.
- Don’t handle deletes: no action is taken on the deleted data in the valid table when that data is detected as deleted in the data source.
- Use soft deletes: valid table records are marked as deleted when those records are detected as deleted in the data source, which means that the deleted data is not physically removed.
- Use hard deletes: deleted data is removed from the valid table when it is detected as deleted in the data source.
Keep Field Values Up to Date
This is a checkbox separate from the deleted record options above. When enabled, all field values in the valid table will be kept up to date, which includes Lookup field values and Supernatural keys, and any other fields that may use the fields that contained deleted data in transformations, conditions, and joins, etc.
Click on Incremental Loading to open the KB Article that has more information on how to configure incremental loading on Data Area tables.
Table Truncation.
The truncation settings are check boxes that can be applied separate from each other, and determine whether a table will be dropped or truncated prior to reloading the data into it. Truncation can help ensure that the data loaded is up to date, however, this setting cannot be used when incremental loading is used, as incremental loading by nature is only loading the newest data, and so the previously loaded data must be preserved.
The three check boxes that can be selected are as follows:
- Truncate raw table before transfer.
- Truncate valid table before data cleansing. (This setting is ignored when the Data Extraction setting above is set to Automatic.)
- Empty raw table after data cleansing. Includes the option to “Keep Errors and Warnings”, which may result in the table being deleted instead of truncated when errors or warnings are detected. This setting is ignored by Simple Mode tables.
Click on Execute Tables to open the KB Article that has more information regarding the different tables referenced in the truncation options above.
History Tab
Enabling History allows for the configuration of Slowly Changing Dimensions tables.
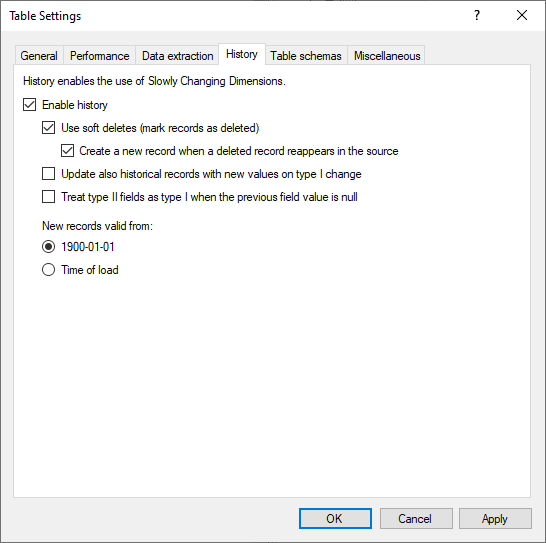
Slowly Changing Dimensions have different types, but are generally implemented as type 1 or type 2.
Click Enable History to open the KB Article the explains how to use TimeXtender History settings to implement slowly changing dimension tables. A brief summary of the options available is as follows:
- Use soft deletes to mark records that have been deleted in the source system as deleted in the table.
- Create a new record when a deleted record reappears in the source to keep track of history when a record is deleted and later restored in the source system.
- Update all records with new value on type I change to update all versions of a record with the new value when a type I change is detected.
- Treat type II as type I when field value is null to not insert a new record when a type II field changes from null to a non-null value.
- Under New columns valid from, click Time of load to have TimeXtender insert the time of load in the "valid from" field when a new record is added. Depending on you reporting needs, this might make more sense than the default, 1900-01-01.
Table Schemas Tab
TimeXtender database schemas allow developers to apply a specific schema to a table or group of tables. Schemas can be used to restrict access to tables that are not useful or needed for report designers, simplifying the creation of reports based on the Prepare Instance.
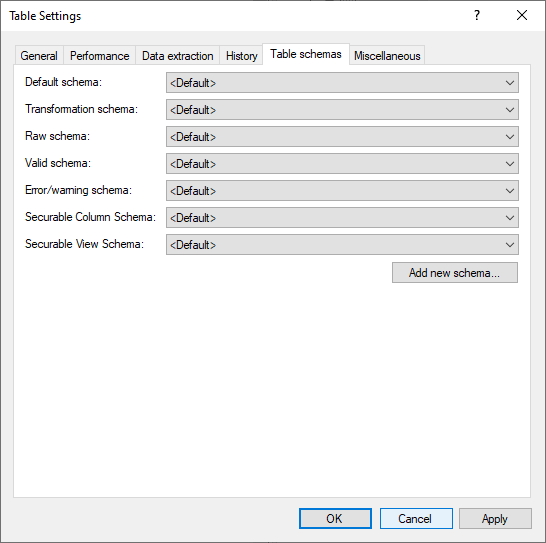
Click Schemas to open the KB Article the explains how to use schemas for Data Area tables in detail.
Miscellaneous Tab
This tab conditions contains items related to the use of user-defined functions that may affect performance when enabled.
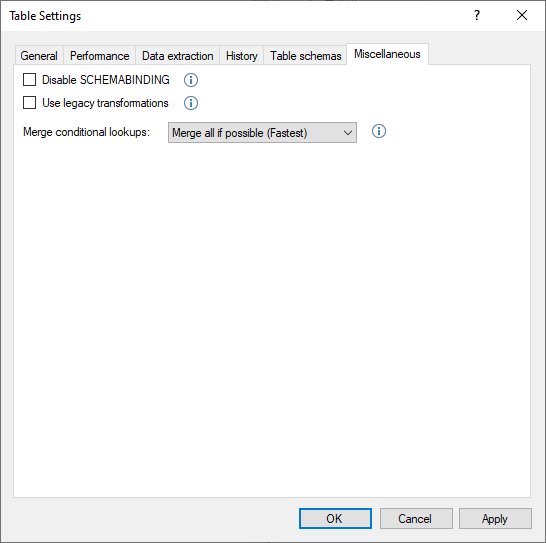
Click on Performance Recommendations to open the KB Article that explains these items in more detail. A brief explanation of the available options is as follows:
Disable SCHEMABINDING for autogenerated user-defined functions containing field transformations. Check this option only if you want to use your own user-defined functions and reference them in field transformations.
Use legacy transformations: Transformations will always use autogenerated user-defined functions instead of inline expressions. Check this option only if you have custom code that has too many nested CASE WHEN statements that cause it to fail during deployment. As a limitation of SQL Server, case expressions may only be nested to a level of 10.
Disable SCHEMABINDING and Use legacy transformations options decrease performance and should only be enabled when absolutely necessary.
Merge conditional lookups:
- “Merge all if possible”: will merge all conditional lookup fields in the table that are not related to one another into one SQL Update statement. This is the fastest setting but requires more RAM to support it.
- “Merge only similar lookups” setting will be slower but requires less RAM.
- “Don’t merge” is the slowest setting and is usually only recommended for debugging purposes.
