With the TimeXtender REST data source, you can gain access to REST APIs. Many APIs have a unique setup and use a specific behavior, this article describes the settings to connect to various APIs.
Connect to REST APIs with various authentication methods such as Header options, Bearer Tokens, OAuth, and similar. If the REST API contains multiple resources such as users, posts, and comments you can use it to connect to each one as individual endpoints, by providing the base URL. The data source offers pagination options to connect to each page of an endpoint. In some cases, endpoints require the input of a date or an ID from another endpoint. Configure dynamic values within the data source to handle this requirement.
At the bottom are some real examples showing how to connect to some APIs everyone should have access to. Additionally, they show how to use specific options for authentications and how to use dynamic values.
Add a data source in the Portal and select the TimeXtender REST data source. Add a name and description for the data source.
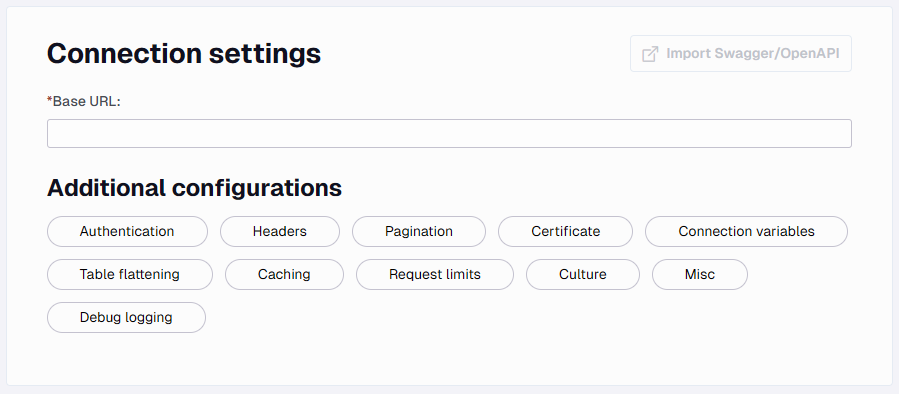
Connection Settings
Here you add the base URL for the API to connect to. The base URL would be the bold part of the following URL https://gorest.co.in/public/v2/users. The remainder (i.e. /public/v2/users) is the part that will be used for the Users Endpoint.
Below this is the other configurations you can set besides Endpoints. These will be explained in the Additional Configurations section.
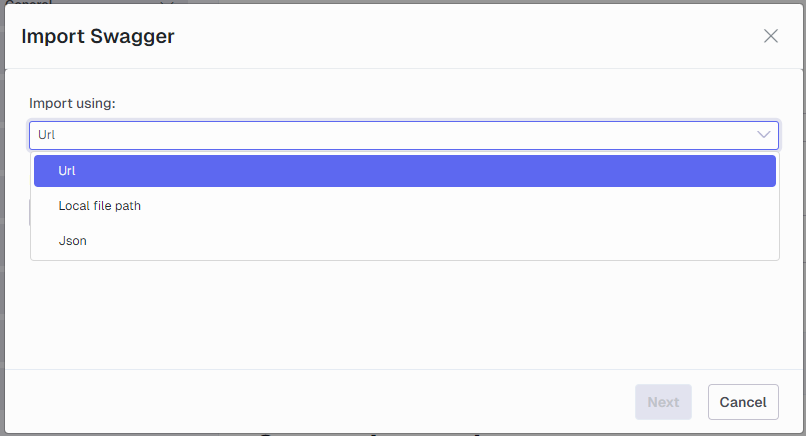
Import Swagger
This feature will become available once you have mapped the data source to an Ingest instance. When you click on the icon the following menu will be shown.
The Import Swagger feature will try to parse OpenAPI definition and auto-create settings and endpoints. There are three ways to provide an OpenAPI definition.
Url: A URL that links directly to the definition. The URL is accessed from the selected Ingest service.
Local file path: A path to a file that is accessible from the Ingest service that contains the definition.
Json: Copy and paste the definition in this window. Using this has a size limit of 250000 characters.
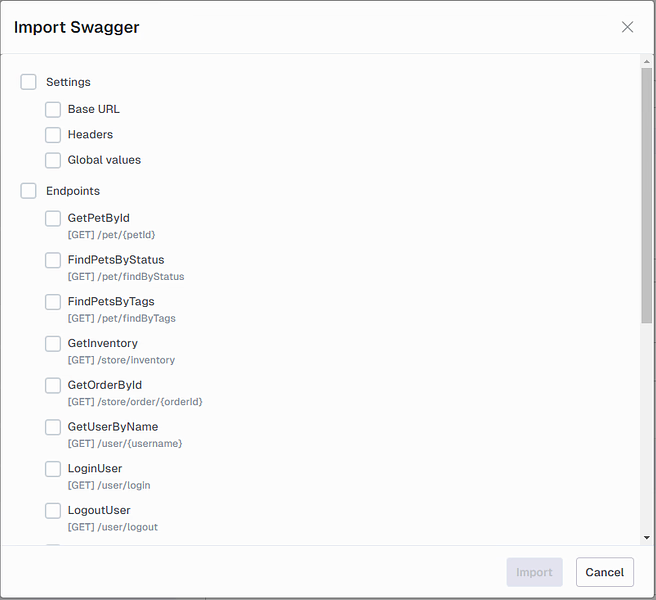
Click Next to start the processing of the definition. On the next page select what to import.
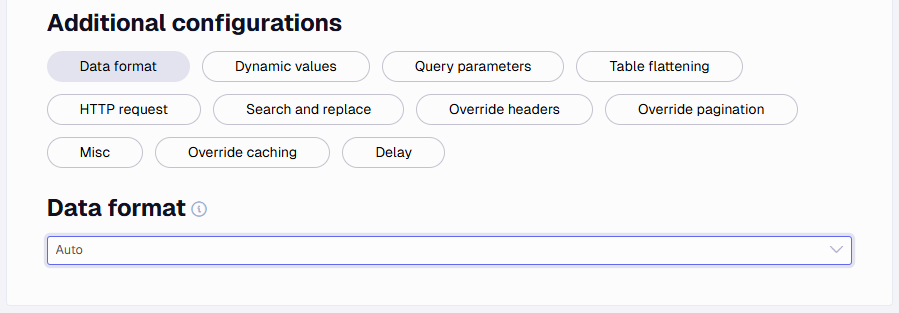
Additional Configurations
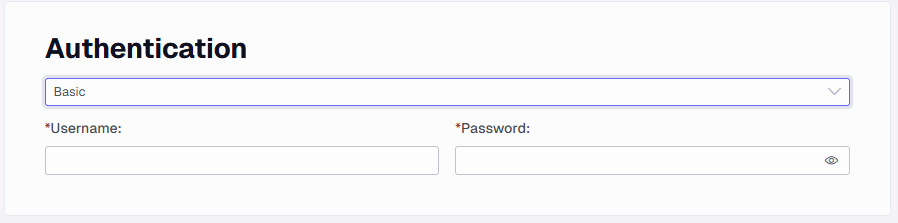
Authentication
Click on the Authentication step to make the option appear.
Setup Authentication by selecting one of the options below from the dropdown. Some authentication options such as APIKey header need to be set up as a header instead.
None - No authentication will be done with this section
Basic - Authenticate using a username and password
Bearer - Authenticate using a non-expiring Bearer Token
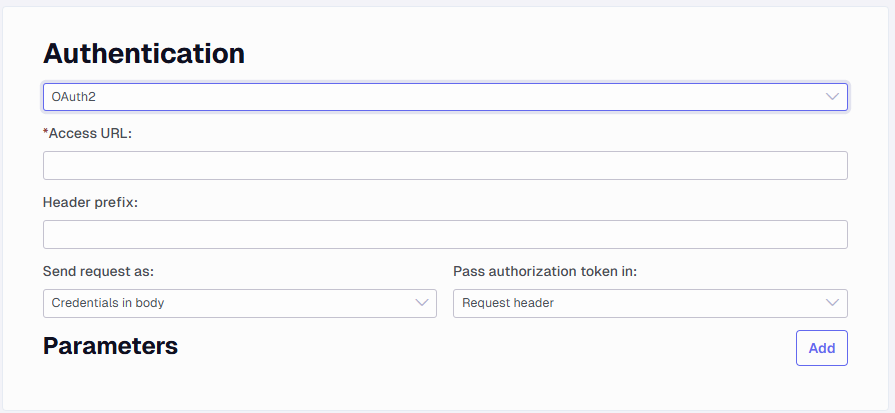
OAuth2 - Authenticate using OAuth 2.0 to gain access
You will need to apply an Access URL that returns the token. Then you need to apply how the Send request is done as either Credentials in the body or a Basic authentication header. You also need to choose how the Authorization token is returned, either in a Request header or in a Request URL. You can apply parameters by clicking on the Add button. These could be client_Id and client_secret. You have an option to set the value as Is sensitive to make it obscured when it is previewed.
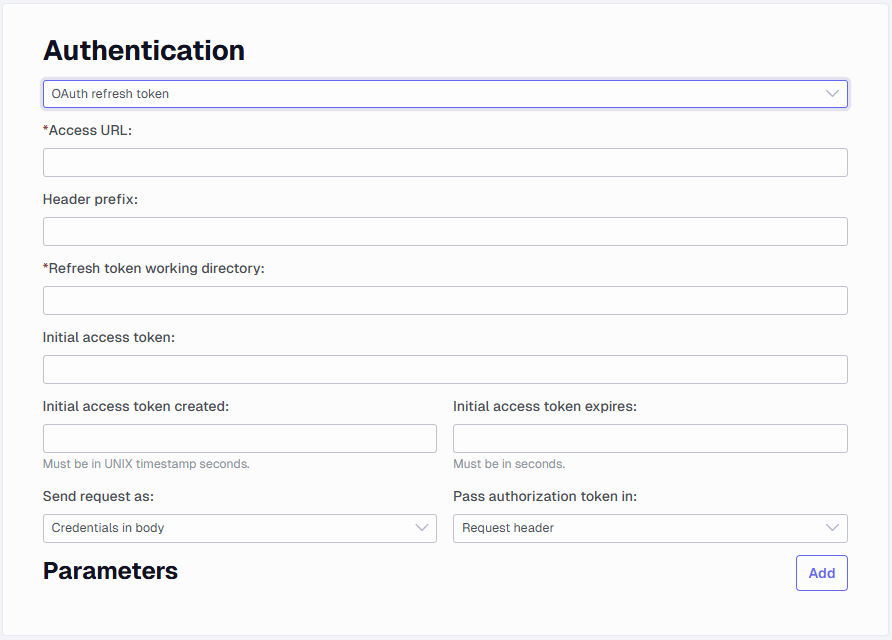
OAuth refresh token - Use this option when a refresh token is needed to maintain access
This is a similar setup to the OAuth2 option from above, the difference is that you can set a Refresh token working directory path to store these in.
The Initial access token is the value of the initial access token. The Initial access token created is the UNIX timestamp in seconds for when the initial access token was created. The Initial access token expires is how long the initial access token is valid (from when it was created), in seconds.
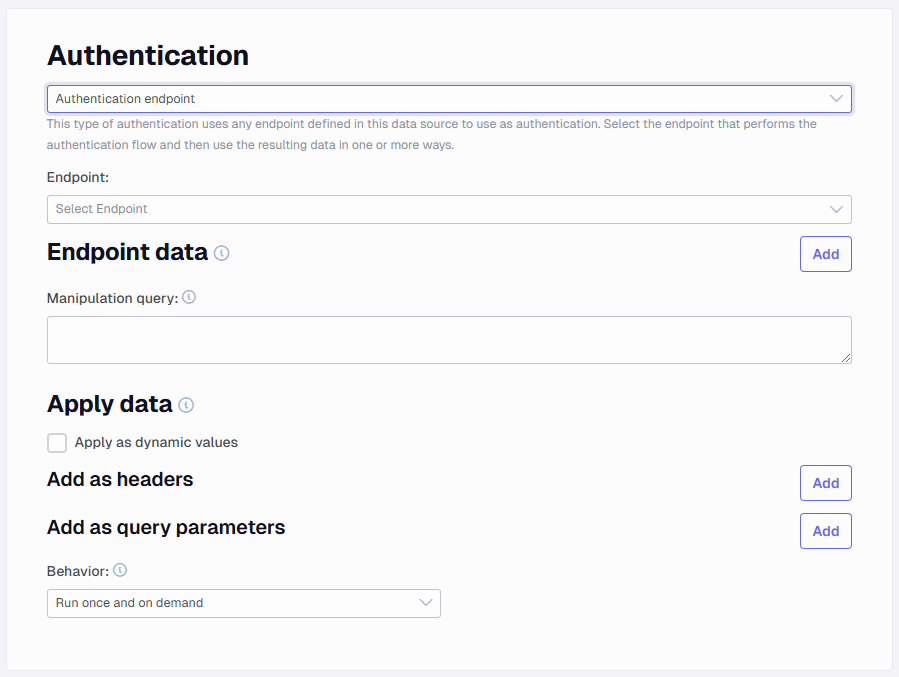
Authentication endpoint - Authenticate using an endpoint
The Authentication endpoint uses any endpoint defined in the data source to perform steps to authenticate. The selected endpoint will execute as any other endpoint with all the same features.
Start by selecting an Endpoint from the dropdown. Only one endpoint can be selected, but the endpoint can be dependent on other endpoints, the dependent endpoints will be executed automatically.
Then in the Endpoint data section, add different sources of data to get from the selected endpoint after it has executed.
The Name entered here will be available as a dynamic value in the Apply data section. The Type is either XPath or Header. When using XPath, it will extract data using XPath from the result body of the request or in the flattened data. Select a Table flattening name if the data the XPath needs to apply to is from a table flattening.
The Manipulation query can be used to alter the data extracted in the Endpoint data section. This is a SQL query running in SQLite. The endpoint data can be referenced in the query by using curly braces and the endpoint data name: "select '{MyHeaderValue} some change' as AlteredMyHeaderValue ".
The Apply data section defines where and how the values from endpoint data will be used. Apply as dynamic values: This will make the named endpoint data and the columns from the manipulation query available to use as dynamic values in all other endpoints.
Add as header: This will add all the headers in the list to all requests in all other endpoints.
Add as query parameters: This will add all the parameters in this list to all requests in all other endpoints.
Behavior defines when to execute the authentication endpoint. Run once and on demand: Will run before the first request, and will execute again only if the request returns a 401. This should be sufficient for most use cases. Run every x minutes: This will run before the first request and then wait for the specified amount of minutes before it executes again (during execution). Run before every request: This will run before the first request and before every subsequent request.
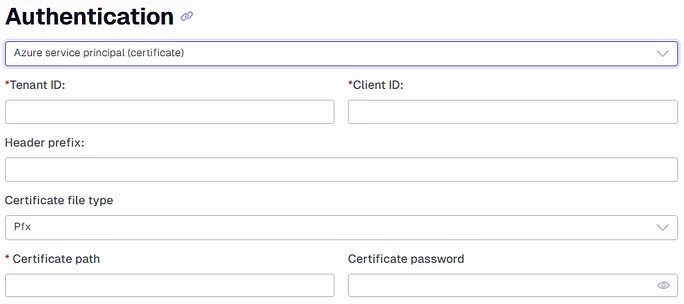
Azure service principal (certificate) This authentication is specialized for azure service principals that uses certificates for authentication, instead of the more common way of using a client secret.
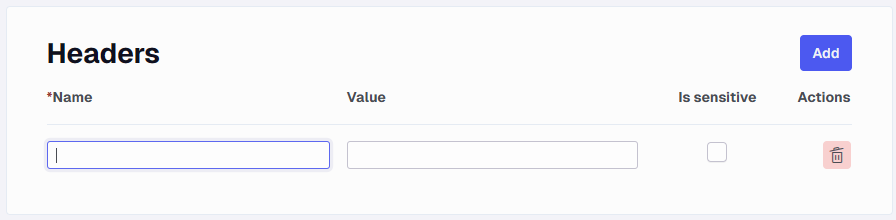
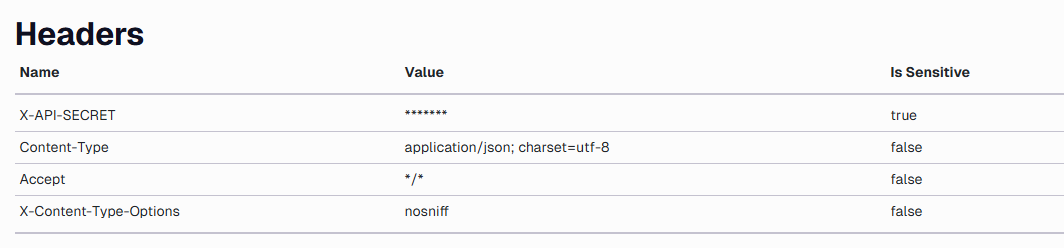
Headers
Add all the headers the API requires to return the desired output.
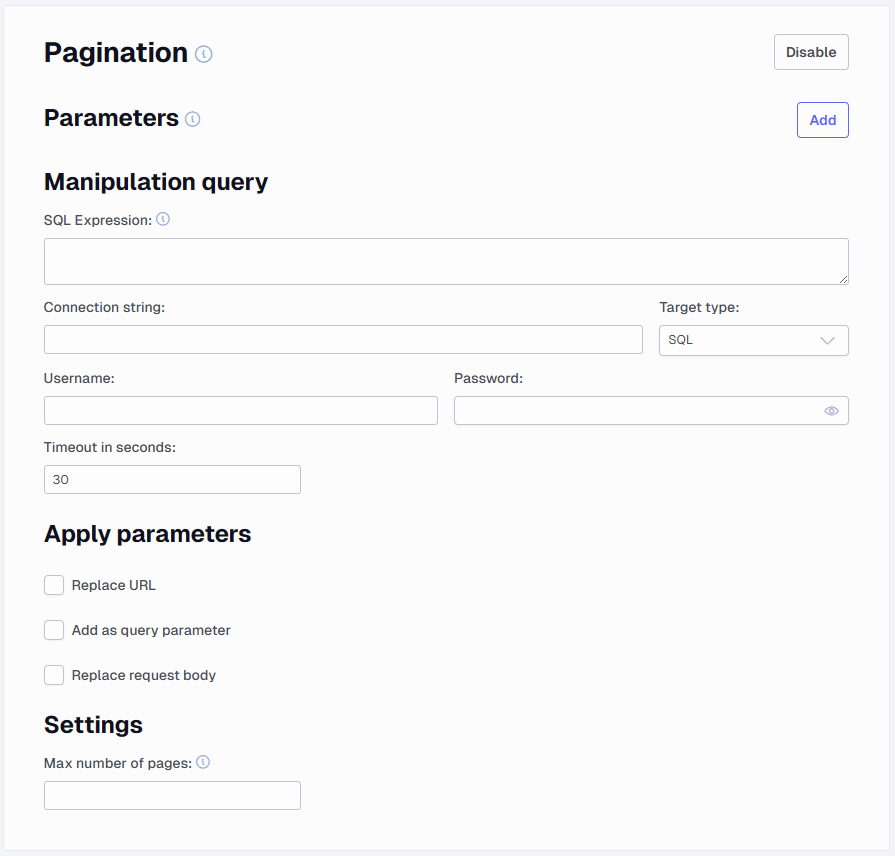
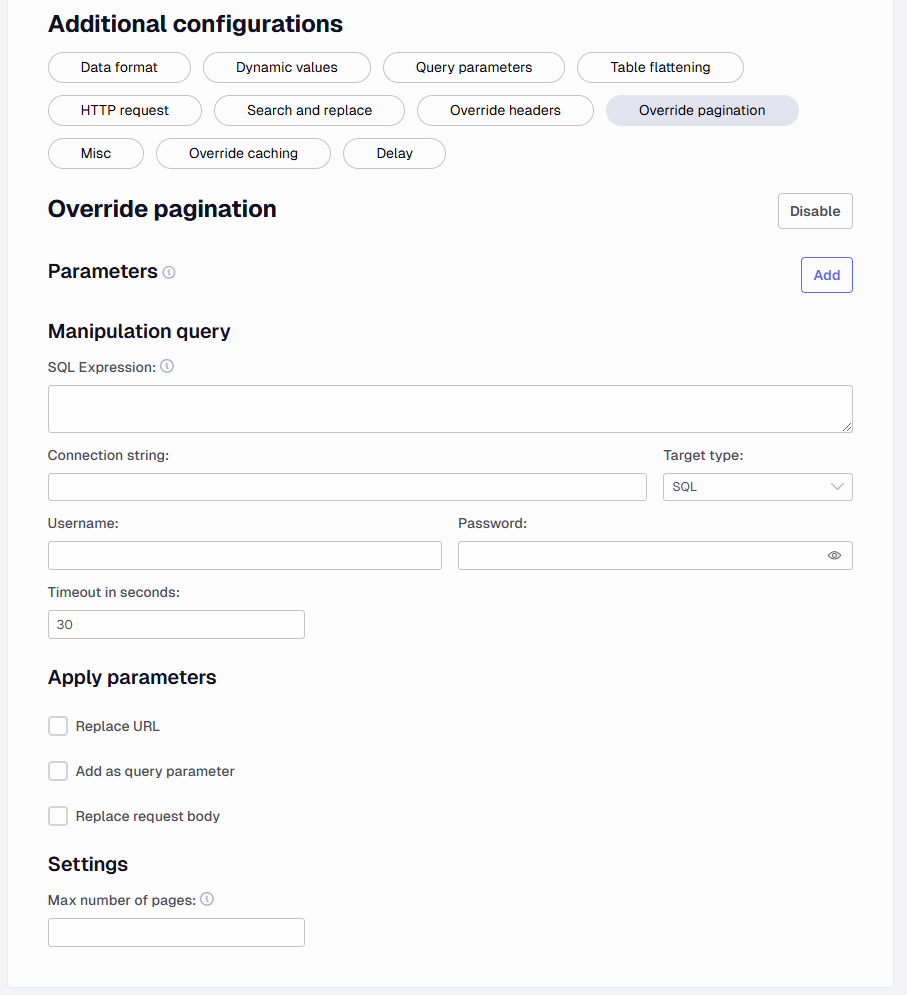
Pagination
Many APIs have limits on how many rows are returned and this option will help ensure all rows are returned.
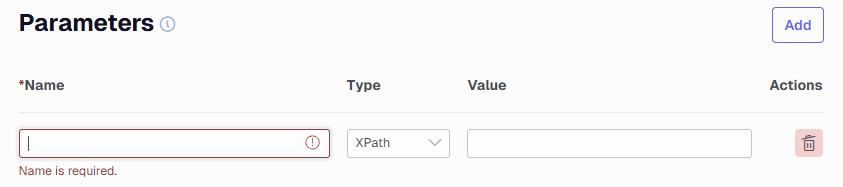
Parameters - Add the necessary parameters such as page or page size.
Set the type of parameter that contains the value. It can be XPath which will be similar to /meta/pagination/page or Header which could be links-next. If any of the parameters are not found, the pagination will stop.
Manipulation Query - This area allows you to create queries that can return values to be used in parameters, URLs or body requests.
SQL Expression - Create a SQL query that returns some value. Similar to the above this requires setting up a parameter action to handle what this returns. Add a Connection string to the server and enter the username and password.
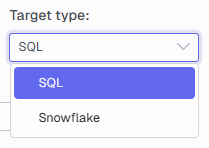
Target type - Set SQL or Snowflake as the target type to run the query against.
Connection string - Add your connection string, you can exclude user and password in this, but you can also just add it to the connection string.
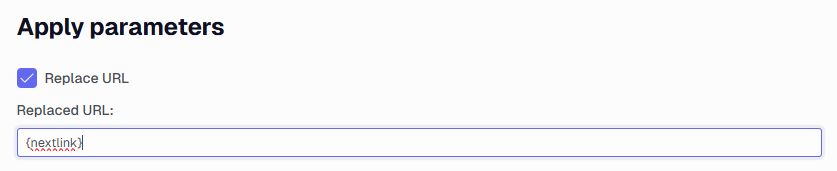
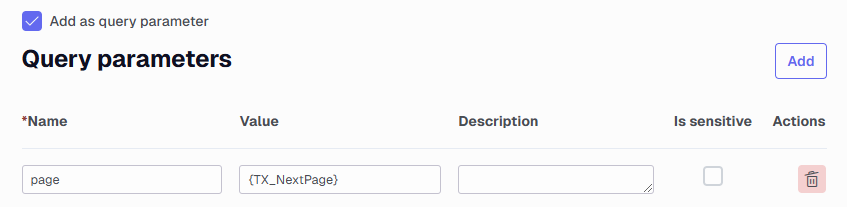
Built-in value options - There are two options to help with increasing a value to use for pagination. These are {TX_NextPage} and {TX_CurrentPage}. They both are usable as the value option in query parameters such as page parameter equal to {TX_NextPage} or in a SQL query where you increase the current value with a number such as SELECT {TX_CurrentPage} * 1000 AS offsetValue. On a given page where you used both options for some reason and {TX_NextPage} is equal to 2 then {TX_CurrentPage} would be equal to 1. There is two guides in the bottom of this guide that show how to use either one.
Apply parameters - You have some options that can be set to handle what is returned from a parameter and an SQL Expression.
Don’t do anything - If you select none of the options
Replace URL - This will replace the current URL with the returned value
Add as query parameter - Select this to add the value such as page number to the URL
Replace post body - Select this to configure how the post body shall be like on all subsequent requests. This is done on each endpoint. It is enabled generally, but you need to configure the "replace post body" for each endpoint you have)
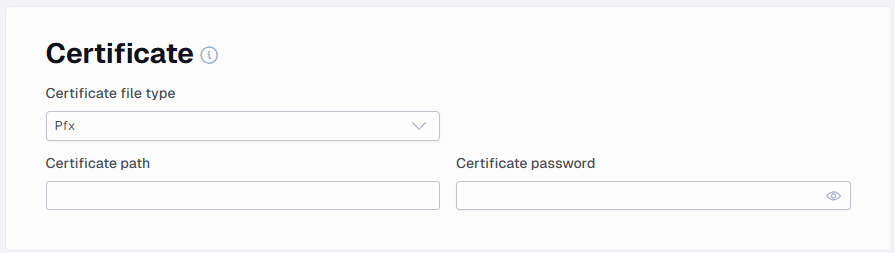
Certificates
You can add a certificate to all requests. This is usually used instead of normal authentication methods like bearer token. File types that are supported are ‘pfx’ and ‘pem’. The password field is optional.
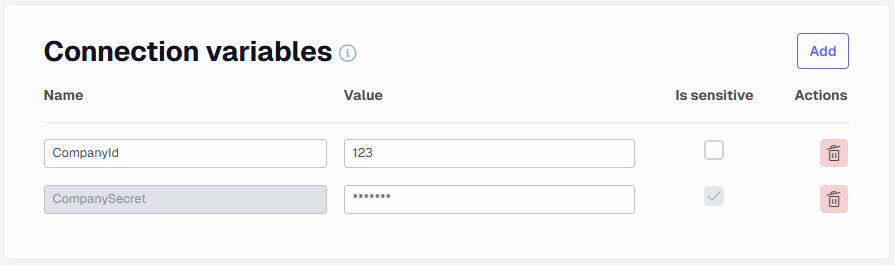
Connection variables
Connection variables are values that are available and can be used in each endpoint, similar to how dynamic values work within one endpoint (see the Dynamic values section for more information). Note that if a connection variable is set to Is Sensitive the values cannot be used in queries and table flattening.
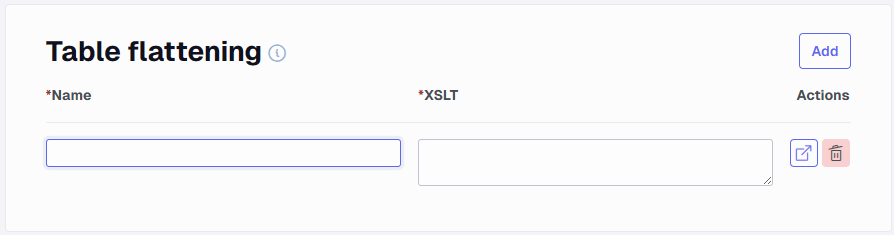
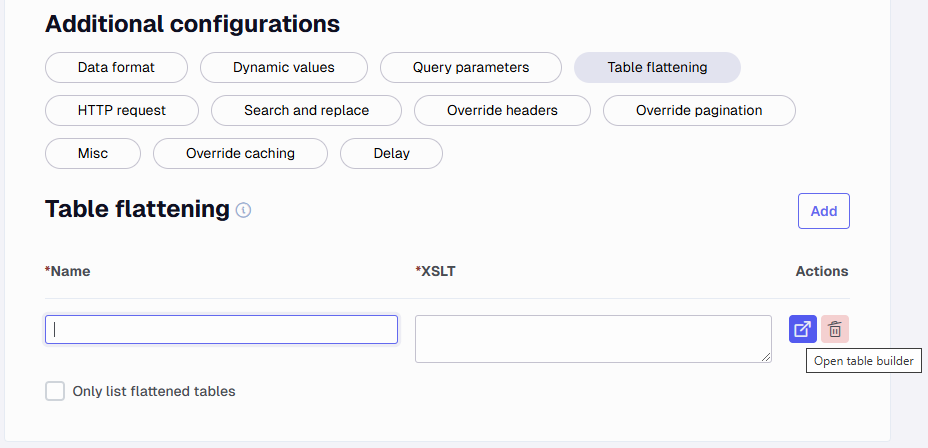
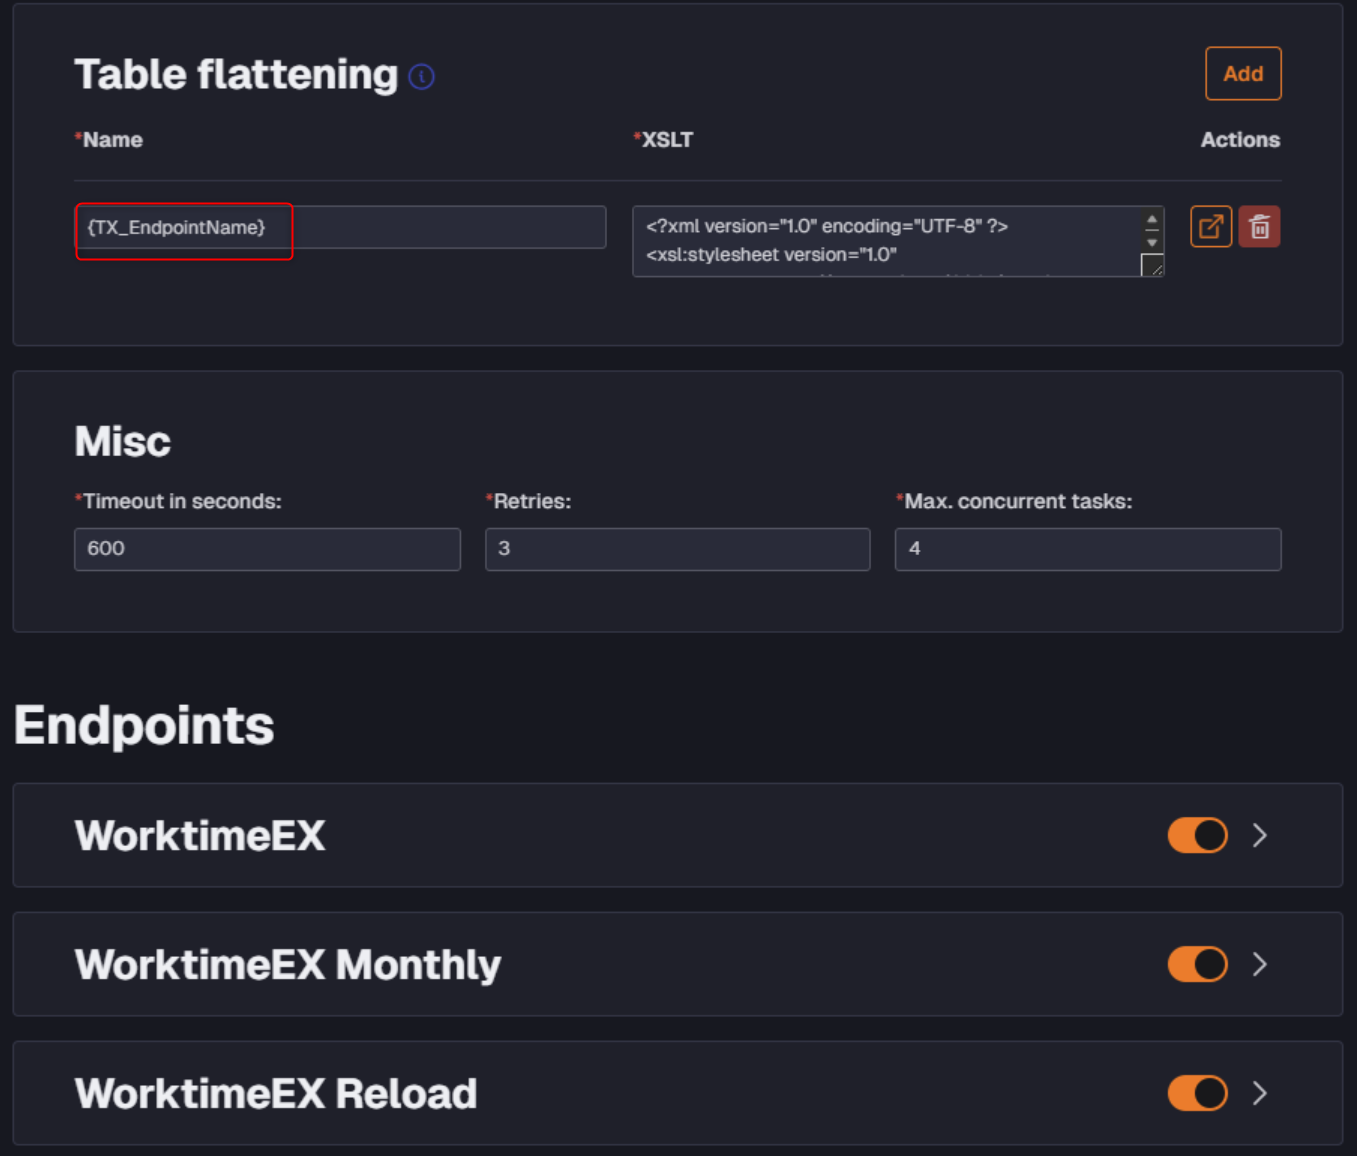
Table flattening
Using this option, you can add table flattening that are applied to all endpoints.
The dynamic value {TX_EndpointName} can be used to insert the endpoint name into the flattening name or in the xslt itself. This can be useful when there is need for some difference in the transformation between each endpoint.
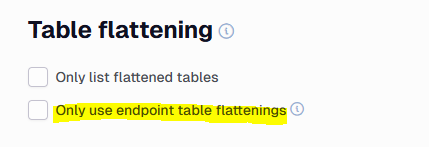
It is possible to override the global table flattening on an endpoint by selection the "Only use endpoint table flattenings" on the endpoint.
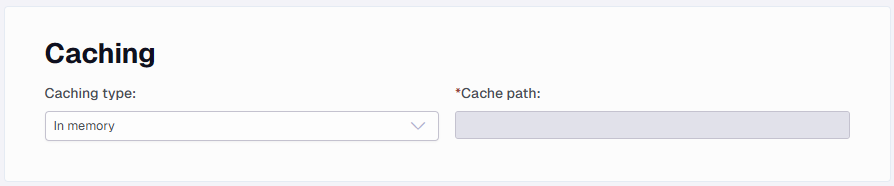
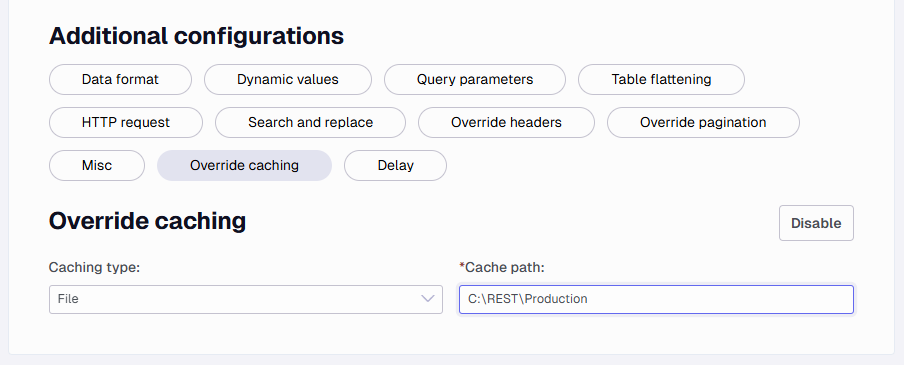
Caching
The caching options decide how the downloaded data is handled. If In Memory is selected, all the downloaded data will be kept in memory. Processing, such as XSLT will also happen in memory. If the downloaded data is large, the machine can run out of memory. If this happens, switch to File type caching.
Besides saving memory, storing it in a file helps identify the output being returned and assists in troubleshooting when completing the initial setup.
Adding a cache path as shown above will store all the files in a folder named after the data source.
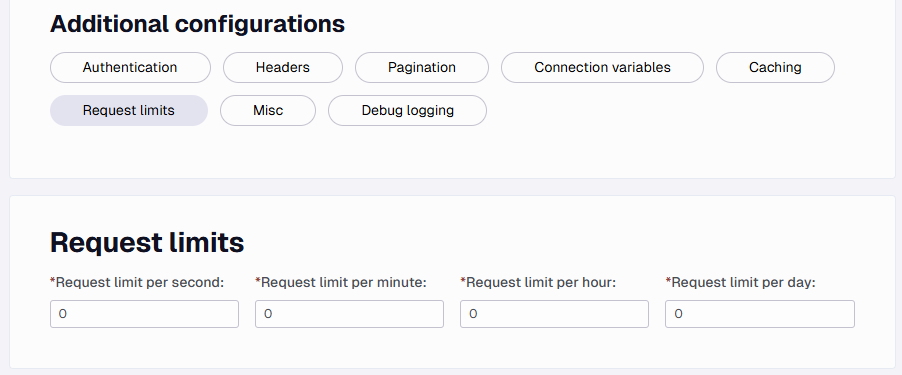
Request limits
Some APIs have limits on the amount of calls being allowed and this setting helps to manage this. You can set limits for requests per second, minute, hour, or day.
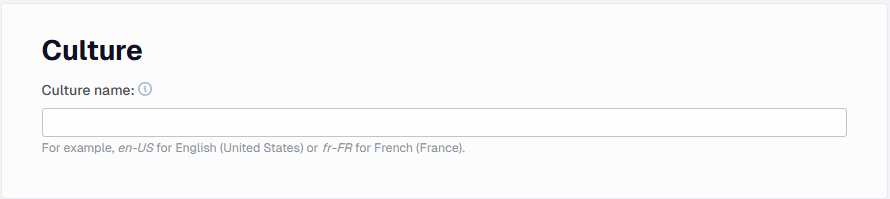
Culture
The culture setting affects how different number and date formats are interpreted.
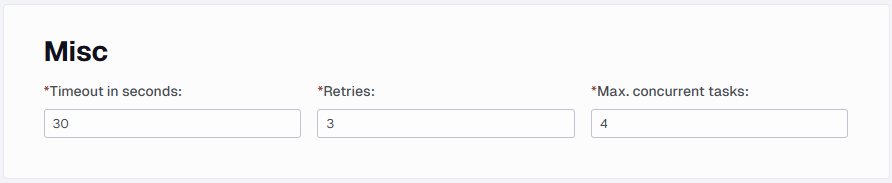
Misc
If necessary, you can set up retries and timeouts for the API calls
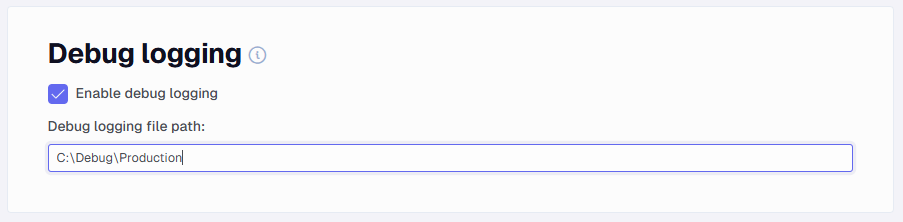
Debug Logging
When debug logging is enabled, the data source will write a detailed log file to disk in the path specified. The log file can be inspected to determine how complex endpoints behave. It can also be a useful tool to provide support with detailed information that can otherwise be difficult to obtain. This should only be enabled when needed, as the files can get very big.
Once checked you can add a path to the folder you want to store the file in. The file will be named after what data source it was and when the task was started.
Endpoints
An endpoint is a specific part of the API that is being accessed. As explained in the Base URL section, it will be what is after the base. Most APIs will have a list of these documented somewhere so you can know what options are available.
The data source will not work if you do not have an endpoint added.
When you set the path of an endpoint, for example, API/users, the name will automatically be applied as users. You can then edit the name afterward to make it Users or All Users.
Click Add endpoint to further configure the endpoint
Data Format
Data Format defines what data format the REST endpoint returns. There are several choices:
Auto: This will automatically determine if the data format is JSON or XML. If it is unable to classify it as JSON or XML, it will default to Text.
JSON: Force the data source to read the data as JSON.
XML: Force the data source to read the data as XML.
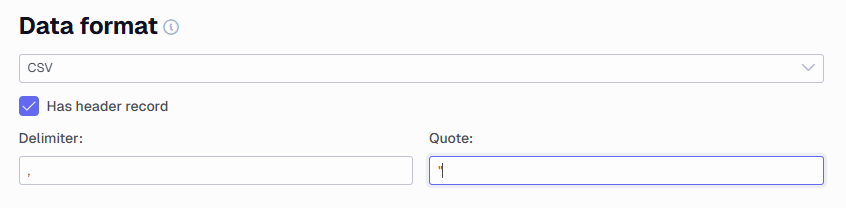
CSV: Force the data source to read the data as CSV. When selecting this format, a few settings will appear below the dropdown box.
Text: Force the data source to read the data as text. When reading as text it will take the whole data content from the data source and save it without modification as a single row single column.
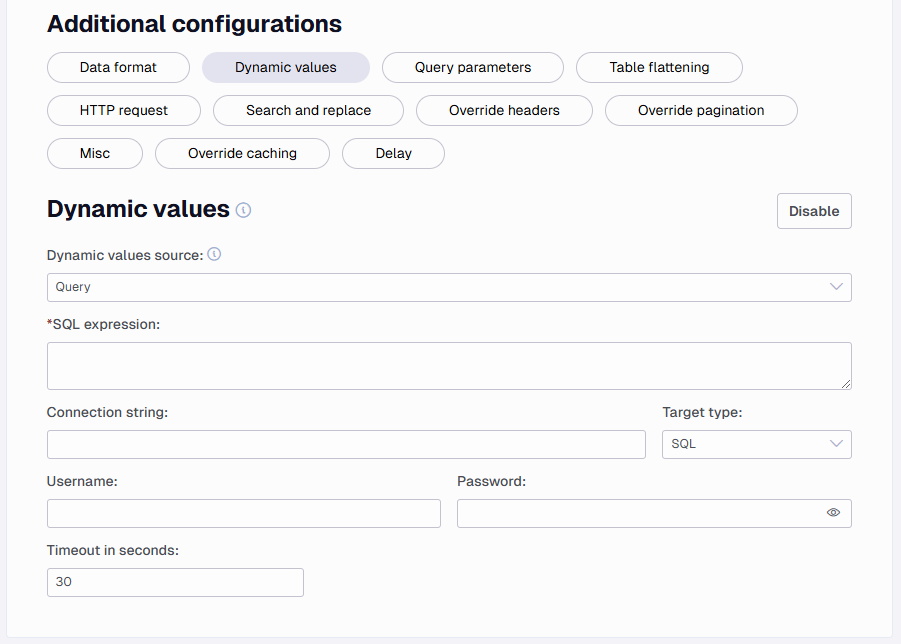
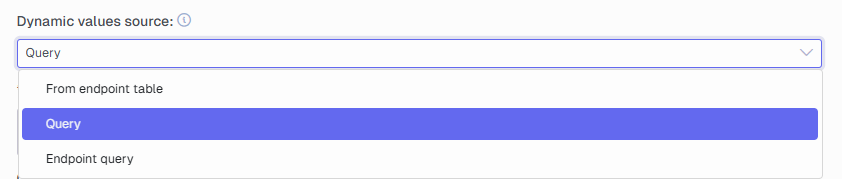
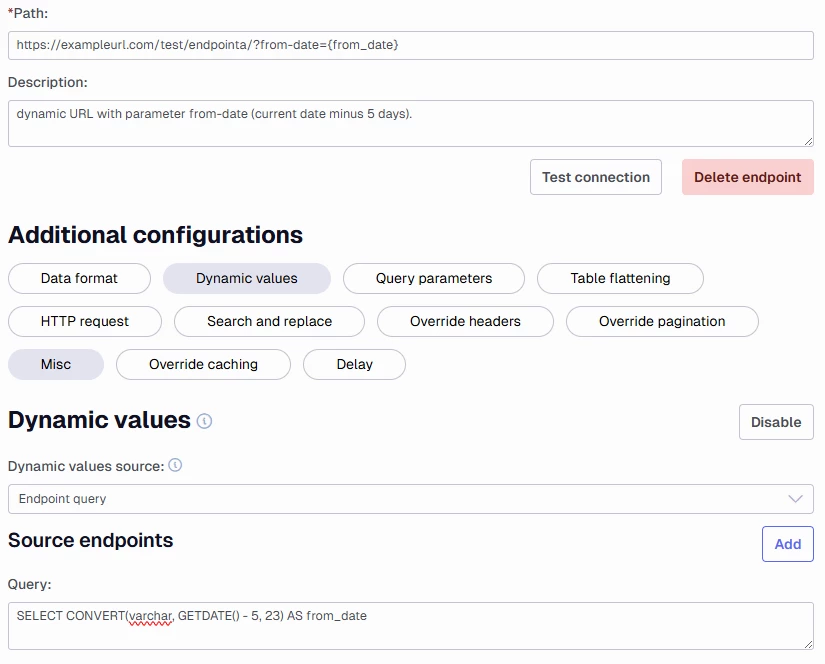
Dynamic values
There are three options
The Query option can be used to loop over a set of values. Each row in the dynamic values will be one REST call (or many, if there are multiple pages). They can be used by referencing a column name in curly brackets, for example: {MyColumn}. The dynamic values can be used in Query Parameters (value), Post Body, Headers (name and value), Pagination (SQL Expression, Replaced URL and Replaced Post Body), Endpoint Path, and Table Flattening (Xslt).
Target type - Set SQL or Snowflake as the target type to run the query against.
Connection string - Add your connection string, you can exclude user and password in this, but you can also just add it to the connection string.
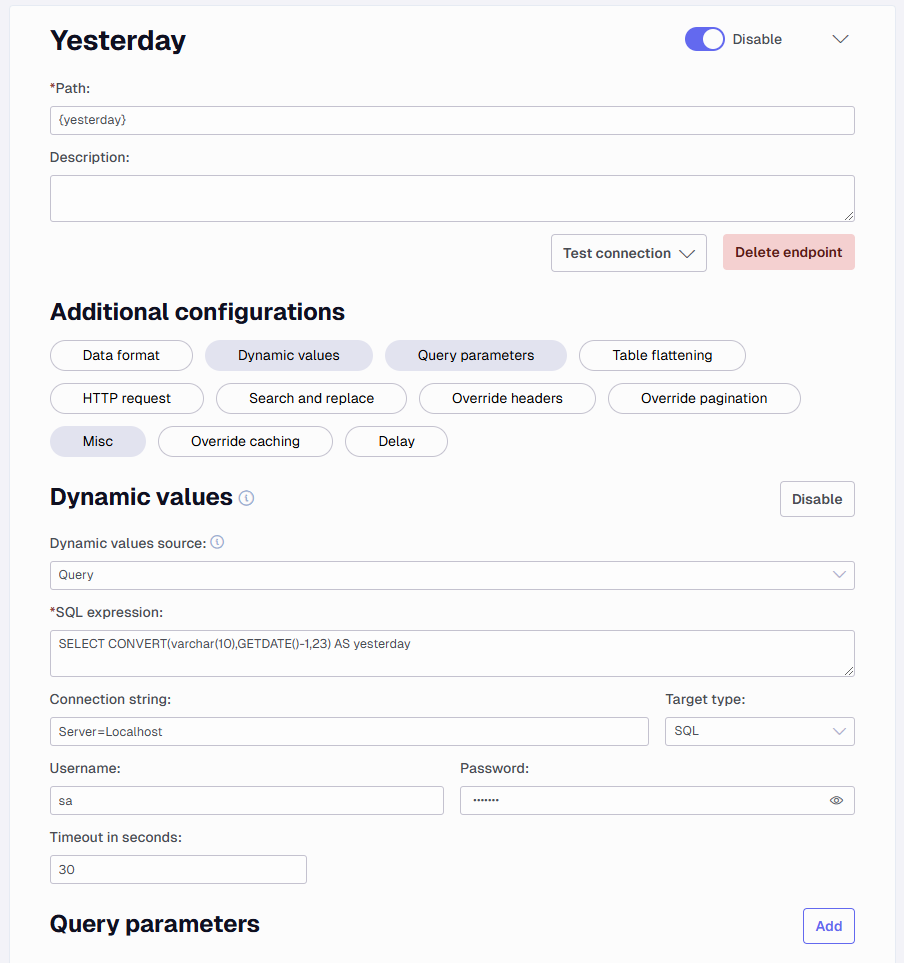
Below is a simple example of how to use a SQL query to set dynamic values, where yesterday's date is used as an endpoint value.
Notice the path is the name of the endpoint in curly brackets {yesterday} as long as my SQL query returns this name it will be applied.
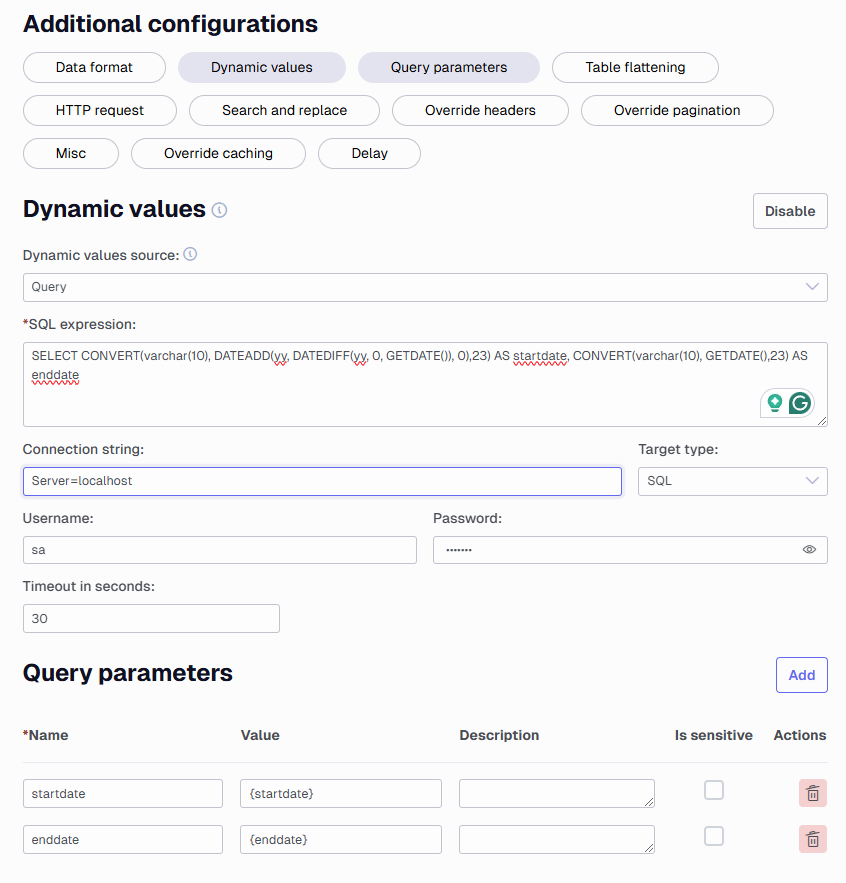
If a date range is needed (i.e. a start and end date with individual values) it could be done similarly, by ensuring that two dates are returned by the SQL query.
Changing the Dynamic values source to Endpoint query lets you select one or more Source Endpoints (and optionally a Table flattening).
The data from these endpoints can then be queried using a SQLite Query. The result of this Query is then used as dynamic values. Note that all columns will be nvarchar and the table names will match those seen in TDI.
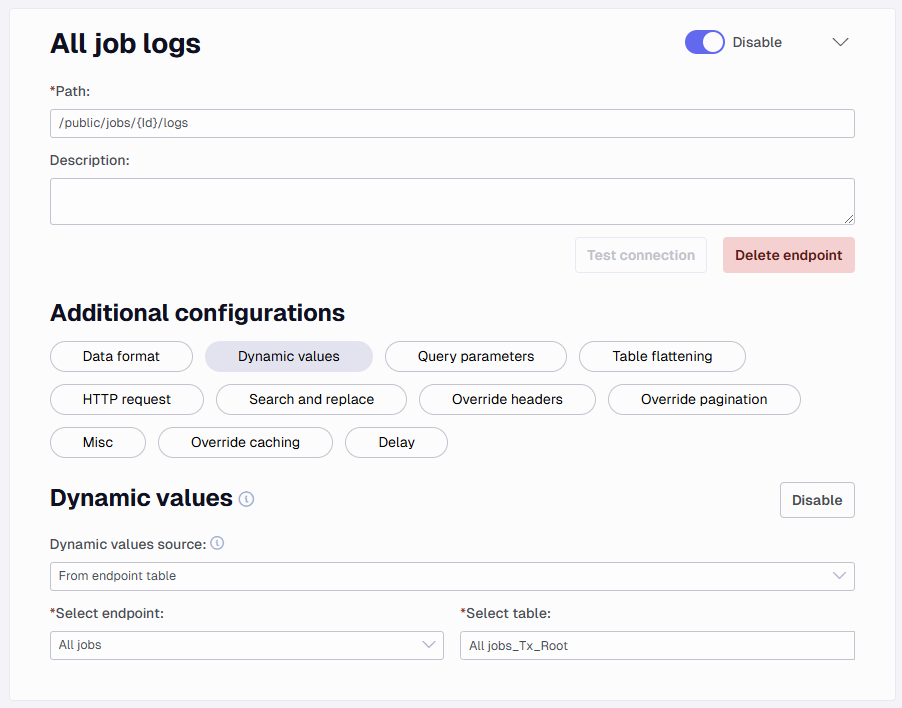
You can also change the Dynamic values source to be From the endpoint table instead. Here you choose an already added data source endpoint. Similar to when using a query a part stored in curly brackets {} will be what it attempts to change. Here it is important that you add a field that exists in the endpoint you point at.
Here below I point at an All jobs endpoint that has a table called All Jobs_TX_Root with two fields Id and Name. So in my setup, I have added {Id} as the value to change. You need to be sure it is in the same case setting as well, adding id or ID would not work.
Query Parameters
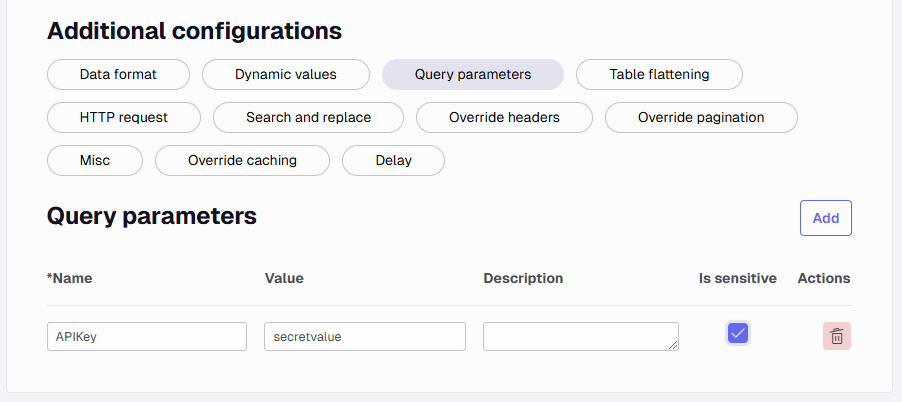
This is an option to add additional values that are applied to the URL such as an access_key value or similar.
It will be applied like ?access_key=<value> and if you have more than one parameter with & signs between each.
Table flattening
A table flattening is an XSLT Transformation that can be used to transform (most notably to flatten) the data returned from the API.
You can use the Table builder to generate an XSLT document in the field and the name it has will become a table.
The flattening helps get fields from other areas into a table that would normally not have them.
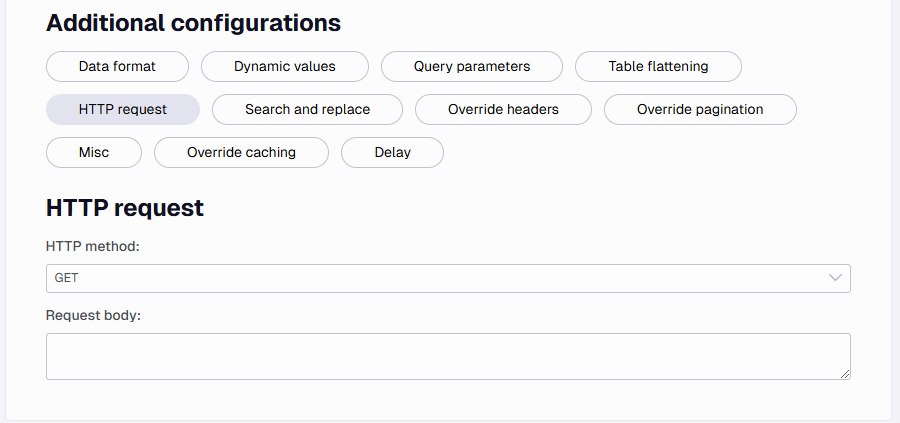
HTTP method - Set this to Get, Post, or Put to decide how the call is being done. When this is set to Post you will have to add how the post body will look.
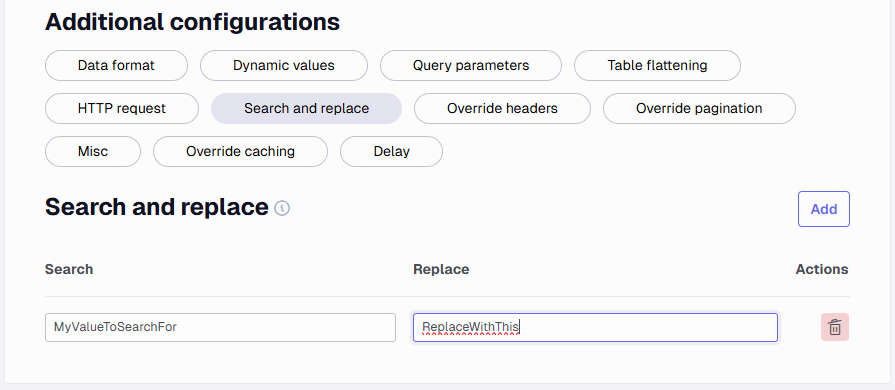
Search and replace
A Search and replace can be used to perform one or more regex replace operations on the raw data before it is loaded or used to interpret metadata. This can for example be useful if the data contains some special characters that are not handled correctly.
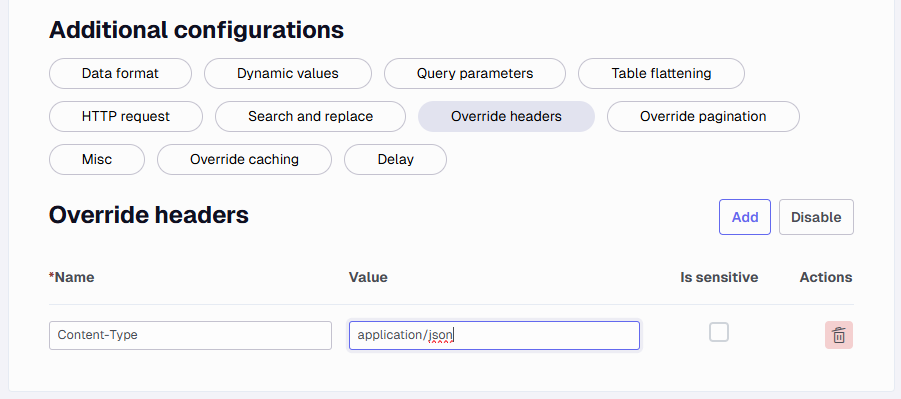
Override headers
This can be used to override existing headers to values that are set for this endpoint.
Override pagination
This is similar to the data source pagination section, only here it is done to override the existing setup.
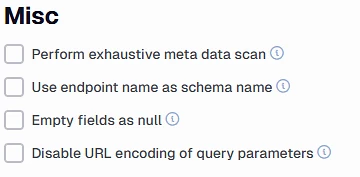
Misc
Perform exhaustive metadata scan: If this is checked, all pages and all dynamic values (if any) are executed during metadata operations. If not, only the first page and first dynamic values are executed.
Use endpoint name as schema name: This feature will add the name of the endpoint as the schema name. This is beneficial when the data source returns data with the same format despite using different endpoint paths. Be aware that if this is checked after the initial synchronize task has been done it will generate a new table in the data source.
Empty fields as null: If enabled, the value of empty fields will be converted to null.
Disable URL encoding of query parameters: If enabled, query parameters are not encoded when they’re added to the REST request.
Override caching
This is similar to the data source caching section, only here it is done to override the existing setup.
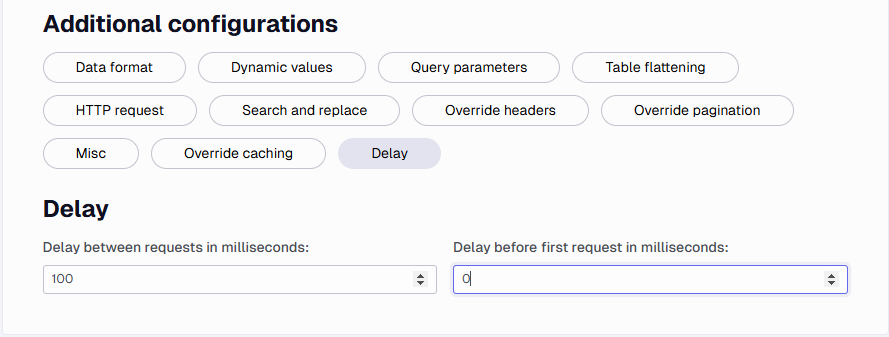
Delay
Here you can configure various delays for an endpoint. The Delay between requests in milliseconds will add a delay between each request to an endpoint. The Delay before first request in milliseconds will add a delay before executing the first request to an endpoint. Empty or zero means no delay for both types.
Real examples to use for TimeXtender REST data source
Dynamic value from SQL query
Here is an article showing how you can connect to a specific API called Fixer IO. The guide has many specific examples which use some of the options explained. Specifically, it uses SQL queries and XSL in the setup to gain the most from the API.
Here is an article showing how you can connect to our own TimeXtender API. The guide has many specific examples which use some of the options explained. Specifically, it shows how to use dynamic values from another endpoint and it shows how to apply a header for authorization. Connect to TX API
Applying pagination, request limits, and using a bearer token for authentication
Here is an article showing how you can connect to a free API called GoREST. The guide has many specific examples which use some of the options explained. Specifically, it shows how to set up Pagination based on a header, how to use request limits, and how to apply a bearer token for authentication. Connect to GoREST
Using OAuth 2.0 client authentication and doing token-based pagination
Here is an article showing how you can connect to the Microsoft Graph API. The guide has many specific examples which use some of the options explained. Specifically, it shows how to set up Pagination based on a URL located in the result and how to use OAuth 2.0 Client authentication. Connect to Graph API
Using {TX_NextPage} for pagination when no next or last page option is known
Here is an article showing how you can connect to the openbrwerydb API. The guide has many specific examples which use some of the options explained. Specifically, it shows how to set up Pagination based on page and page size when no last of next page options is known. Connect to openbrewerydb
Using {TX_NextPage} for pagination when current page and max pages exists as options in the returned result
I do not have a API to base this on. If your data is returned as you see below.
You need to stop the run when the two elements CurrentPage and MaxPages is equal to each other. There is a usable XPath function called not() which negates the equality check, filtering out matches. There is a way to compare a current fields value to another, which is shown like his . = ../elementname. You need to locate the CurrentPage element and run the not() function where you compare the current element value with the MaxPages element current value. First locate the CurrentPage element, which can be done like so /*/*/CurrentPage.This is the sibling of the parent TX_Autogenerated_Element, which in turn is the sibling of the TX_Autogenerated_Root element. In this element [] you can add the not() function like so, CurrentPage[not()]. To add the comparison to the MaxPages element inside the not() function you can add ../MaxPages. This refers to a sibling element named MaxPages of the parent of the current CurrentPage node. This needs to be compared with the CurrentPage element value, which can be done like so . = ../MaxPages. This Compares the text content of the CurrentPage node with that of its parent’s MaxPages sibling. The whole XPath function would look like this /*/*/CurrentPage[not(. = ../MaxPages)]. The result of this would be this pagination setup.
Using {TX_CurrentPage} for pagination when no last offset or next starting point is known
Here is an article showing how you can connect to the soda.demo.socrata.com API. The guide has many specific examples which use some of the options explained. Specifically, it shows how to set up pagination based on an offset and limit when no info about what the last offset value will be. Connect to soda Socrata
@Thomas Lind or @Christian Hauggaard, the new TimeXtender REST data source looks very promising and I am currently trying to set up an API with dynamic values. The dynamic values need to be applied in the second endpoint, using the output of the first endpoint.
The first endpoint needs to be flattened first but I do not really get the hang of the XLST format. Your example regarding the rates is clear, but what do I need to use in the XLST in order to flatten the table? Would that be this complete string?
The provider can read JSON, but not if any of the field names contain a invalid character like : as it gets converted to XML. What field is it that contains a : character in its name? It does not seem like the ones you shared.
In any case, you can use the Table builder tool, link here
To change the name or contents of fields if they can’t be read.
Thanks for the reply, I also found out that JSON was not the problem, though “:” shouldn't return in a response of an API in a name, but that is besides the point and will be resolved. I have tried to use the table builder by only selecting the fields without the : in de name or renaming but that didn't do the trick (same error) Also in the Builder it already gives an error:
I want to use a GraphQL data source. It is using the REST also:
Is there a sample how to do this?
I can connect to the GraphQL API using postman, but in the TimeXtender Data Source I am missing fields for the Query to be executed, the variables, and also there is no endpoint I think, which is mandatory.
Others have used GraphQL. You can do Post calls in the endpoint, you can add the query in the field called Post Query. You need to be sure it is converted to a JSON query, or it will not work.
By endpoint, you need to add something. Your base URL can’t only be https:www.API.com and everything after that can be used as an endpoint. You will likely use the same endpoint, but with different names and post queries.
There will be made a proper GraphQL guide eventually, I just haven’t had time to write it yet.
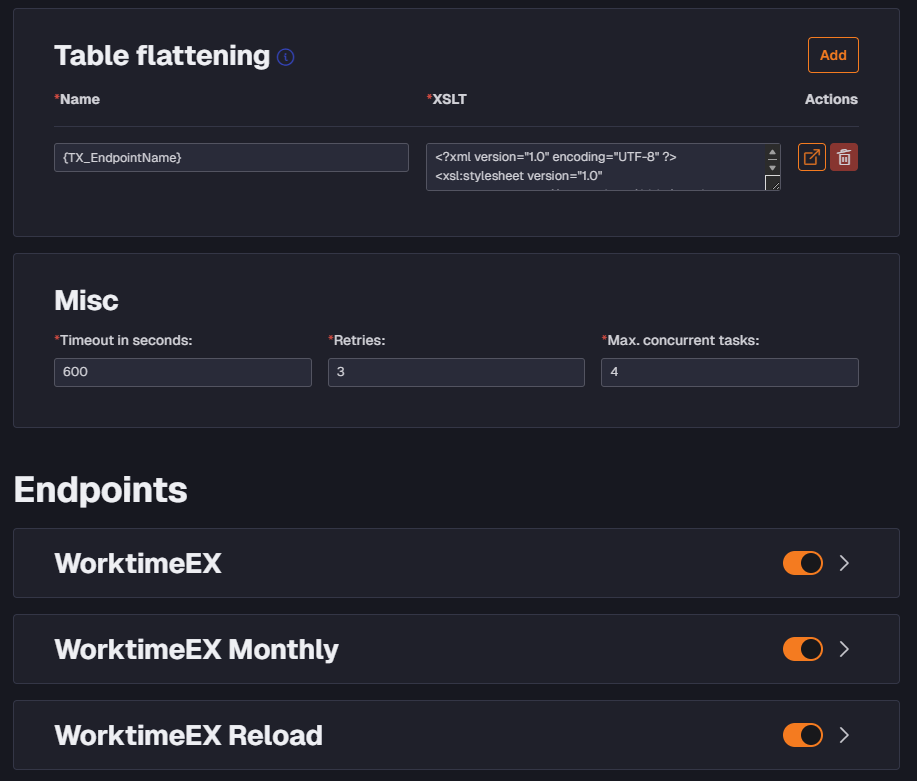
Hi, Quick question on the new global Table Flattening. I have the connector set up like this:
I know that it might look a bit suspicious, but the tree endpoints will deliver data structured in exactly the same way - just different number of rows. :) I was just wondering how this is supposed to look in the metadata manager. If I disable the “Monthly” and the “Reload” endpoints the metadata import completes successfully and the “table” WorktimeEX shows up but if either of the other endpoints are enabled at the same time, the metadata import fails. My idea was to put these endpoints in separate transfer tasks so that they could be scheduled at separate times. Or should I put something else in the name field of the Table flattening?
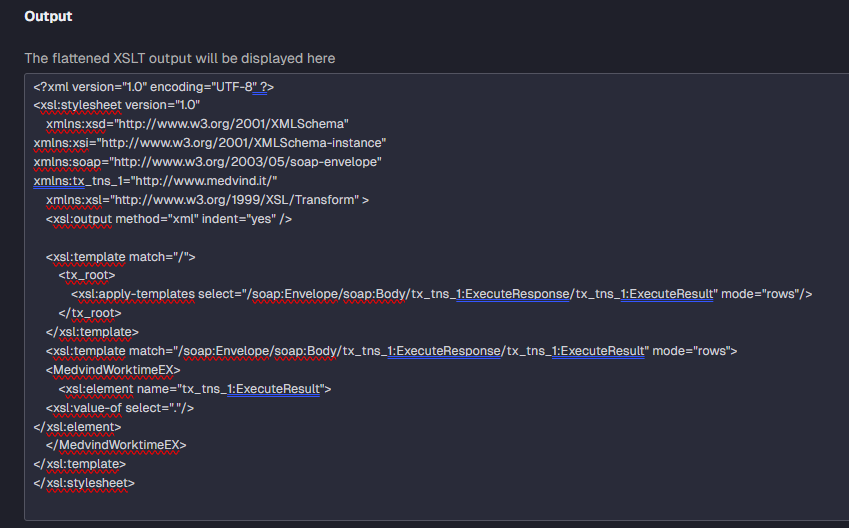
The <GroupMembers></GroupMember> will be the name of the table, it doesn’t matter what you set as the name of the XLST, besides when it is initially set, it will keep the name from then.
I can’t see what you choose in the code from the image, but it can’t be the same across endpoints.
Hi! Not quite sure I understand fully. The XSLT in the Global Table Flattening looks like this at the moment:
The result from the API is one column containing an XML:
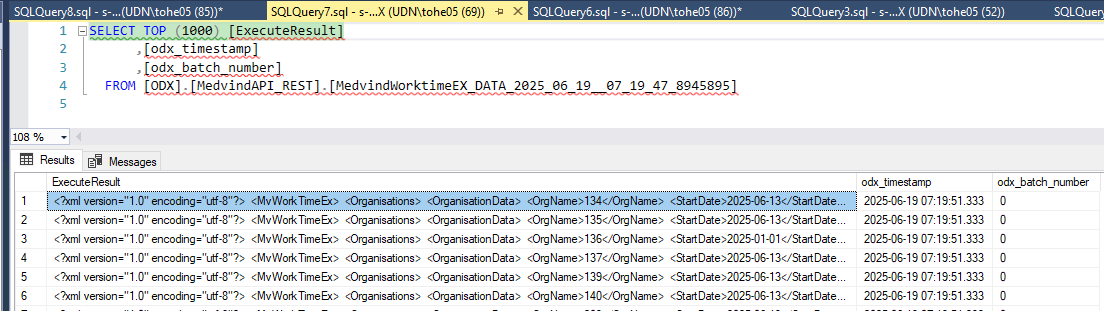
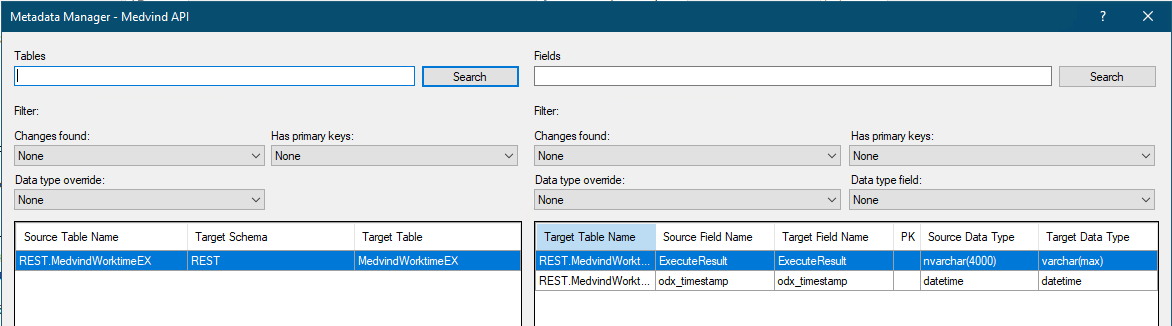
And it looks like this in Metadata Manager
Ideally in Metadata Manager I would like to have three Source Tables:
MedvindWorktimeEX
MedvindWorktimeEX_monthly
MedvindWorktimeEX_reload
so that I can put each one into a separate transfer task and schedule them at different times. Should I put the table flattening on each endpoint instead? Not really sure how the {TX_EndpointName} variable is supposed to work.
My response in regards to names is because of what you share of your setup.
So here is an image that I hope explains what I meant.
The Name of the XSLT is not dynamically able to change the name of the table. It will be set the first time and not later on.
You need to go to a lower level with the root node. If the result contain different fields.
The metadata manager can’t control what tables you can see once it has done synchronizing, it is entirely the setup of the data source and endpoint that does this.
You can use the table builder to read the endpoint and hopefully select the fields of the execute result. If it isn’t returning anything, turn on Caching to a file and import the result in the field and use that as the base of the setup.
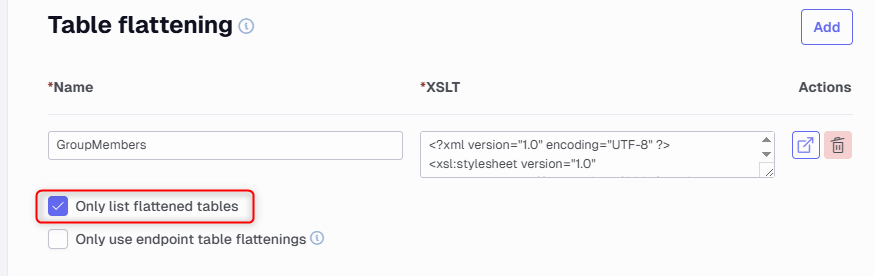
You can also turn it off, or uncheck the Only list flattened tables to see what it would find if it wasn’t applied.
Deleting the existing table flattening and recreating it as a new XLST setup with the name you want may be a better way to do this than editing the existing result.
We managed to create this succesfull for most of the fields, but in TimeXtender it gives me an error “String or binary would be truncated” on 1 field. So this field contains more than 4000 characters. Is there a possibility to enlarge a column lenght within the REST connector?
In this case a data type override to make this field NVarChar(MAX) should resolve the issue. There is a default max size and in some cases you need to change its size like this.
small detail for when you are using Snowflake for manipulation queries in Pagination, the parameter you need to use is: account=<account identifier> and not account name.
Is it possible to use a dynamic value as a query parameter? In the image below I have an endpoint with a static parameter. This is working fine, but I need it to be a dynamic value, something like: